3.3.3
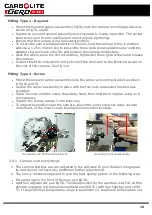
Fitting the Work Tube Front Seal Assembly
Slide the work tube front insulating collar over the front protruding part of the work
tube until it is in contact with the front face of the heating chamber.
Dismantle the front tube seal assembly by removing the six socket screws. See fig 3.
Slide the work tube ring over the front of the work tube with the internal chamfer facing
towards the front. See fig 3 and See fig 7.
Fit the tube ‘O’ ring over the front of the work tube and position it uniformly 7.0 mm
from the front edge of the work tube. See fig 7.
Fit the work tube gasket to the work tube sealing ring as fig 7, position the work tube
sealing ring on the front end of the work tube and loosely secure to the work tube ring
using the six socket screws provided.
Rotate the front seal assembly so that the swing bolts are positioned horizontally and
the gas inlet fixing is at the lower left side of the work tube. See fig 8.
Tighten the six socket screws evenly in the sequence as shown by numbers 1 to 6 in fig
8. Ensure that the work tube sealing ring is held firmly against the end of the work tube
and is evenly spaced from the work tube ring about its circumference.
Fit the furnace front panel in position and adjust the work tube front support bracket to
support the weight of the work tube assembly. See fig 9.
Note:
Do not stress the work tube. With the work tube front support correctly adjusted
there should be a slight gap around the circumference of the tube within the aperture of
the furnace heating chamber. This can be tested for by lifting the work tube upwards
from the support bracket, only a slight gap should be observed between the work tube
and the support bracket when the work tube is lifted as far as possible.
3.3.4
Fitting and Adjusting the Door Arm Assembly
Note:
the refractory door plug is fragile: handle with care.
The door plug is supplied separate from the door arm assembly to avoid transit
damage. Fit the door plug to the door arm assembly before fitting the door assembly to
the furnace. Refer to section 5.4.
Pull out the door slide shaft to its full extension and rotate it fully anti clockwise (view
from front). The door slide shaft will only rotate when it is fully extended.
Remove the four socket screws from the back of the door arm assembly mounting block
only; do not remove the front fixing screws, which are factory set to position the door
arm. See fig 10a.
Slide the door arm assembly onto the end of the door slide shaft and secure firmly in
the door open position shown in fig 10. using the four socket screws. Take care to
tighten the socket screws evenly to avoid any distortion in the door arm assembly.
Caution
: To allow the door side shaft to slide in and out, some clearance is required in
the door mechanism; consequently there is a small radial movement in the door slide
arm when the door arm is pushed in towards the work tube. Because of this radial
movement it is possible for the door plug to contact the work tube front seal assembly if
the door handle is lifted as the door arm is pushed inwards: take care to avoid this
happening.
13
Summary of Contents for CARBOLITE GERO CAF G5
Page 63: ...Fig 3 Front Tube Seal Assembly Fig 4 Door Arm Assembly 63 ...
Page 64: ...Fig 5a Camera Mounting Bracket Fig 5b Lens and Camera Assembly 64 ...
Page 65: ...Fig 5c Sliding the Camera Mounting Bracket Assembly onto the Door Arm 65 ...
Page 66: ...Fig 5d Securing the Camera Mounting Bracket Assembly to the Door Arm 66 ...
Page 67: ...Fig 5e Mounting the Lens and Camera Assembly 67 ...
Page 68: ...Fig 5f Lens and Camera Assembly in Position 68 ...
Page 69: ...Fig 6a Rear View of the Standard CAF G5 Furnace Showing Brick Box Assembly 69 ...
Page 71: ...Fig 7 Front Tube Seal Position 71 ...
Page 72: ...Fig 8 Tube End Seal Assembly Tightening Sequence Fig 9 Work Tube Front Support 72 ...
Page 73: ...Fig 10 Fitting the Door Arm Assembly Fig 10a Adjusting the Door Arm Assembly 73 ...
Page 74: ...Fig 11a Furnace Case and Controls 74 ...
Page 75: ...Fig 11b Gas Inlet Pipe Fig 12 Positioning the Furnace 75 ...
Page 77: ...Fig 13c Loading Samples into the Work Tube 77 ...
Page 78: ...Fig 16 File Folder 78 ...
Page 79: ...Fig 17 Door Arm Assembly Exploded View 79 ...
Page 82: ...SST DT HT FT Fig 18 Report Sheet Page 2 Side View Plan View Fig 19 Formed Wire Sample 82 ...
Page 83: ...Fig 20 Sample Carrier Sample Tiles and Sample Positions 83 ...
Page 84: ...Fig 21a Coal and Coke Test Piece Mould Fig 21b Biomass Test Piece Mould and Hand Press 84 ...
Page 85: ...Fig 22 Sample Loading Tool Fig 23 Camera Ethernet Connection 85 ...
Page 86: ...Fig 24 LED Driver Connection 86 ...
Page 87: ...Notes Service Record Engineer Name Date Record of Work ...


