V-Sense
TM
Profile X1
©
User Guide
Zeroing:
The idea of defining when/how the V-
Sense POD should ‘zero’ itself for the test is very important
to understanding the test data.
The process of defining when to ‘Zero’ and which ‘Zero’ to use for a test
is important for a successful test and sensor setup. Prior to starting any test, the V-Sense POD must be
told which ‘zero’ reference to use for the test. The action of ‘Zeroing’
the V-
Sense POD is done to establish the reference point to compare all test data. The
‘Zeroing’ process is also used to allow for mounting the V
-Sense POD in a
manner that does NOT
require the POD to be ‘level.’ If the POD is mounted in a
manner that is
reasonably ‘level’ with the X, Y, and Z axis; the zero process
ensures the collected data is accurate for the test as compared to a reference
point that matches how the POD is mounted on the test object. In addition, as
an example, the TRUE ZERO for all Vericom V-Sense POD is the flat surface located in the Vericom test
facility used as the calibration surface. It is on that surface that every V-Sense POD is calibrated after the
POD is fully assembled and ready for shipment to our customers. That is kno
wn as the ‘Factory Zero’. As
an example, if you decide to use the ‘Factory Zero’, you are telling the V
-Sense POD that all test data
should be compared to the Factory Zero as stored in the memory of that specific V-Sense POD.
Added Test Data
:
The ‘Added Test Data’ option is intended for use with
any test in which you desire to have data that was collected a few
moments prior to the V-
Sense POD registering the ‘Start Trigger’ and/or
data that was collected a few moments after the ‘Stop Trigger.’ This
setup option allows for adding data that was collected 0, 50, 100, 150,
and 200 milliseconds prior to or after the Start/Stop trigger. If you elect
to have Pre-Test data, you will notice the first data will be logged in the
data file as happening at ‘negative’ time.
Triggers and Alarms
: The Triggers
and Alarms screen is for setting the
Start/Stop triggers and Alarms for
the test. For both the Triggers and
Alarms when using the data from a
sensor as the activation point to
Start/Stop a test or to log an Alarm,
the system requires that you define
if the trigger/alarm is to operate
based on passing the trigger/alarm
point from a lower level to a higher level or from a high level to a lower level. As an example, if the test
is to Start when the GPS speed passes 10 MPH, select GPS Speed from the drop-down list for Start Trigger.
Then select the ‘GREATER THAN’ option (>) and enter 10. This tells the V
-Sense POD to start the test when
the GPS speed first
exceeds
10 MPH from a starting point speed that is lower than 10 MPH. As another
example, if you wanted to trigger the test to start when Gx first hits -0.1Gx from an accelerating vehicle
(this might be a common setup for a brake test), the trigger would be set to activate when Gx is ‘LESS
THAN’ (<)
-0.1Gx. In this case, since the test object is expected to be accelerating at a positive Gx level
prior to beginning the braking event, the start trigger is set to activate when Gx approaches from a high
Gx level to a lower Gx level (remember, -5 is actually
‘
less than
’
-1; meaning -5 is technically a smaller
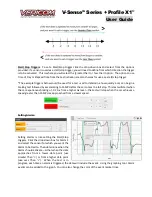
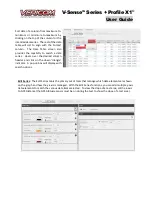
number than -1). Use the image below to help define when you should use the GREATER THAN or LESS
THAN symbol for the specific Start/Stop trigger or Alarm setpoint.


