9
VPC5000 WALL MOUNT INSTALLATION STEPS
St
ep 1:
Please inspect your VeriPure® System Glass Dielectric Tube at this time.
Locate the knob on your
VeriPure® System. Rotate 1/4 turn counter clockwise and
PULL STRAIGHT OUT VERY CAREFULLY
as to prevent
breaking. Inspect the dielectric for any cracks or breakage that may have occurred in shipping. If none are found, then
replace dielectric. When replacing dielectric, rotate 1/4 turn clockwise to lock in place.
Step 2:
Locate the power outlet for the power supply.
Step 3:
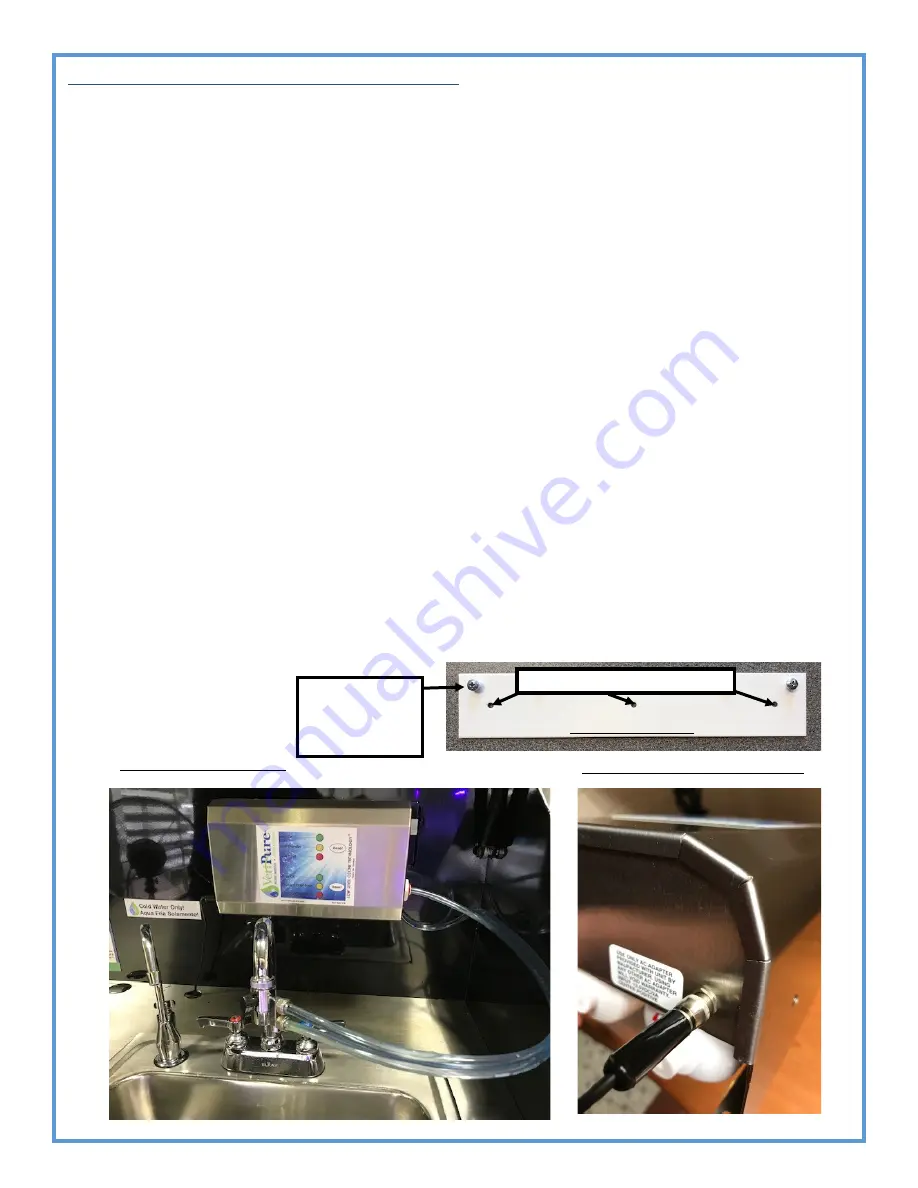
Locate the best area for hanging the VeriPure® System. Directly above the faucet or slightly to the
left. Attach
the diverter valve to the faucet,
CAUTION: DO NOT OVERTIGHTEN
. Stretch out the hoses to get an approximate
location for the VeriPure® System.
Step 4:
Mount screws for the VeriPure® System by using the provided screws and mounting plate.
Step 5:
Locate the 1/4" filter inlet fitting on your VeriPure® System. Remove the 3/8" red locking clip also located on
your VeriPure® System on the 3/8" outlet fitting.
Step 6:
Mount your VeriPure® System onto the mounting screws previously installed and tighten screws.
Step 7:
Insert the
1/4”
stem adapter fitting at the end of the hose into the 1/4" filter inlet fitting on your
VeriPure® System.
Step 8:
Insert the other end of the 3/8" tubing into the 3/8" outlet fitting located on your VeriPure® System. Replace
the 3/8" red locking clip.
Step 9:
Thread the power supply into the power jack located on your VeriPure® System. Plug the power supply into the
electrical outlet.
MOUNTING PLATE
WALL MOUNTED EXAMPLE
POWER PLUGGED INTO POWERJACK
THESE 3 HOLES USE TO MOUNT PLATE TO WALL
SCREW ON EACH END OF
MOUNTING PLATE USED
TO FASTEN VERIPURE®
SYSTEM TO PLATE


