Getting Started
42
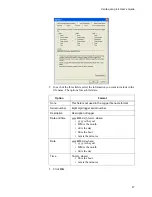
8. To modify
channel descriptions
, select the
Modify Description
checkbox
for the channel to modify and enter a new description in the text box.
9. Click
Setup Logger
or
Close
to close without saving.
10. The Confirm System Time dialog appears, asking you to confirm the exact
time before clearing the logger. Click
OK
.
11. Confirm any changes to the description(s). Click
OK
.
12. A message appears showing the changes to be made, asking if you want to
continue. Click
Yes
.
Second and subsequent loggers if performing Batch Setup using only
one COM Port:
1. With the Logger Batch Setup dialog box still open, disconnect the current
logger from the logger cable and attach the next logger to be configured.
2. On the Logger Batch Setup window, change the logger or channel descrip-
tions if desired.
3. Click
Setup Logger
.
4. Confirm the changes to the logger and descriptions. Click
OK
.
5. A message appears showing the changes to be made, asking if you want to
continue. Click
Yes
.
6. The settings as specified will be applied to this logger.
7. Repeat from step 1 for all remaining loggers.
8. When all loggers have been setup, click
View Report
if desired, otherwise,
click
Close
.
Second and subsequent loggers if performing Batch Setup using multiple
COM ports:
1. The Confirm Description dialog box opens for the next COM port.
2. If this COM port is assigned to a logger you wish to setup with the same
Sample Timing settings as the first logger, skip to step 5. If this COM port
is not assigned to a logger you wish to setup, click
Cancel
.
3. A message appears, asking if you would like to abort the batch setup. Click
No
.
4. Repeat from step 1 until you reach a COM port which is assigned to a log-
ger you wish to setup.
5. In the Confirm Descriptions dialog box, change the Logger and Channel
Descriptions as desired. Click
OK
.
6. A message appears showing the changes to be made, asking if you want to
continue. Click
Yes
.
7. Repeat from step 1 for all remaining loggers.
8. When all loggers have been setup, click
View Report
if desired, otherwise,
click
Close
.
Summary of Contents for vLog 4.4
Page 1: ...Veriteq vLog 4 4 User s Guide w w w v e r i t e q c o m w w w v a i s a l a c o m ...
Page 6: ......
Page 16: ...Introducing Veriteq vLog 10 ...
Page 17: ...11 2 Installing vLog Software System Requirements 12 Installing vLog Software 12 ...
Page 20: ...Installing vLog Software 14 ...
Page 98: ...Viewing Reports and Statistics 92 ...
Page 99: ...93 7 Troubleshooting Serial Port Problems 94 Frequently Asked Questions 95 ...
Page 103: ...97 8 Glossary 98 A B 98 C E 98 F K 99 L Q 99 R T 99 U Z 101 ...
Page 108: ...Glossary 102 ...


