background image


276 


2011-09


The rollator can be used indoor and outdoor.  
However, it cannot be used by persons with a 
visible weakened hand and/or arm function 
and also not by persons with a balance 
problem.


The product is not meant for transport of 
people and/or goods. The seating bench can 
only be used when the parking  brake is 
locked.


6.  Fold and Unfold the rollator 

L

L

L


WARNING:  Risk  of  clamping  -  Keep 


fingers,  buckles  and  clothes  away 


from the folding mechanism.


Place  the rollator  with  his two  rear wheels  on 
the  ground  and  press  from  above  to  the 
upholstered tube from the seat. 
The  rollator  shall  now  be  unfolded  and  lock 
into the plastic holders. 
 
To  fold  the  rollator  you  shall  work  in  the 
reverse  steps,  if  necessary  pull  the  folding 
security on the right side slightly upwards.  


7.  Assembly 

 Slide the handgrips in the front frame 

so that these are positioned backwards 
and not inwards or to the outside. 

 If needed, adjust the cables connected 

to the brakes. 

 Adjust the handgrips to the desired 

height (see further).


8.  Handgrips 


L  


CAUTION:  Risk  of  falling  -  Firmly  fix 


the handles before use of the rollator.


L  


CAUTION:  Risk  of  falling  -  Don't 


exceed  the  maximum  adjustment, 


your rollator will not be   stable 


anymore.


L  


CAUTION: 

Use 

the    

handgrips  

only  

parallel 

to the walking  direction 


of your rollator.


The handgrips can be adjusted in height. 
Unlock/release the quick-release on the side 
so that you can adjust the height of the 
handgrips. When standing straight, the 
handles should be as high as your wrists. 
Leave your arms hanging loose. Lock the 
quick-release again firmly. The adjustment 
minimum and maximum can be seen on the 
marks on the inner tubes which slide into the 
frame. When you exceed the maximum 

adjustment, your rollator will not be stable 
anymore.  


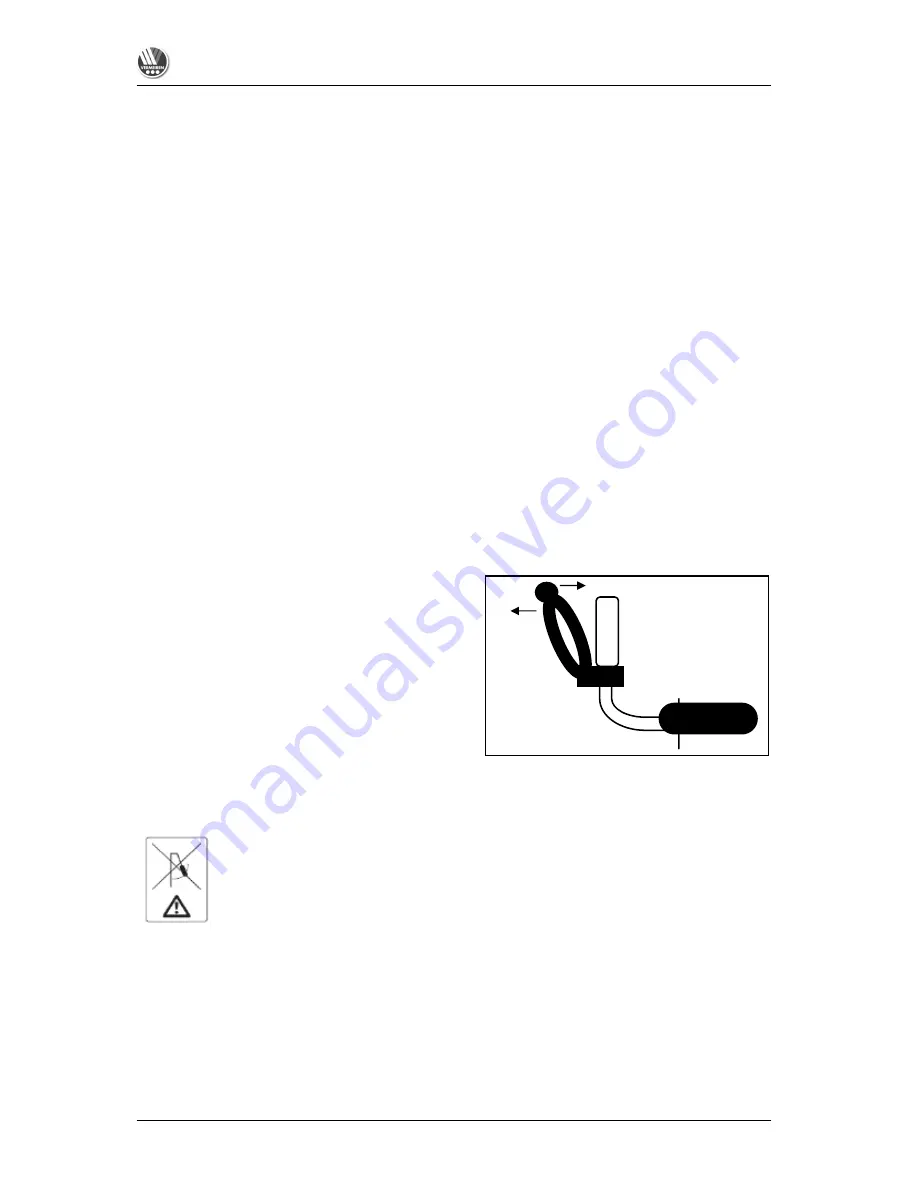
9.  Brake system (Fig. 1) 

L  


WARNING:  Good  operation  of  the 


brakes is  influenced  by  wear  and 


contamination of the  

tires  (water, 


oil,  mud,  ...)  -  Check  the  condition 


of the tires before each use.


L  


WARNING:  The  brakes  can  wear  - 


Check 

the 

operation 

of 

the 


brakes before each use.


The  rollator  has  been  equipped  with  a 
multifunctional  brake  system.  The  brake 
handles underneath the handgrips are regular 
brakes as well as parking brakes. 
For  the  usage  of  a  short  brake  (regular 
brakes),  pull  the  brake  handle  upwards 
(toward the handgrip).  
For the usage of a long brake (parking brake), 
push  the  brake  handle  downwards  till  you 
hear a locking sound of the brake. The wheels 
(use  both  parking  brakes  left  and  right 
simultaneously) are now blocked until you pull 
the parking brakes upwards again.  
 

Fig. 1 – Handgrip / brake 


10.  Basket / Plastic tray 

L  


WARNING: Risk of falling, tipping over 


- Do not   overload 

the 

shopping 


basket. 

 
On the front side you can slide and block the 
sliding tray below the seat. Put the sliding tray 
on the basket. 
These is foreseen of attachment points for the 
sliding tray. 
The basket shall be mounted to the tube with 
two  attachment  brackets  next  to  the  seat,  so 
that  the  bottom  of  the  basket  on  the  front 
transverse frame (steering wheels) rest. 
The  maximum  carrying  weight  from  the 
shopping basket is 5 kg.  


Parking 
brake 


Regular brake 

Summary of Contents for 276

Page 1: ...VERMEIREN 276 I N S T R U C T I O N M A N U A L ...

Page 2: ...oduct sold Version A September 2011 All rights reserved including translation No part of this manual may be reproduced in any form what so ever print photocopy microfilm or any other process without written permission of the publisher or processed duplicated or distributed by using electronic systems N V Vermeiren N V 2011 ...

Page 3: ...elivery 2 5 Intended use 2 6 Fold and unfold the rollator 3 7 Assembly 3 8 Handgrips 3 9 Brake system Fig 1 3 10 Basket Plastic tray 3 11 Safety instructions 4 12 Care 4 13 Disinfection 4 14 Repairs Service Inspection 4 15 Shipping and storage 5 16 Warranty 5 17 Disposal 5 18 Declaration of conformity 5 ...

Page 4: ... specialist dealer To find a service facility or specialist dealer near you contact the nearest Vermeiren facility A list of Vermeiren facilities can be found on the last page 2 Components 3 Explanation of symbols Maximum mass Indoor and outdoor use CE conformity Read the instruction manual before use Observe the safety instructions 4 Check after delivery Unpack your product and verify if the deli...

Page 5: ...tanding straight the handles should be as high as your wrists Leave your arms hanging loose Lock the quick release again firmly The adjustment minimum and maximum can be seen on the marks on the inner tubes which slide into the frame When you exceed the maximum adjustment your rollator will not be stable anymore 9 Brake system Fig 1 L L L L WARNING Good operation of the brakes is influenced by wea...

Page 6: ...tc for a sufficient amount of time and when touching Surfaces can assume the environment temperatures Take note of the instructions for care and service The manufacturer is not liable for damage caused by improper servicing care 12 Care Use only a soapy solution for cleaning The cleaning liquid should in any case have a pH value of at least 6 Do not use a cleaning agent which contains solvents Obs...

Page 7: ...or from rust and foreign bodies e g salt water sea air sand dust The rollator must be stored without being subjected to strains Don t put too heavy parts on the rollator not clamping between something 16 Warranty Excerpt from the General Business Conditions 5 The guarantee period for warranty claims is 24 months The warranty excludes damage arising from structural changes to our products insuffici...

Page 8: ...irizzarla al vostro distributore di fiducia che presentera al produttore il tagliando RISERVE Questa garanzia non potra essere applicata nei seguenti casi danno dovuto al cattivo ed improprio utilizzo della carrozzina danno subito durante il trasporto incidente o caduta smontaggio modifica o riparazione effettuate in proprio usura abituale della carrozzina invio del tagliando di garanzia con la da...

Page 9: ...istration à renvoyer dans les 8 jours après achat ou régistrer votre produit sur notre site http www vermeiren be registration please return within 8 days of date of purchase or register your product at our website http www vermeiren be registration zurückschicken innerhalb von 8 Tagen nach kauf oder registrieren Sie Ihr Produkt auf unserer website http www vermeiren be registration da restituire ...

Page 10: ...ate Dealer s stamp Date Dealer s stamp Date Dealer s stamp Date Dealer s stamp Date Dealer s stamp Date Dealer s stamp Date Dealer s stamp Date Dealer s stamp Date For service checklists an additional technical information please see our specialist dealers nearest to you More information on our website at www vermeiren com ...

Page 11: ... ...

Page 12: ...02 93 58 56 17 website www reatime it e mail info reatime it Hühnerhubelstraße 59 CH 3123 Belp Tel 41 0 31 818 40 95 Fax 41 0 31 818 40 98 website www vermeiren ch e mail info vermeiren ch Poland The Netherlands Vermeiren Polska Sp z o o Vermeiren Nederland B V ul Łączna 1 PL 55 100 Trzebnica Tel 48 0 71 387 42 00 Fax 48 0 71 387 05 74 website www vermeiren pl e mail info vermeiren pl Domstraat 50...

Reviews: