background image


Electra 


2016-08


20 


Instrukcj

ę

 obs

ł

ugi 

Laski Electra 


1. Dane 

techniczne 

L


OSTRZE

Ż

ENIE:


Ryzyko 

 niebezpiecznych 

ustawie

ń

 — nale

ż


u

ż

ywa

ć

 wy

łą

cznie ustawie

ń

 opisanych 


w tej instrukcji obs

ł

ugi.


Producent 

Vermeiren 

Adres 

Vermeirenplein 1 / 15 
B-2920 Kalmthout 

Typ Laski
Model Electra 

Szeroko

ść

 160 

mm 

Wysoko

ść


ca

ł

kowita 

775 mm – 1000 mm 

Wysoko

ść

 uchwyty  765 mm – 990 mm 

G

łę

boko

ść


39 mm  

D

ł

ugo

ść

 uchwyt  

120 mm 

Waga 0,35 

kg 

Maksymalna waga 
u

ż

ytkownika 

maks. 120 kg  

Akumulatory AAA, 

1,5 

V (2 Akumulatory) 

Producent zastrzega sobie prawo do wprowadzania 

zmian parametrów technicznych. Tolerancja pomiaru 

+/- 15 mm / 1,5 kg 


Dziekujemy za zaufanie jakim nas Pa

ń

stwo 

obdarzyli

ś

cie wybieraj

ą

c wyroby  

VERMEIREN

Przed u

ż

yciem laski, uwa

ż

nie przeczytaj 

instrukcj

ę

 obs

ł

ugi; b

ę

dzie to pomocne w 

zapoznaniu si

ę

 z tym produktem.


Na stronie internetowej “Vermeiren” 
znajdziesz instrukcje bezpiecze

ń

stwa i 

wskazówki dotycz

ą

ce obchodzenia si

ę

 z laski. 

Prosimy zapami

ę

ta

ć

ż

e przestrzeganie 

naszych zalece

ń

 i utrzymanie laski w 

doskona

ł

ym stanie, pozwoli na ich 

u

ż

ytkowanie na najwy

ż

szym poziomie nawet 

po wielu latach u

ż

ywania. 

W razie jakichkolwiek pyta

ń

 prosimy 

kontaktowa

ć

 si

ę

 ze sprzedawc

ą

Aby uzyska

ć

 informacj

ę

 o odpowiednim 

punkcie serwisowym lub wyspecjalizowanym 
sprzedawcy, nale

ż

y skontaktowa

ć

 si

ę

 z 

najbli

ż

szym przedstawicielem firmy 

Vermeiren. Wykaz przedstawicieli firmy 
Vermeiren podano na ostatniej stronie. 
Osoby niedowidz

ą

ce mog

ą

 skontaktowa

ć

 si

ę


ze sprzedawc

ą

 w celu uzyskania instrukcji 

u

ż

ytkowania. 


2. Sk

ł

adniki 


3. Obja

ś

nienie symboli 

Waga maksymalna 

CE deklaracja 

4.  Kontrola po dostawie 

Dostarczony produkt nale

ż

y rozpakowa

ć

 i 

sprawdzi

ć

, czy zawiera wszystkie elementy. 

W zestawie powinny znajdowa

ć

 si

ę

 1 

lask

ę

 + r

ą

czka ze 

ś

wiate

ł

kiem led, 

ś

wiat

ł

a awaryjne 

 Kóncówka 

  System regulowania wysoko

ś

ci 

 Instrukcja 

obs

ł

ugi 

 
Dwie baterie AAA 1,5V nie s

ą

 dostarczane 

wraz z produktem. Nale

ż

y je naby

ć

 osobno. 


Prosz

ę

 sprawdzi

ć

 wyrób pod katem zniszcze

ń


w transporcie. Je

ś

li wyrób nosi 

ś

lady 

uszkodze

ń

 w transporcie prosz

ę

 zastosowa

ć


si

ę

 do poni

ż

szej procedury: 

 Prosz

ę

 skontaktowa

ć

 si

ę

 i poinformowa

ć


firm

ę

 transportow

ą


 Sporz

ą

d

ź

 list

ę

 uszkodze

ń


 Skontaktuj 

si

ę

 ze sprzedawc

ą


5. Przeznaczenie 

ś

rodowisko 

L


OSTRZE

Ż

ENIE: Ryzyko upadku – Nie 

u

ż

ywaj lask

ę

 je

ś

li masz s

ł

ab

ą

  r

ę

k

ę

dysfunkcj

ę

 stawu nadgarstkowego lub 

problemy z równowag

ą

.  

Laska electra s

ł

u

ż

y jako pomoc przy 

poruszaniu si

ę

. Laska pomaga utrzymac 

balans cia

ł

a  oraz w przypadku bólu konczyn 

odci

ąż

a obolo

łą

 nog

ę

.


Lask

ę

 mog

ą

 by

ć

 u

ż

ywane w mieszkaniu i na 

dworze. 
 
B

ą

d

ź

 bardzo ostro

ż

ny aby si

ę

 nie po

ś

lizgn

ąć

je

ś

li u

ż

ywasz kul na mokrych powierzchniach. 


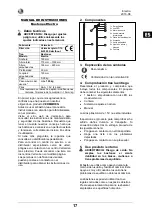
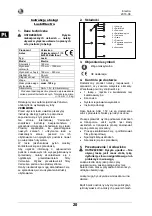
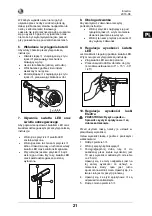
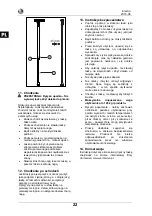
1 = Uchwyty 
2 = 

Ś

wiat

ł

o led 

3 = Dzwonek 
4 = 

Ś

wiat

ł

a awaryjne 

  5 = Tabliczka 

6 = Rama 
7 = Pier

ś

cie

ń


8 = Regulacja wysoko

ś

ci 

      + blokada 

  9 = Kóncówka 


Summary of Contents for Electra

Page 1: ...I N S T R U C T I O N M A N U A L M O D E D E M P L O I G E B R U I K S A A N W I J Z I N G G E B R A U C H S A N W E I S U N G I S T R U Z I O N I P E R L U S O MANUAL DE INSTRUCCIONES I N S T R U K C J A O B S Ł U G I ...

Page 2: ...s reservados incluidos los de la traducción Se prohíbe la reproducción total o parcial del presente manual de cualquier forma impresión fotocopia microfilm o cualquier otro procedimiento así como la edición copia o distribución empleando sistemas electrónicos sin el permiso escrito del editor Wszelkie prawa zastrzeżone łącznie z tłumaczeniem Żadna część niniejszej instrukcji nie może być powielana...

Page 3: ...ung 11 5 Zweckbestimmung Umgebung 11 6 Wechseln der Batterien 12 7 Nutzung des LED Lichts und des Warnlichts 12 8 Betätigen der Hupe 12 9 Einstellen des LED Lichts 12 10 Höhenverstellung des Gehstocks 12 11 Gehen 13 12 Treppensteigen 13 13 Sicherheitsanweisungen 13 14 Wartung 13 Indice 1 Dettagli tecnici 14 2 Componenti 14 3 Significato dei simboli 14 4 Controllo dopo la consegna 14 5 Utilizzo pre...

Page 4: ...ents 3 Explanation of symbols Maximum mass CE conformity 4 Check after delivery Unpack your product and verify if the delivery is complete Following items should be included 1 walking stick Handgrip with LED light warning light Tip Height adjustment system Manual The two AAA batteries of 1 5 V are not included with the delivery Verify your product for transport damage If you find any damages after...

Page 5: ...le to adjust the angle of the LED light with the instructions below Grasp the LED light with your hand Move these downwards or upwards until the desired angle 4 positions 0 15 30 45 10 Height adjustment walking stick L CAUTION Risk of falling Check that the spring pins are good clicked back Before using the walking stick you must adjust these in the correct height Adjust the height of the walking ...

Page 6: ...step and put your affected leg beside them 13 Safety instructions Let someone assist you if this is the first time you are using the walking stick Note that you use your walking stick on a good surface Not with too many gravel Be extra careful on a wet slippery ground Before every usage check if the walking stick is adjusted in the correct height Check that the spring pins for the height adjustmen...

Page 7: ...ouverez une liste des établissements sur la dernière page Les personnes souffrant de problèmes visuels peuvent prendre contact avec le revendeur pour les instructions d utilisation 2 Composants 3 Explication des symboles Poids maximum Conformité CE 4 Contrôle lors de la réception Déballez le produit et contrôlez si la livraison est complète Se trouvent dans le paquet 1 canne poignée avec LED des p...

Page 8: ...a lampe LED et le voyant lumineux s éteignent 8 Utilisation de l avertisseur Pour utiliser l avertisseur vous pouvez utiliser les instructions ci dessous Appuyez sur le bouton d alerte et la sirène s activera Appuyez une nouvelle fois sur le bouton pour éteindre la sirène 9 Ajustement de l angle de la lampe LED Il est possible d ajuster l angle de la lampe LED avec les instructions suivantes Saisi...

Page 9: ...z quelqu un pour vous assister si c est la première fois que vous utilisez une canne La canne doit s employer sur une surface correcte pas trop de graviers Redoublez de vigilance sur les sols humides et glissants Avant chaque utilisation vérifiez la hauteur de la canne Vérifiez que les goupilles de blocages sont bien clipsées et resserrez fermement l anneau antibruit Ne lancez pas la canne trop en...

Page 10: ...t van de Vermeiren faciliteiten zijn terug te vinden op de laatste bladzijde Mensen met een visuele beperking kunnen contact opnemen met de vakhandelaar voor de gebruikersinstructies 2 Onderdelen 3 Gebruikte symbolen Maximum gewicht CE conformiteit 4 Controle bij ontvangst Pak het product uit en controleer of de levering volledig is In het pakket zitten 1 wandelstok handgreep met LED verlichting w...

Page 11: ... tegelijkertijd Druk opnieuw of driemaal op de toets de LED verlichting en waarschuwingsknipperlicht gaan uit 8 Bedienen van het alarmsignaal Om het alarmsignaal te bedienen kan U onderstaande instructies gebruiken Duw op de paniek toets het alarmsignaal wordt geactiveerd Duw opnieuw op de paniek toets het alarmsignaal wordt uitgeschakeld 9 Hoekverstelling LED verlichting Het is mogelijk om de hoe...

Page 12: ...ucties Laat iemand U assisteren als dit de eerste keer is dat U een wandelstok gebruikt Let erop dat U Uw wandelstok gebruikt op een goede ondergrond Niet met te veel kiezelstenen Bij een natte gladde ondergrond moet U extra voorzichtig zijn Controleer voor ieder gebruik dat de wandelstok op een goede hoogte is ingesteld Controleer dat de borgpennen voor de hoogteverstelling goed zijn vast geklikt...

Page 13: ...e Niederlassungen gerne zur Verfügung Eine Auflistung aller Vermeiren Niederlassungen finden Sie auf der letzten Seite dieser Gebrauchsanweisung Sehbehinderte können sich zur Erläuterung der Bedienungsanleitung an den Händler wenden 2 Komponenten 3 Zeichenerklärung Max zulässiges Gewicht CE Konformität 4 Prüfungen nach der Lieferung Packen Sie Ihr Produkt aus und überprüfen Sie ob die Lieferung vo...

Page 14: ...mal auf den Druckknopf und das LED Licht und das Warnlicht leuchten zusammen Drücken Sie abermals oder dreimal auf den Druckknopf schalten Sie das LED Licht und das Warnlicht aus 8 Betätigen der Hupe So nutzen Sie die Hupe Drücken Sie den Panik Knopf und die Hupe ertönt Drücken Sie erneut den Panik Knopf um die Hupe auszuschalten 9 Einstellen des LED Lichts Befolgen Sie die nachfolgenden Hinweise ...

Page 15: ...Stellen Sie Ihr gesundes Bein auf die erste Stufe und dann das verletzte Bein daneben 13 Sicherheitsanweisungen Holen Sie sich Hilfe wenn Sie diese Einstellungen und den Gehstock zum ersten Mal nutzen Achten Sie darauf den Gehstock nur auf geeignetem Untergrund einzusetzen nicht zu viel Schotter Seien Sie auf nassem rutschigem Untergrund besonders vorsichtig Überprüfen Sie vor jedem Gebrauch ob di...

Page 16: ...ermeiren Nell ultima pagina del manuale è disponibile un elenco di centri Vermeiren autorizzati I pazienti con problemi di vista possono contattare il rivenditore per le istruzioni d uso 2 Componenti 3 Significato dei simboli Peso massimo Conformità CE 4 Controllo dopo la consegna Disimballare il prodotto e verificare che tutti i componenti siano stati consegnati Devono essere incluse le parti seg...

Page 17: ... tre volte la luce a LED e la luce di allarme si spengono 8 Utilizzo del campanello Per utilizzare il campanello seguire le indicazioni qui sotto Premendo il bottone anti panico il campanello viene attivato Premendolo ancora una volta il campanello viene disattivato 9 Regolazione dell angolazione del LED E possibile regolare l angolazione del LED come segue Afferrare la luce a LED con la mano Spos...

Page 18: ...persona che vi assiste Il bastone deve essere utilizzato su una superficie uniforme senza troppa ghiaia Prestate la massima attenzione su terreni bagnati scivolosi Prima di ogni utilizzo assicuratevi che il bastone sia regolato all altezza corretta Assicuratevi che i perni di regolazione siano bloccati correttamente indietro e che l anello anti rumore sia fissato saldamente Non disegnate una curva...

Page 19: ...r una lista con los centros Vermeiren en la última página Las personas con deficiencias visuales pueden ponerse en contacto con el distribuidor para obtener las instrucciones de uso 2 Componentes 3 Explicación de los símbolos Peso máximo Conformidad con la normativa CE 4 Comprobación tras la entrega Desembale el producto y compruebe que incluye todos los componentes El paquete debe contener los si...

Page 20: ...resionar o presione tres veces el botón la luz LED y la luz de advertencia se apagarán 8 Funcionamiento de la alarma sonora Para hacer funcionar la alarma sonora siga estas instrucciones Presione el botón la alarma sonora se activará Vuelva a presionar el botón para desactivarla 9 Ajuste del ángulo de la luz LED Para ajustar el ángulo de la luz LED siga éstas instrucciones Agarre la luz LED con su...

Page 21: ... seguridad Haga que alguien le ayude si es la primera vez que utiliza un bastón para caminar Debe emplear los bastones en superficies adecuadas en que no haya demasiada gravilla Preste especial atención en superficies húmedas resbaladizas Antes de cada uso compruebe si los bastones están ajustados a la altura correcta Verifique que los resortes de ajuste de la altura están debidamente apretados y ...

Page 22: ...ależy skontaktować się z najbliższym przedstawicielem firmy Vermeiren Wykaz przedstawicieli firmy Vermeiren podano na ostatniej stronie Osoby niedowidzące mogą skontaktować się ze sprzedawcą w celu uzyskania instrukcji użytkowania 2 Składniki 3 Objaśnienie symboli Waga maksymalna CE deklaracja 4 Kontrola po dostawie Dostarczony produkt należy rozpakować i sprawdzić czy zawiera wszystkie elementy W...

Page 23: ...dź wciśnij go od razu trzy razy światło LED oraz światło ostrzegwacze zostaną wyłaczone 8 Obsługa dzwonka Aby skorzystać z dzwonka przeczytaj poniższą instrukcje Wciśnij przycisk znajdujący się pod rękojeścią laski w tym momencie dzwonek powinien się włączyć Wciśnij ten sam przycisk ponownie aby wyłaczyć dzwonek 9 Regulacja wysokości światła LED Jest możliwość regulacji padania światła LED W tym c...

Page 24: ...eniu laski jeśli robisz to po raz pierwszy Zapamiętaj że możesz używać laskę na dobrej powierzchni Nie używaj jeśli jest zbyt dużo żwiru Bądź bardzo ostrożny na mokrym śliskim podłożu Przed każdym użyciem upewnij się że laskę są ustawione na odpowiedniej wysokości Sprawdź czy styki sprężynowe są dobrze zatrzaśnięte oraz czy nakładka gumowa jest poprawnie nałożona i się dobrze przylega Aby uniknąć ...

Page 25: ...al vostro distributore di fiducia che presentera al produttore il tagliando RISERVE Questa garanzia non potra essere applicata nei seguenti casi danno dovuto al cattivo ed improprio utilizzo della carrozzina danno subito durante il trasporto incidente o caduta smontaggio modifica o riparazione effettuate in proprio usura abituale della carrozzina invio del tagliando di garanzia con la data di acqu...

Page 26: ... en nuestra página web http www vermeiren be registration à renvoyer dans les 8 jours après achat ou régistrer votre produit sur notre site http www vermeiren be registration please return within 8 days of date of purchase or register your product at our website http www vermeiren be registration zurückschicken innerhalb von 8 Tagen nach kauf oder registrieren Sie Ihr Produkt auf unserer website h...

Page 27: ...itore Sello del distribuidor Dealerzy pieczęć Date Datum Data Fecha Dealer s stamp Cachet du revendeur Stempel van de handelaar Händlerstempel Timbro del rivenditore Sello del distribuidor Dealerzy pieczęć Date Datum Data Fecha Dealer s stamp Cachet du revendeur Stempel van de handelaar Händlerstempel Timbro del rivenditore Sello del distribuidor Dealerzy pieczęć Date Datum Data Fecha For service ...

Page 28: ... www vermeiren it e mail info vermeiren it Eisenbahnstrasse 62 3645 Gwatt Thun Tel 41 0 33 335 14 75 Fax 41 0 33 335 14 67 website www vermeiren ch e mail info vermeiren ch Poland Spain Portugal Vermeiren Polska Sp z o o Vermeiren Iberica S L ul Łączna 1 PL 55 100 Trzebnica Tel 48 0 71 387 42 00 Fax 48 0 71 387 05 74 website www vermeiren pl e mail info vermeiren pl Carratera de Cartellà Km 0 5 Sa...

Reviews: