background image


Eris 


2019-03 


Page 18 


If  your  scooter  is  stored  for  a  while,  it  is  advised  to  charge  the  battery  regularly 
(approximately once a month).  


Do not interrupt the charging cycle; wait till the charger indicates that the battery is 
fully  charged,  see  the  charger  instruction  manual.  Prevent  charging  for  a  short 
period.  Note: this is NOT applicable for Lithium batteries. 


The  battery  may  be  irreversibly  damaged  if  the  battery  is  fully  discharged. 
Therefore, make sure that the battery is charged on time. 


The lifespan reduces if the battery is exposed to extreme cold for a longer period of 
time, see the technical details in §1.3. 


Make sure that all connection points on the battery and the connection point in the 
battery housing are free of dust and other contamination.  


Protect your battery from large sources of electromagnetic radiation. 


Fully recharge your new battery before its first time use. 
 
The light emitting diode (LEDs) in the steering unit indicates the remaining capacity of your batteries. If 
the battery charger is turned on and no LED's are lit, check the fuse. If the red LED does not illuminate 
the charger is defective, consult your specialist dealer.  


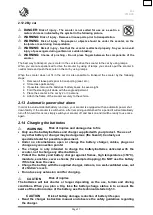
1.  Switch the scooter OFF and remove the key. 

2.  FIRST  connect  the  battery  charger  to  a 

230V AC power socket.  

3.  If  applicable,  open  the  cover  (2)  of  the 

charging point on the scooter, see picture. 

4.  Connect the charger.  
5.  Refer  to  the  battery-charger  manual  for  the 

explication of the indicators on the charger. 

6.  When the battery  is fully  loaded, disconnect 

the battery. 

7.  Switch the scooter ON and check if all lights 

of the battery status indicator are ON.  

8.  Remove  the  charger  from  the  socket,  let  it 

cool down and store it on a dry location.  


In case of any problems whereby the battery cannot be charged according to the instructions in 
the charger manual, please contact your specialist dealer. 
 
When the operating console displays the error code “Drive inhibit” after charging, make sure 
that the battery charger is disconnected. This safety measure prevents driving with the charger 
still connected to the supply grid. 


1 = Key lock 
2 = Socket battery charger 


Summary of Contents for Eris

Page 1: ...VERMEIREN Eris I N S T R U C T I O N M A N U A L ...

Page 2: ......

Page 3: ...sition in the scooter 11 2 7 Driving the scooter 12 2 8 Driving the scooter on ramps 14 2 9 Driving the scooter over obstacles 15 2 10 Operator control 15 2 11 Neutral 16 2 12 Transport 16 2 13 Automatic power shut down 17 2 14 Charging the batteries 17 3 Installation and adjustment 19 3 1 Tools 19 3 2 Manner of delivery 19 3 3 Adjusting the steering unit 19 3 4 Adjusting the seat 20 3 5 Folding t...

Page 4: ...eviously delivered models For any further questions please consult your specialist dealer Information available On our website http www vermeiren com you will always find the most recent version of following information Please consult this website regularly since the printed version may be out of date This manual Visually impaired people can download the electronic version of this manual and have ...

Page 5: ...re all four wheels are touching the ground and where there is sufficient contact to propel the wheels equally You should practice for use on uneven surfaces cobblestones etc slopes curves and to get past obstacles curbs etc The scooter should not be used as a ladder nor is it a transport for heavy or hot objects When using your scooter on streets or footpaths local laws and regulations apply The s...

Page 6: ... shrouding cover against humidity L High levels of humidity or very cold conditions can reduce the performance of your scooter L Use your scooter strictly in accordance with regulations Avoid driving straight over obstacles e g step edge of the curb or down from high ledges L Obey traffic regulations when driving on public roads Please take other road users into consideration L As is the case with...

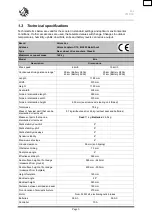
Page 7: ...950 mm Folded dismantled width 570 mm Folded dismantled height 600 mm seat removed steering unit folded Total mass 75 kg Mass of heaviest part that can be dismantled or removed 57 kg without seat or 46 kg without seat and batteries Masses of parts that can be dismantled or removed Seat 11 kg Batteries 26 5 kg Static stability downhill 9 Static stability uphill 9 Static stability sideways 9 Dynamic...

Page 8: ...ntrol lever Lights Serial Indicator light Serial Mirrors Optional Storage and use temperature 5 C to 40 C Operating temperature of the electronics 10 C to 40 C Storage and use humidity 30 Tested and meets requirements of ISO 7176 14 2008 Resistance to ignition acc to EN1021 2 We reserve the right to introduce technical changes Measurement tolerance 15 mm 1 5 kg 1 5 The theoretical driving distance...

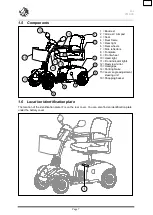
Page 9: ...You can also find an identification plate under the battery cover 1 Backrest 2 Armrest Armpad 3 Seat 4 Rear frame 5 Rear light 6 Rear wheels 7 Side reflectors 8 Footplate 9 Front wheel 10 Head light 11 Front indicator lights 12 Rearview mirror 13 Handgrips 14 Parking brake 15 Lever angle adjustment steering unit 16 Shopping basket ...

Page 10: ... battery charger Protection class II Maximum safe slope CE conformity Maximum speed Not intended to be used as a seat in a Motor vehicle Type designation Warning Do not Pinch hands fingers 1 8 Expected lifespan The average lifespan of your scooter is 5 years Depending on the frequency of use driving circumstances and maintenance the lifespan of your scooter will increase or decrease ...

Page 11: ...r or cell phones in the immediate environment of your scooter for as long as it is turned on L WARNING Check the area for transmitter masts and avoid using the scooter close to them L WARNING If involuntary movements or braking occur turn off the scooter as soon as it is safe to do so Interfering electromagnetic fields may have a negative effect on the scooter s electronic systems These can includ...

Page 12: ... protection from the more common sources of radiated EMI This powered vehicle model as shipped with no further modification has an immunity level of 20 V m without any accessories 2 2 Carrying the scooter The best way to carry the scooter is to make use of neutral mode of the scooter Place the scooter in neutral and roll the scooter to the desired place If this is not possible you can carry the sc...

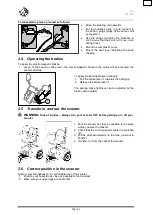
Page 13: ...apply the parking brakes optional 1 Pull the brake lever towards the handgrip 2 Release the brake lever The parking brake tightness can be adjusted by the brake cable adjuster 2 5 Transfer in and out the scooter L WARNING Risk of injuries Always turn your scooter OFF before getting on or off your scooter 1 Park the scooter as close as possible to the place where you want to transfer 2 Check that t...

Page 14: ...w put the speed control on the operator control to the minimum position Your scooter is now ready for use Only use higher speed setting when you are confident that you can easily operate and control your scooter Before using the scooter in busy or potentially dangerous areas familiarize yourself with the operation of your scooter Please practice in a wide and open area like a park 2 7 2 Handling a...

Page 15: ...y important that you ensure that there is enough space allowing you to go around bends and corners Narrow passages must preferably be approached in a large curve so as to allow you to enter the narrowest part as straight from the front as possible Bear in mind that your scooter s back part will in most cases be wider than the front part Take care not to enter curves and corners diagonally By cutti...

Page 16: ...l your scooter Never put your scooter in neutral on slopes L WARNING Control your speed Moving on slopes as slow as possible L WARNING Risk of tipping over Avoid sharp bends L WARNING Risk of tipping over Do not exceed the maximum gradient of static stability downhill see paragraph Technical specifications Sitting position going downhill Adjust your seat depth and backrest angle in order to sit in...

Page 17: ...arge recoil 2 10 Operator control Put the ON OFF key switch on please wait for at least 3 seconds before you press the speed lever otherwise you have a delay protection alarm Now the battery level indicator will light up and shows the current level of your batteries Now turn the speed switch to the desired driving speed Pull the drive lever with your fingers backwards right lever for forward movem...

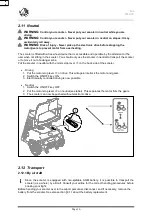
Page 18: ...with the motor stop lever on the back side of the scooter Driving 1 Put the motor stop lever on drive This will again interlock the motor and gears 2 Switch the ON OFF key ON 3 Electronically controlled driving is now possible Neutral 1 Switch the ON OFF key OFF 2 Put the motor stop lever on neutral see label This separates the motor from the gears 3 The scooter can now be pushed without electroni...

Page 19: ...al battery run down your scooter is equipped with an automatic power shut down facility If the scooter is switched on after remaining undisturbed for a period it will automatically turn off Should this occur simply switch your scooter off and back on and it will be ready to use once again 2 14 Charging the batteries L WARNING Risk of injuries and damage due to fire Only use the battery batteries a...

Page 20: ...he remaining capacity of your batteries If the battery charger is turned on and no LED s are lit check the fuse If the red LED does not illuminate the charger is defective consult your specialist dealer 1 Switch the scooter OFF and remove the key 2 FIRST connect the battery charger to a 230V AC power socket 3 If applicable open the cover 2 of the charging point on the scooter see picture 4 Connect...

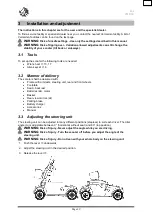
Page 21: ... n 6 3 2 Manner of delivery The scooter shall be delivered with Frame with armrests steering unit rear and front wheels Footplate Seat backrest Batteries 2x motor Basket Rear view mirrors 2x Parking brake Battery charger Accessories Manual 3 3 Adjusting the steering unit The steering unit can be adjusted in many different positions stepless to suit each driver The tiller angle A is adjustable betw...

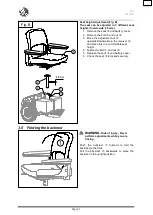
Page 22: ...ed in 3 Release the seat lever 4 Check that the seat is firmly secured Swivel seat Fig A 1 Pull the seat lever upwards 2 Turn the seat in the desired direction 3 Release the seat lever and the seat will always stop after 90 4 Check that the seat is firmly secured Depth adjustment Fig A 1 Pull the seat depth adjustment lever outwards 2 Move the seat forward or backward over the seat depth rails 3 T...

Page 23: ...wards downwards in the receiver and place this in a comfortable seat height 4 Fasten the bolt and nut 5 Replace the seat and battery cover 6 Check the seat is locked securely 3 5 Folding the backrest L WARNING Risk of injury Never perform adjustments while you are driving Push the backrest forward to fold the backrest to the front Pull the backrest backwards to place the backrest in the upright po...

Page 24: ...he star knob 5 Check that the armrest is fixated very well 3 8 Tyre changing L CAUTION There must be no air in the tube before it can be removed L CAUTION Risk of damage If handled improperly the rim might be damaged Note the following before inserting the new tube Check the rim bed and the inside wall of the tyre for foreign matter and clean these properly if necessary Check the condition of the ...

Page 25: ...ated to its full operating pressure note the maximum and the valve cap should be replaced Only an expert can guarantee correct assembly Work not done by your specialist dealer would void any warranty claims When inflating the tyres always check that the pressure is correct The correct pressure is given on the tyre walls Use only inflating equipment which complies with regulations and indicates the...

Page 26: ...ttery Replace both batteries at once and not one battery Change the batteries of your scooter with the same type batteries Type AGM Absorbed glass mat batteries The supplied battery charger works only with AGM batteries If you use other types of batteries replace also the battery charger Improper batteries battery chargers voids any warranty claim Contact your specialist dealer about other batteri...

Page 27: ...ole Well secured F Seat and backrest Dented spot damages or tears Replace the seat and or backrest if necessary Contact your specialist dealer for possible repairs or part replacements Yearly or more often Have your scooter inspected and serviced by your specialist dealer at least once a year or more often The minimum maintenance frequency depends on use and should therefore be commonly agreed on ...

Page 28: ...nfections may only be undertaken by trained persons Consult your specialist dealer 5 End of use At end of life you need to dispose your scooter according to the local environmental legislation The best way to do so is to disassemble the scooter to facilitate the transport of recyclable parts Usually batteries are collected separately 6 Declaration of conformity This product is certified for CE and...

Page 29: ... Date By stamp Kind of work I S R D Date By stamp Kind of work I S R D Date By stamp Kind of work I S R D Date By stamp Kind of work I S R D Date By stamp Kind of work I S R D Date By stamp Kind of work I S R D Date By stamp Kind of work I S R D Date By stamp Kind of work I S R D Date By stamp Kind of work I S R D Date By stamp Kind of work I S R D Date By stamp Kind of work I S R D Date By stamp ...

Page 30: ......

Page 31: ......
Page 32: ...company every product sold Version D 2019 03 All rights reserved including translation No part of this manual may be reproduced in any form what so ever print photocopy microfilm or any other process without written permission of the publisher or processed duplicated or distributed by using electronic systems R E Vermeiren GROUP Vermeirenplein 1 15 2920 Kalmthout Belgium Instruction manual Eris_EN...

Reviews: