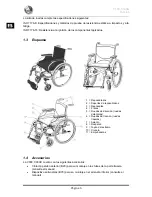
background image

 V300, 

V300D 


2016-06 


Pagina 17 


3.3  Regolazione dell'altezza e dell'angolazione del sedile 

La carrozzina Vermeiren V300, V300D consente di regolare l'altezza del sedile in quattro 
posizioni, mentre per l'angolazione sono disponibili cinque posizioni (0°-2,5°-5°-7,5°- 10°), 
modificando la posizione delle ruote per ciascuna altezza e angolazione è disponibile 
un'impostazione diversa delle ruote anteriori e posteriori. 
Nella tabella che segue sono riassunte le diverse altezze del sedile con un'angolazione 
standard di 5°. 

Altezza sedile 

Ruote 

posteriori 

Ruote anteriori 

Foro  

Foro  

Boccola 

Ⓑ 

relativa all'alloggiamento 

dello stelo pressofuso


440 mm  


Sopra 

470 mm 


Sotto 

500 mm (standard) 


Sotto 

530 mm 


Sotto 

Tabella 3: Altezze del sedile a un'angolazione di 5° 


Altezza sedile

530 mm

Altezza sedile

500 mm (Standard)

Altezza sedile 

470 mm 

Altezza sedile

440 mm 

Ruote posteriori piastra dell' asse 

Ruota anteriore 

Summary of Contents for V300 ACTIVE

Page 1: ...D I N S T R U C T I O N M A N U A L M O D E D E M P L O I G E B R U I K S A A N W I J Z I N G G E B R A U C H S A N W E I S U N G I S T R U Z I O N I P E R L U S O MANUAL DE INSTRUCCIONES I N S T R U K C J A O B S Ł U G I ...

Page 2: ...weisung darf in irgendeiner Form Druck Fotokopie Mikrofilm oder einem anderen Verfahren ohne schriftliche Genehmigung des Herausgebers reproduziert oder unter Verwendung elektronischer Systeme verarbeitet vervielfältigt oder verbreitet werden N V Vermeiren N V 2016 Istruzioni per il rivenditore Il presente Manuale di istruzioni è parte integrante del prodotto e deve essere fornito assieme alla pro...

Page 3: ...7 Transfer in and out the wheelchair 10 2 8 Correct position in the wheelchair 11 2 9 Riding the wheelchair 11 2 10 Moving on slopes 11 2 11 Negotiating steps or curbs 11 2 12 Fold up the wheelchair 13 2 13 Taking off the wheels 13 2 14 Transport in the car 13 2 15 Use of the wheelchair as seat in a motor vehicle 14 3 Installation and adjustment 16 3 1 Tools 16 3 2 Manner of delivery 16 3 3 Adjust...

Page 4: ...xpected lifetime of 8 years for your wheelchair is strongly influenced by the care and maintenance of the wheelchair This manual will help you get acquainted with the operation of your wheelchair Following the user instructions and the maintenance instructions are an essential part of the guarantee This manual reflects the latest product developments Vermeiren has the right to introduce changes wi...

Page 5: ...requirements body size and weight max 130 kg physical and psychological condition residential circumstances environment should be taken into consideration Your wheelchair should only be used on surfaces where all four wheels are touching the ground and where there is sufficient contact to propel the wheels equally You should practice for use on uneven surfaces cobblestones etc slopes curves and to...

Page 6: ...rd configuration Static stability sideways 18 in standard configuration Obstacle climbing 60 mm Seat plane angle 0 10 Effective seat depth 440 mm 520 mm Seat surface height at front edge 440 mm 530 mm Backrest angle 5 Backrest height 420 mm Distance between footrest and seat 330 mm 500 mm Angle between seat and footplate 5 25 Angle between seat and leg footrest 105 Angle between leg footrest and f...

Page 7: ...m Seat plane angle 0 10 Effective seat depth 440 mm 520 mm Seat surface height at front edge 440 mm 530 mm Backrest angle 5 Backrest height 420 mm Distance between footrest and seat 330 mm 500 mm Angle between seat and footplate 5 25 Angle between seat and leg footrest 105 Angle between leg footrest and footplate 80 Distance between armpad and seat 220 mm 240 mm Front location of armpad structure ...

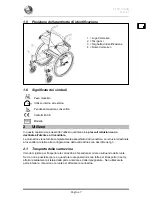
Page 8: ...6 8 Requirements and test methods for static impact and fatigue strengths ISO 7176 16 Resistance to ignition of upholstered parts 1 3 Drawing 1 Armpads 2 Armrests 3 Footrests 4 Brakes 5 Steering wheels front wheels 6 Driving wheels rear wheels 7 Seat 8 Back 9 Tip cap 10 Cross 11 Handgrips ...

Page 9: ...se instructions are for the user and the specialist dealer The wheelchair is delivered fully assembled by your specialist dealer The instructions intended for the specialist dealer on how to set up the wheelchair are given in 3 2 1 Carrying the wheelchair The best way to carry the wheelchair is to make use of the wheels and roll the wheelchair If this is not possible e g when the rear wheels are t...

Page 10: ... footrests is done as follows 1 Hold the footrest sideways at the outside of the wheelchairs frame and mount the tube hood into the frame 2 Swing the footrest inwards till it clicks in position 3 Swing the foot plate downwards To take off the footrests 1 Pull lever 2 Swing the footrest to the outside of the wheelchair till it comes loose from the guidance 3 Pull the footrest from tube hood 2 5 Ope...

Page 11: ...g the lever backwards 2 Hold the hand rim of the release wheel with your hand 3 Release the second brake by pulling the lever backwards 2 6 Mounting or removing of armrests The armrests of the wheelchair can be mounted by following instructions L CAUTION Risk of clamping Keep fingers buckles and clothes away from the bottom side of the armrest 1 Mount the rear tube of the armrest in tube hood 2 Ma...

Page 12: ...erform the transfer in a safe manner ask someone to assist you L CAUTION Risk of tipping over of the wheelchair Do not stand on the foot plates 1 Position the wheelchair as close as possible to the chair couch or bed to from you wish to transfer 2 Check both brakes from the wheelchair are in the on position 3 Fold the foot plates upwards to prevent standing on them 4 If the transfer is on the side...

Page 13: ...der the capacities of your attendant If your attendant does not have enough force to control the wheelchair put on the brakes L WARNING Risk of tipping over Lean forward to move your centre of gravity forward To improve a better stability 1 If available on the wheelchair wear the safety belt 2 Do not attempt moving on too high slopes The maximum slope angles upwards and downwards are mentioned in ...

Page 14: ...tre of gravity above the rear wheel 4 Place the front wheels on the curb 5 Roll rear wheels of the wheelchair over the curb Higher curbs are negotiated backwards 1 Turn the wheelchair to have the rear wheels facing the curb 2 Lean backwards and move your centre of gravity above the rear wheels 3 Ask the attendant to pull the wheelchair on the curb 4 Take back the normal position in the wheelchair ...

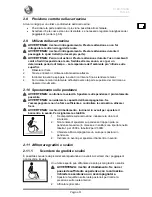
Page 15: ... up 2 13 Taking off the wheels To facilitate the transport off the wheelchair the rear wheels can be taken off 1 Make sure the brakes standing in the off position 2 Take the wheelchair to the side frame where you want to remove the wheel 3 Press the button in the center of the wheel hub 4 Pull the wheel away from the frame 2 14 Transport in the car L WARNING Risk of injury See that the wheelchair ...

Page 16: ... an adjustable seat and or back tilt make sure that the wheelchair user is sitting as upright as possible If the user s condition prevents this a risk assessment should be done to evaluate the user s safety during transit 4 Remove all mounted accessories such as trays and respiratory equipment and secure them in a safe place 5 Position the wheelchair facing forward in the travelling direction cent...

Page 17: ...0 to 75 to the horizontal similar to that shown below 5 A steeper greater angle within the preferred zone is desirable 6 Adjust the belt tightly according to the instructions of the strap system manufacturer consistent with the user s comfort 7 Ensure that the restraint belt connects in a straight line to the anchor point in the vehicle and that no bends in the belt are visible for instance at the...

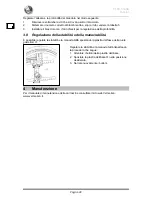
Page 18: ... set n 7 to n 22 Allen keyset n 3 to n 8 Screwdriver n 4 to n 5 Screwdriver Phillips head 3 2 Manner of delivery The Vermeiren V300 V300D shall be delivered with 1 frame with armrests rear and front wheels standard delivery seat height 500 mm seat angle 5 1 pair footrests Tools Manual Accessories 3 3 Adjusting the seat height and seat angle The Vermeiren V300 V300D is adjustable in 4 seat heights ...

Page 19: ...V300 V300D 2016 06 Page 17 Front wheel Axle plate rear wheels Seat height 440 mm Seat height 470 mm Seat height 500 mm standard Seat height 530 mm ...

Page 20: ...el axle Ⓐ so it turn smoothly but there is no space for motion 9 Mount the rear wheels 10 If installed properly the swivel axles of the front wheels and the ground must be perpendicular Check this 11 Adjust the brakes according 3 5 For other seat angle and seat height combinations the above procedure can be used to adjust the front fork and axle plate in the right combination If you don t find the...

Page 21: ...Position 2 520 mm Hole 1 and 3 Position 3 Table 4 Seat depth The seat depth can be changed by the cross according the following steps 1 Remove both clips 2 Move the cross in the desired position see table 4 3 Replace both clips The seat depth can be changed by the back rest connection according the following steps 1 Remove the bolts 2 Move the back rest connection in the desired position see table...

Page 22: ...at the above steps until the brakes are adjusted well 3 6 Adjusting of the footrests 3 6 1 Length of the footrests L CAUTION Risk of damage Avoid that the footrests make any contact with the ground Keep a minimum distance from 60 mm above the ground Adjust the length of the footrests as follow 1 Remove the screw on the back of the footrests 2 Adjust the length of the footrest to a comfortable leng...

Page 23: ...r can be adjustable in height and depth The height of the armrest can be adjusted in 3 positions Height armrest to seat Number of the blocks under the tube Number of blocks between tube and armpads 220 mm Standard 2 1 230 mm 1 2 240 mm 0 3 Table 5 Height of armrest The depth of the armpad can be adjusted in 3 positions Depth of the armpad Used holes Front position Back and middle Middle position S...

Page 24: ...for depth adjustment 3 8 Adjusting the stability and the maneuverability The stability and maneuverability can be adjusted by moving the axle plate of the rear wheels Adjust the stability and maneuverability according following steps 1 Loosen the bolts of axle plate 2 Move the axle plate in the desired position 3 Retighten the bolts 4 Maintenance For the maintenance manual of the wheelchairs refer...

Page 25: ...dans et hors du fauteuil roulant 10 2 8 Position correcte du fauteuil roulant 11 2 9 Déplacements avec le fauteuil roulant 11 2 10 Déplacements en pente 11 2 11 Passage de marches ou de bordures de trottoirs 12 2 12 Pliage du fauteuil roulant 13 2 13 Retrait des roues 13 2 14 Transport en voiture 14 2 15 Utilisation du fauteuil roulant comme siège dans un véhicule 14 3 Installation et réglage 16 3...

Page 26: ...uil roulant La durée de vie attendue de 8 ans de votre fauteuil roulant est fortement influencée par l entretien et la maintenance dont il bénéficie Ce manuel vous aidera à connaître le fonctionnement de votre fauteuil roulant Le respect des instructions d utilisation et des instructions de maintenance est une condition essentielle de la garantie Ce manuel reflète les derniers développements du pr...

Page 27: ...n cas de fourniture pour des besoins individuels la taille et le poids maximum 130 kg l état physique et psychologique la nature de la résidence l environnement doivent être pris en considération Votre fauteuil roulant ne doit être utilisé que sur des surfaces où les quatre roues touchent le sol et où le contact est suffisant pour entraîner les roues de manière équilibrée Il est recommandé de s en...

Page 28: ...é statique latérale 18 en configuration standard Passage d obstacle 60 mm Angle du plan d assise 0 10 Profondeur d assise efficace 440 mm 520 mm Hauteur de la surface d assise sur le bord avant 440 mm 530 mm Angle du dossier 5 Hauteur du dossier 420 mm Distance entre le repose pieds et le siège 330 mm 500 mm Angle entre la palette et le siège 5 25 Angle entre le siège et le jambe de repose pied 10...

Page 29: ...ce 440 mm 520 mm Hauteur de la surface d assise sur le bord avant 440 mm 530 mm Angle du dossier 5 Hauteur du dossier 420 mm Distance entre le repose pieds et le siège 330 mm 500 mm Angle entre la palette et le siège 5 25 Angle entre le siège et le jambe de repose pied 105 Angle entre le jambe de repose pied et la palette 80 Distance entre l accoudoir et le siège 220 mm 240 mm Emplacement avant de...

Page 30: ...héma 1 Accoudoirs 2 Repose bras 3 Repose pieds 4 Freins 5 Roues directrices roues avant 6 Roues motrices roues arrière 7 Siège 8 Dossier 9 Patte d inclinaison 10 Traverse 11 Poignées 1 4 Accessoires Les accessoires suivants sont disponibles pour le V300 V300D Sangle pelvienne antérieure B20 à monter sur les tubes du dossier voir le manuel correspondant Système anti basculement B78 à monter sur le ...

Page 31: ... votre distributeur Les instructions destinées au distributeur pour le réglage du fauteuil roulant sont indiquées au 3 2 1 Transport du fauteuil roulant Le meilleur moyen de déplacer le fauteuil roulant consiste à le faire rouler sur ses roues Si cela n est pas par exemple en cas de retrait des roues arrière pour le transport dans une voiture saisir fermement le cadre à l avant et les poignées Ne ...

Page 32: ...cédez de la manière suivante pour le montage des repose pieds 1 Tenez le repose pied latéralement à l extérieur du châssis du fauteuil roulant et montez le logement de tube sur le châssis 2 Basculez le repose pied vers l intérieur jusqu à ce qu il se bloque en position 3 Basculez la plaque repose pied vers le bas Pour retirer les repose pieds 1 Tirez sur la poignée 2 Basculez le repose pied vers l...

Page 33: ...les freins 1 Relâchez un frein en tirant une poignée vers l arrière 2 Maintenez avec votre main la main courante de la roue relâchée 3 Relâchez le deuxième frein en tirant la poignée vers l arrière 2 6 Montage ou retrait des repose bras Les repose bras du fauteuil roulant peuvent être monté en les instructions suivant L ATTENTION risque de pincement laissez les doigts boucles et vêtements à l écar...

Page 34: ...oute sécurité demandez à quelqu un de vous aider L ATTENTION risque de basculer hors du fauteuil roulant Ne vous levez pas sur les plaques repose pieds 1 Placez le fauteuil roulant aussi près que possible de la chaise du canapé ou du lit concerné par le transfert 2 Vérifiez que les deux freins du fauteuil roulant sont actionnés 3 Basculez les plaques repose pieds vers le haut pour éviter de marche...

Page 35: ...2 Saisissez le haut des deux mains courantes 3 Penchez vous en avant et poussez les mains courantes vers l avant jusqu à ce que vos bras soient tendus 4 Ramenez doucement vos bras vers le haut des mains courantes et répétez ce mouvement 2 10 Déplacements en pente L AVERTISSEMENT contrôlez votre vitesse déplacez vous sur les pentes aussi lentement que possible L AVERTISSEMENT tenez compte des capac...

Page 36: ...re 1 Tournez le fauteuil roulant roues arrière face à la bordure de trottoir 2 Penchez vous vers l avant pour déplacer votre centre de gravité vers l avant 3 Reculez près de la bordure de trottoir 4 Utilisez la main courante pour contrôler la descente de la bordure de trottoir 2 11 2 Montée de marches ou de bordures de trottoirs Montez des marches ou bordures de trottoirs avec un assistant de la m...

Page 37: ...que de basculement Toujours passer des escaliers avec 2 assistants 1 Retirez les repose pieds 2 Un assistant incline légèrement le fauteuil roulant vers l arrière 3 Le deuxième assistant attrape l avant du châssis 4 Restez calme évitez les mouvements brusques et gardez les bras à l intérieur du fauteuil roulant 5 Passez les marches sur les roues arrière du fauteuil roulant 6 Remontez les repose pi...

Page 38: ...enne seule n est pas adaptée pour être utilisée comme ceinture de sécurité pour tout autre passager Le fauteuil est testé avec 4 points d attache et une ceinture 3 points Dès que possible utilisez le siège du véhicule et emportez votre fauteuil dans le coffre Etapes pour fixer le fauteuil dans un véhicule 1 Vérifiez que le véhicule est équipé d un système d accroches pour fauteuils roulant ISO 105...

Page 39: ...ez la 3 Attachez l utilisateur du fauteuil comme indiqué par le fabricant des sangles de sécurité 4 Portez la ceinture de sécurité du bassin de façon à ce qu elle soit positionnée comme sur le dessin ci dessous dans une zone de 30 à 75 par rapport à l horizontal 5 Pour le confort du patient préférez le plus grand angle de la zone hachurée préférez l angle de 75 à l angle des 30 6 Ajustez la ceintu...

Page 40: ...manuel L AVERTISSEMENT une variation des réglages autorisés peut avoir une incidence sur la stabilité de votre fauteuil roulant inclinaison en arrière ou latérale 3 1 Outils Les outils suivants sont requis pour le montage du fauteuil roulant Jeu de clés de 7 à 22 Jeu de clés Allen de 3 à 8 Tournevis n 4 et n 5 Tournevis à tête Phillips 3 2 Mode de livraison Le Vermeiren V300 V300D doit être livré ...

Page 41: ...tulatif des différentes hauteurs de siège pour un angle de siège standard de 5 est présenté dans le tableau ci dessous Hauteur du siège Roues arrière Roues avant Trou Trou Douille Ⓑ par rapport au logement de l arbre du galet pivotant Ⓒ 440 mm Au dessus 470 mm Dessous 500 mm standard Dessous 530 mm Dessous Tableau 3 Hauteurs de siège avec angle de siège de 5 Hauteur du siège 530 mm Hauteur du sièg...

Page 42: ...ement mais sans jeu 9 Montez les roues arrière 10 Si elles sont installées correctement les axes rotatifs des roues avant doivent être perpendiculaires au sol Contrôlez cela 11 Réglez les freins d après le 3 5 Pour les autres combinaisons d angle et de hauteur de siège vous pouvez utiliser la procédure ci dessus pour régler correctement la fourche avant et la plaque d essieu Si vous ne trouvez pas...

Page 43: ...osition 3 Tableau 4 Profondeur du siège Procédez comme indiqué ci dessous pour modifier la profondeur du siège à l aide de la traverse 1 Retirez les deux clips 2 Déplacez la traverse dans la position souhaitée voir tableau 4 3 Remplacez les deux clips Procédez comme indiqué ci dessous pour modifier la profondeur du siège à l aide de la liaison avec le dossier 1 Retirez les boulons 2 Déplacez la li...

Page 44: ... dessus jusqu à ce que les freins soient bien réglés 3 6 Réglage des repose pieds 3 6 1 Longueur des repose pieds L ATTENTION risque de dommage évitez tout contact entre les repose pieds et le sol Conservez une distance minimum de 60 mm au dessus du sol Réglez la longueur des repose pieds de la manière suivante 1 Retirez la vis à l arrière des repose pieds 2 Réglez la longueur des repose pieds pou...

Page 45: ...re réglé en hauteur et en profondeur La hauteur du repose bras peut être réglée sur 3 positions Hauteur du repose bras par rapport au siège Nombre de blocs sous le tube Nombre de blocs entre le tube et les repose bras 220 mm standard 2 1 230 mm 1 2 240 mm 0 3 Tableau 5 Hauteur du repose bras La profondeur de l accoudoir peut être réglée sur 3 positions Profondeur de l accoudoir Trous utilisés Posi...

Page 46: ...ur 3 8 Réglage de la stabilité et de la manœuvrabilité La stabilité et la manœuvrabilité peuvent être réglées en déplaçant la plaque d essieu des roues arrière Réglez la stabilité et la manœuvrabilité d après les mesures suivantes 1 Desserrez les boulons de la plaque d essieu 2 Déplacez la plaque d essieu dans la position souhaitée 3 Reserrez les boulons 4 Maintenance Le mode d emploi des fauteuil...

Page 47: ...in en uit de rolstoel 10 2 8 Correcte positie in de rolstoel 11 2 9 Rijden met de rolstoel 11 2 10 Rijden op hellingen 11 2 11 Nemen van hindernissen trottoirs 11 2 12 Opvouwen van de rolstoel 13 2 13 Afnemen van de wielen 13 2 14 Transport in de auto 13 2 15 Gebruik van de rolstoel als zit in een motorvoertuig 14 3 Montage en afstellen 16 3 1 Gereedschap 16 3 2 Leveringsomvang 16 3 3 Instellen va...

Page 48: ... U de rolstoel behandelt Deze handleiding maakt U vertrouwd met de bediening van Uw rolstoel In dit document vindt U ook enkele onderhoudsadviezen zodat Uw rolstoel lang meegaat Het naleven van de gebruiks en onderhoudsinstructies vormen een essentieel onderdeel van de garantiebepalingen Deze handleiding houdt rekening met de recentste productontwikkelingen De Firma Vermeiren behoudt zich echter h...

Page 49: ...ht max 130 kg fysieke en psychische gesteldheid woonomgeving milieu Uw rolstoel mag alleen gebruikt worden op ondergronden waarbij alle vier de wielen de grond raken en waarbij het bodemcontact voldoende is voor een gelijkmatige aandrijving van alle wielen Extra oefening is nodig voor het rijden op ongelijkmatige ondergrond kasseien etc hellingen en bochten zijdelings omvallen evenals het nemen va...

Page 50: ...uratie Statische stabiliteit bergop 7 in standaard configuratie Statische stabiliteit zijwaarts 18 in standaard configuratie Maximum hoogte hindernis 60 mm Zithoek 0 10 Effectieve zitdiepte 440 mm 520 mm Zithoogte aan voorzijde 440 mm 530 mm Rughoek 5 Rughoogte 420 mm Afstand tussen zit en voetsteun 330 mm 500 mm Hoek tussen zit en voetplaat 5 25 Hoek tussen zit en been voetsteun 105 Hoek tussen b...

Page 51: ...atie Maximum hoogte hindernis 60 mm Zithoek 0 10 Effectieve zitdiepte 440 mm 520 mm Zithoogte aan voorzijde 440 mm 530 mm Rughoek 5 Rughoogte 420 mm Afstand tussen zit en voetsteun 330 mm 500 mm Hoek tussen zit en voetplaat 5 25 Hoek tussen zit en been voetsteun 105 Hoek tussen been voetsteun en voetplaat 80 Afstand tussen armsteun en zit 220 mm 240 mm Afstand voorzijde armsteunen 410 mm Diameter ...

Page 52: ... 1 Armleggers 2 Armsteunen 3 Voetsteunen 4 Remmen 5 Stuurwielen voorwielen 6 Aandrijfwielen achterwielen 7 Zit 8 Rug 9 Trapdop 10 Kruis 11 Handvaten 1 4 Accessoires Volgende accessoires zijn beschikbaar voor de V300 V300D Anterior bekkengordel B20 om te bevestigen aan de tubes van de rug zie volgens handleiding Anti tipping apparaat B78 om te bestiging aan het onderste frame zie volgens handleidin...

Page 53: ...laar De instructies voor de montage en afstelling van de rolstoel staat in 3 2 1 Dragen van de rolstoel De beste manier om de rolstoel te dragen is om gebruik te maken van de wielen en zo de rolstoel verder te rollen Als dit niet mogelijk is bv wanneer de achterwielen verwijderd zijn voor het transporteren in de auto grijp de rolstoel stevig vast aan de voorzijde van het frame en de handgrepen Geb...

Page 54: ... van de voetsteunen gaat als volgt 1 Hou de voetsteun zijdelings aan de buitenkant van de stoel en hang de steun met dop in het frame 2 Zwenk de voetsteun naar binnen tot hij vastklikt 3 Zwaai de voetplaat naar beneden Om de voetsteunen af te nemen gaat U als volgt te werk 1 Trek hendel omhoog en houdt deze omhoog 2 Draai de voetsteun naar buiten tot deze uit de geleiding komt 3 Trek de voetsteun ...

Page 55: ... achteren te trekken 2 Houdt het ongeremde wiel vast aan de hoepel 3 Los de andere rem door de bedieningsknop naar achteren te trekken 2 6 Plaatsen of verwijderen van de armsteunen De armsteunen van de rolstoel kunnen worden gemonteerd met volgende instructies L VOORZICHTIG Kans op klemmen Houdt vingers gespen en kledingsstukken weg van de onderkant van de armsteun 1 Plaats de achterzijde van de a...

Page 56: ...IG Indien U de transfer niet veilig op eigen kracht kan doen vraag dan hulp van iemand anders L VOORZICHTIG Kans op kantelen van de rolstoel Niet op de voetplaten staan 1 Plaats de rolstoel zo dicht mogelijk bij stoel zetel of bed van naar waar U zich wilt verplaatsen 2 Zorg dat beide remmen van de rolstoel aan staan 3 Klap de voetplaten omhoog zodat U er niet op gaat staan 4 Indien U zich langs d...

Page 57: ...w snelheid onder controle Neem hellingen steeds met de laagst mogelijke snelheid L WAARSCHUWING Houd rekening met de capaciteiten van Uw begeleider Blokkeer de rem van zodra U merkt dat Uw begeleider onvoldoende kracht heeft om de rolstoel onder controle te houden L WAARSCHUWING Kans op kantelen Leun voorover om Uw zwaartepunt naar voor te verplaatsen Zo kan de stabiliteit beter behouden blijven 1...

Page 58: ... er voldoende ruimte onder de voorwielen is om de hindernis te nemen 3 Leun hierbij een beetje achterover om het zwaartepunt boven de achterwielen te houden 4 Plaats de voorwielen op het trottoir 5 Laat de rolstoel op de achterwielen over de hindernis duwen Een hoger trottoir kan best achterwaarts genomen worden 1 Draai de rolstoel met de achterwielen naar het trottoir toe 2 Leun een beetje achter...

Page 59: ...ielen Om het transport van de rolstoel te vergemakkelijken kunnen de achterwielen worden afgenomen 1 Zorg ervoor dat de remmen afstaan 2 Neem de rolstoel vast aan het frame aan de zijde waar U het wiel wil afnemen 3 Druk op de knop in het midden van de naaf van het wiel 4 Trek het wiel van het frame weg 2 14 Transport in de auto L WAARSCHUWING Gevaar voor letsel Zorg er voor dat de rolstoel voldoe...

Page 60: ...ndien uitgerust met een verstelbare zit en of een kantelbare rug controleer of de rolstoelgebruiker zo recht mogelijk zit Als de toestand van de gebruiker dit niet toe laat moet een risicoanalyse worden uitgevoerd om de veiligheid van de gebruiker tijdens transport te evalueren 4 Verwijder alle gemonteerde accessoires zoals dienbladen en beademingsapparatuur en zet ze op een veilige plaats 5 Posit...

Page 61: ...riem strak aan volgens de instructies van het riem systeem van de fabrikant en in overeenstemming met het comfort van de gebruiker 7 Zorg ervoor dat de veiligheidsriem verbonden wordt in een rechte lijn aan het ankerpunt van het voertuig en dat er geen bochten in de riem zichtbaar zijn bijvoorbeeld op de as van het achterwiel 8 Installeer de armleuningen indien gewenst Zorg ervoor dat de gordels n...

Page 62: ...kantelen 3 1 Gereedschap Om Uw rolstoel op te bouwen is het volgende gereedschap nodig Steek ringsleutel set n 7 tot n 22 Inbussleutel set n 3 tot n 8 Schroevendraaier n 4 tot n 5 Kruiskopschroevendraaier 3 2 Leveringsomvang De Vermeiren V300 V300D wordt als volgt geleverd 1 frame gemonteerd met armsteunen achter en voorwielen standaard levering zithoogte 500 mm zithoek 5 1 paar voetsteunen Gereed...

Page 63: ...V300 V300D 2016 06 Pagina 17 Voorwiel Asplaat achterwiel Zithoogte 440 mm Zithoogte 470 mm Zithoogte 500 mm standaard Zithoogte 530 mm ...

Page 64: ...s de achterwielen 10 Bij een correcte montage moeten de zwenkassen van de voorwielen haaks op de grond staan Kijk dit na 11 Stel de remmen af volgens 3 5 Voor andere zithoek en zithoogte combinaties kunt U met dezelfde procedure een geschikte combinatie van voorvork en asplaat instellen Bij het zoeken naar de geschikte combinatie kan U altijd contact opnemen met de firma Vermeiren Controleer dat d...

Page 65: ...n 4 Positie 2 520 mm Gaten 1 en 3 Positie 3 Tabel 4 Zitdieptes Om de zitdiepte via het kruis te wijzigen gaat U als volgt te werk 1 Verwijder beide clips 2 Verzet het kruis in de gewenste positie zie tabel 4 3 Bevestig beide clips terug Om de zitdiepte via de rugbevestiging te wijzigen gaat U als volgt te werk 1 Verwijder de bouten 2 Verzet de rugbevestiging in de gewenste positie zie tabel 4 3 Be...

Page 66: ...ng van de remmen 7 Indien nodig herhaal voorgaande stappen tot de remmen goed afgesteld staan 3 6 Afstellen van de voetsteunen 3 6 1 Lengte van de voetsteunen L VOORZICHTIG Kans op beschadiging Zorg er voor dat de voetsteunen niet over de grond slepen Houd een minimum afstand van 60 mm tot de grond aan Om de lengte van de voetsteunen te verstellen gaat U als volgt te werk 1 Draai schroef aan de ac...

Page 67: ...en van de armsteunen De armsteunen van Uw rolstoel zijn in te stellen zowel in de hoogte als in de diepte De hoogte van de armsteun kan in 3 posities afgesteld worden Hoogte armsteun t o v zitvlak Aantal blokjes onder de buis Aantal blokjes tussen buis en armlegger 220 mm Standaard 2 1 230 mm 1 2 240 mm 0 3 Tabel 5 Hoogte van armsteun De diepte van de armlegger kan in 3 posities afgesteld worden D...

Page 68: ...gt te werk 1 Draai de bouten van de asplaat los 2 Zet de asplaat in de gewenste positie 3 Draai de bouten van de asplaat terug vast 4 Onderhoud Voor de onderhoudshandleiding van de manuele rolstoelen kan U de website van Vermeiren raadplegen www vermeiren be www vermeiren nl 5 Clusteromschrijvingen De V300 V300D met 24 inch achterwielen voldoen voor Transport duw hoepelen TH Hoepelrolstoel bedoelt...

Page 69: ...stuhl 10 2 8 Prüfen Sie ob die Sitzposition korrekt ist 11 2 9 Fahren mit dem Rollstuhl 11 2 10 Bewegen an Steigungen 11 2 11 Überwinden von Stufen und Bordsteinen 12 2 12 Zusammenklappen des Rollstuhls 13 2 13 Abnehmen der Hinterräder 13 2 14 Transport in einem Auto 14 2 15 Nutzung des Rollstuhls als Sitz in einem PKW 14 3 Zusammenbau und Einstellung 16 3 1 Werkzeug 16 3 2 Lieferumfang 16 3 3 Ein...

Page 70: ...ängt stark von der Wartung und Pflege ab die für den Rollstuhl aufgewendet wird Diese Bedienungsanleitung soll Ihnen helfen sich mit der Benutzung Ihres Rollstuhls vertraut zu machen Das Befolgen der Bedienungsanleitung und der Wartungshinweise bildet einen wesentlichen Teil der Garantiebedingungen Diese Bedienungsanleitung spiegelt die neuesten Produktentwicklungen wider Das Unternehmen Vermeiren...

Page 71: ...iduellen Versorgung sind außerdem Körpergröße und gewicht max 130 kg körperlicher und geistiger Zustand Wohnverhältnisse Umgebung zu beachten Ihr Rollstuhl darf nur auf Flächen verwendet werden auf denen alle vier Räder den Boden berühren und ausreichend Kontakt vorhanden ist um die Räder gleichmäßig anzutreiben Sie sollten die Verwendung des Rollstuhls auf unebenen Flächen Pflastersteinen usw Abh...

Page 72: ...tabilität bergauf 7 in der Standardkonfiguration Statische Stabilität seitwärts 18 in der Standardkonfiguration Überfahren von Hindernissen 60 mm Winkel der Sitzebene 0 10 Effektive Sitztiefe 440 mm 520 mm Höhe der Sitzoberfläche an der Vorderkante 440 mm 530 mm Rückenlehnenwinkel 5 Rückenlehnenhöhe 420 mm Abstand zwischen Fußplatte und Sitz 330 mm 500 mm Winkel zwischen Sitz und Fußplatte 5 25 Wi...

Page 73: ...ndernissen 60 mm Winkel der Sitzebene 0 10 Effektive Sitztiefe 440 mm 520 mm Höhe der Sitzoberfläche an der Vorderkante 440 mm 530 mm Rückenlehnenwinkel 5 Rückenlehnenhöhe 420 mm Abstand zwischen Fußplatte und Sitz 330 mm 500 mm Winkel zwischen Sitz und Fußplatte 5 25 Winkel zwischen Sitz und Bein der Fußauflagen 105 Winkel zwischen Bein der Fußauflagen und Fußplatte 80 Abstand zwischen Armauflage...

Page 74: ...ten Teilen 1 3 Zeichnungen 1 Armauflagen 2 Armauflagenträger 3 Fußplatten 4 Bremsen 5 Lenkräder Vorderräder 6 Antriebsräder Hinterräder 7 Sitz 8 Rückenlehne 9 Kipphilfe 10 Schere 11 Handgriffe 1 4 Zubehör Für den V300 V300D ist das folgende Zubehör erhältlich Vorderer Beckengurt B20 zur Befestigung an den Rohren der Rückenlehne siehe entsprechendes Handbuch Anti Kippvorrichtung B78 zur Befestigung...

Page 75: ...sungen für den Fachhändler wie der Rollstuhl zusammengebaut und eingerichtet wird befinden sich in 3 2 1 Transportieren des Rollstuhls Am besten lässt sich der Rollstuhl transportieren indem die Räder verwendet und der Rollstuhl geschoben wird Sollte dies nicht möglich sein beispielsweise wenn die Hinterräder für den Transport in einem Auto abgenommen wurden greifen Sie den Rahmen fest an der Vord...

Page 76: ... wie folgt montiert 1 Halten Sie die Fußplatte seitlich an die Außenseite des Rollstuhlrahmens und stecken Sie den Zapfen in den Rahmen 2 Schwenken Sie die Fußplatte nach innen bis sie in der Endposition einrastet 3 Schwenken Sie die Fußplatte nach unten So bauen Sie die Fußplatten ab 1 Ziehen Sie am Griff 2 Schwenken Sie die Fußplatte zur Außenseite des Rollstuhls bis sie sich aus der Führung lös...

Page 77: ... Sie den Greifreifen des Rads mit der gelösten Bremse mit Ihrer Hand 3 Lösen Sie die zweite Bremse indem Sie den Griff nach hinten ziehen 2 6 An oder Abbauen der Armauflagen Die Armauflagen des Rollstuhl können durch folgende Hinweise angebaut werden L VORSICHT Klemmgefahr Halten Sie Ihre Finger Schnallen oder Kleidungsstücke fern von der Unterseite der Armauflage 1 Schieben Sie das hintere Rohr d...

Page 78: ...cher in den Rollstuhl setzen können bitten Sie jemanden um Hilfe L VORSICHT Kipprisiko des Rollstuhls nicht auf die Fußplatten stellen 1 Stellen Sie den Rollstuhl so nahe wie möglich an den Stuhl die Couch oder das Bett von dem Sie zum Rollstuhl wechseln möchten 2 Achten Sie darauf dass beide Bremsen des Rollstuhls betätigt sind 3 Klappen Sie die Fußplatten nach oben damit Sie sich nicht versehent...

Page 79: ...ie beide Hände an die oberste Position des Greifreifens 3 Lehnen Sie sich nach vorn und drücken Sie die Greifreifen nach vorn bis beide Arme gerade sind 4 Schwingen Sie Ihre Arme lose zurück an die Oberkante der Greifreifen und wiederholen Sie die Bewegung 2 10 Bewegen an Steigungen L WARNUNG Kontrollieren Sie Ihre Geschwindigkeit Bewegen Sie sich an Steigungen so langsam wie möglich L WARNUNG Ber...

Page 80: ...Bordstein stehen 2 Lehnen Sie sich nach vorn um Ihren Schwerpunkt nach vorne zu verlagern 3 Bewegen Sie den Rollstuhl so nach wie möglich an den Bordstein 4 Drücken Sie vorsichtig am Greifreifen um den Rollstuhl langsam den Kantstein hinunterfahren zu lassen 2 11 2 Hinauffahren von Stufen und Bordsteinen So überwinden Sie Stufen oder Bordsteine mit einem Helfer 1 Achten Sie darauf dass die Fußplat...

Page 81: ... Helfer kippt den Rollstuhl etwas nach hinten 3 Der zweite Helfer fasst den Rollstuhl am vorderen Rahmen 4 Bleiben Sie ruhig vermeiden Sie plötzliche Bewegungen und halten Sie die Arme am Körper 5 Überwinden Sie die Stufen mit den Hinterräder des Rollstuhls 6 Bauen Sie die Fußplatten nach dem Überwinden der Treppe wieder am Rollstuhl an 2 12 Zusammenklappen des Rollstuhls L VORSICHT Quetschgefahr ...

Page 82: ... zu verwenden Der Rollstuhl wurde getested unter Verwendung eines 5 Punkt Rückhaltegurtsystems Rollstuhl und eines 3 Punkt Sicherheitsgurtes Nutzer Grundsätzlich ist wenn möglich bevorzugt ein vorhandener PKW Sitz zu verwenden und der Rollstuhl sicher im Gepäckraum zu verstauen Sicheres Verzurren des Rollstuhls innerhalb des PKW s 1 Prüfen Sie ob der PKW mit einem PKW Gurtsystem und einem Sicherhe...

Page 83: ...eitsgurt des PKW s an gemäß den Angaben des jeweiligen Herstellers 4 Legen Sie den Gurt so über dem vorderen Becken des Nutzers an dass der Gurtriemen in einem Winkel zwischen 30 und 75 Grad zur Horizontalen liegt siehe auch nachfolgende Zeichnung 5 Je größer steiler der Winkel des Gurtriemens innerhalb der markierten Fläche desto besseren Halt kann das Gurtsystem bieten 6 Legen Sie den Gurt stram...

Page 84: ...aben dieser Gebrauchsanweisung L WARNUNG Änderungen an den zulässigen Einstellungen können die Stabilität des Rollstuhls verändern Kippen nach hinten oder zur Seite 3 1 Werkzeug Für die Montage des Rollstuhl und für Einstellungen werden die folgenden Werkzeuge benötigt Schraubenschlüsselsatz Größe 7 bis 22 Inbusschlüsselsatz Größe 3 bis 8 Schlitzschraubendreher Größe 4 bis 5 Kreuzschlitzschraubend...

Page 85: ...Vorder und Hinterräder gewählt Die Summe der unterschiedlichen Sitzhöhen bei einem Standardwinkel von 5 ist in der folgenden Tabelle aufgeführt Sitzhöhe Hinterräder Vorderräder Bohrung Bohrung Buchse Ⓑ relativ zur Fußrollenaufnahme Ⓒ 440 mm Oberhalb 470 mm Unterhalb 500 mm Standard Unterhalb 530 mm Unterhalb Tabelle 3 Sitzhöhen bei einem Sitzwinkel von 5 Sitzhöhe 530 mm Sitzhöhe 500 mm Standard Si...

Page 86: ...en sein 9 Bauen Sie die Hinterräder an 10 Wenn alles ordnungsgemäß zusammengebaut wurde müssen die Steckachsen der Vorderräder senkrecht zum Boden stehen Überprüfen Sie ob diese Ausrichtung gegeben ist 11 Stellen Sie die Bremsen gemäß 3 5 ein Für andere Sitzwinkel und Sitzhöhenkombinationen können Sie das oben beschriebene Verfahren verwenden um die Vordergabel und die Achsplatte in der richtigen ...

Page 87: ...Tabelle 4 Sitztiefe Der Sitztiefe kann durch Ändern der Schere wie folgt verstellt werden 1 Entfernen Sie die beiden Clips 2 Verschieben Sie die Schere in die gewünschte Position siehe Tabelle 4 3 Setzen Sie die beiden Clips wieder auf Die Sitztiefe kann durch Ändern der Rückenlehnenverbindung wie folgt verstellt werden 1 Drehen Sie die Schrauben heraus 2 Verschieben Sie die Rückenlehnenverbindung...

Page 88: ...die Bremsen ordnungsgemäß justiert sind 3 6 Einstellen der Fußplatten 3 6 1 Länge der Fußplatten L VORSICHT Risiko der Beschädigung Achten Sie darauf dass die Fußplatten den Boden nicht berühren Achten Sie auf einen Abstand von mindestens 60 mm zwischen den Fußplatten und dem Boden So stellen Sie die Länge der Fußplatten ein 1 Drehen Sie die Schraube auf der Rückseite der Fußplatten heraus 2 Stell...

Page 89: ...lstuhls können in der Höhe und der Tiefe verstellt werden Die Höhe der Armauflage kann dreifach verstellt werden Höhe der Armauflage zum Sitz Anzahl der Blöcke unter dem Rohr Anzahl der Blöcke zwischen Rohr und Armauflagen 220 mm Standard 2 1 230 mm 1 2 240 mm 0 3 Tabelle 5 Höhe der Armauflagen Die Tiefe der Armauflage kann dreifach verstellt werden Tiefe der Armauflage Verwendete Bohrungen Vorder...

Page 90: ...der Tiefe vorzunehmen 3 8 Einstellen der Stabilität und der Manövrierbarkeit Die Stabilität und Manövrierbarkeit kann durch Verschieben der Achsplatte der Hinterräder eingestellt werden So stellen Sie die Stabilität und Manövrierbarkeit ein 1 Lösen Sie die Schrauben der Achsplatte 2 Verschieben Sie die Achsplatte in die gewünschte Position 3 Ziehen Sie die Schrauben wieder fest 4 Wartung Hinweise ...

Page 91: ...arrozzina all interno e all esterno 10 2 8 Posizione corretta nella carrozzina 11 2 9 Utilizzo della carrozzina 11 2 10 Spostamento sulle pendenze 11 2 11 Affrontare gradini e scalini 11 2 12 Ripiegare la carrozzina 13 2 13 Smontare le ruote 13 2 14 Trasporto in auto 13 2 15 Uso della carrozzina quale sedile su un autovettura 14 3 Installazione e regolazione 16 3 1 Attrezzi 16 3 2 Modalità di cons...

Page 92: ... carrozzina di 8 anni dipende fortemente dalla cura e manutenzione che vi si dedicano Il presente manuale ha lo scopo di aiutare ad acquisire familiarità con il funzionamento della carrozzina Attenersi alle istruzioni operative e di manutenzione costituisce parte integrante della garanzia Questo manuale riflette gli sviluppi più recenti dei prodotti Vermeiren si riserva il diritto di apportare mod...

Page 93: ...are e per usi geriatrici Nella valutazione delle esigenze personali le seguenti condizioni corporatura e peso corporeo 130 kg max condizioni psico fisiche abitazioni ambiente devono essere prese in considerazione La carrozzina deve essere utilizzata solo su superfici che consentono il contatto adeguato delle quattro ruote e dove sia possibile spingere in modo uniforme le ruote Esercitarsi su super...

Page 94: ... standard Stabilità statica lateralmente 18 in configurazione standard Superamento degli ostacoli 60 mm Angolazione del piano del sedile 0 10 Profondità effettiva del sedile 440 mm 520 mm Altezza della superficie del sedile all estremità frontale 440 mm 530 mm Angolazione dello schienale 5 Altezza dello schienale 420 mm Distanza tra poggiapiedi e sedile 330 mm 500 mm Angolazione tra sedile e pedan...

Page 95: ...zione del piano del sedile 0 10 Profondità effettiva del sedile 440 mm 520 mm Altezza della superficie del sedile all estremità frontale 440 mm 530 mm Angolazione dello schienale 5 Altezza dello schienale 420 mm Distanza tra poggiapiedi e sedile 330 mm 500 mm Angolazione tra sedile e pedana 5 25 Inclinazione tra sedile e piatto pedana 105 Angolazione tra piatto pedana e pedana 80 Distanza tra brac...

Page 96: ...i 2 Poggiabraccia 3 Poggiapiedi 4 Freni 5 Ruote direttrici ruote anteriori 6 Ruote motrici ruote posteriori 7 Sedile 8 Schienale 9 Calotta ribaltamento 10 Crociera 11 Impugnature 1 4 Accessori I seguenti accessori sono disponibili per il modello V300 V300D Cintura pelvica anteriore B20 per il montaggio sui tubi posteriori vedere il manuale adatto Dispositivo antiribaltamento B78 per il montaggio s...
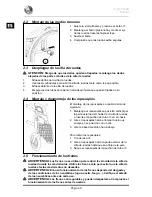
Page 97: ...l rivenditore Le istruzioni destinate al rivenditore relative alla configurazione della carrozzina sono descritte nel 3 2 1 Trasporto della carrozzina Il modo migliore per trasportare la carrozzina è facendola scorrere usufruendo delle ruote Se ciò non è possibile per es quando le ruote posteriori sono tolte per il trasporto in auto afferrare saldamente il telaio dalla parte anteriore e dalle impu...

Page 98: ... 1 Reggere il poggiapiedi lateralmente dalla parte esterna del telaio della carrozzina e montare il coperchio del tubo nel telaio 2 Ruotare il poggiapiedi verso l interno fino a quando non fa clic in posizione 3 Ruotare la pedana verso il basso Per asportare i poggiapiedi 1 Tirare l impugnatura 2 Ruotare il poggiapiedi verso l esterno della carrozzina fino a quando non si allenta dalla guida 3 Tir...

Page 99: ...orrimano della ruota di rilascio con la mano 3 Rilasciare l altro freno tirando le impugnature all indietro 2 6 Montaggio o rimozione dei poggiabraccia I poggiabraccia della carrozzine possono essere montato le istruzioni seguendo L ATTENZIONE rischio di intrappolamento Tenere le dita le fibbie e gli indumenti lontani dalla parte laterale del poggiabraccia 1 Montare il tubo posteriore del bracciol...

Page 100: ...rasferimento in modo sicuro chiedere assistenza L ATTENZIONE rischio di ribaltamento della carrozzina Non reggersi in piedi sulle pedane 1 Posizionare la carrozzina il più vicino possibile alla sedia alla poltrona o al letto da verso cui si desidera trasferirsi 2 Verificare che entrambi i freni della carrozzina siano in posizione di attivazione 3 Ripiegare le pedane verso l alto per evitare di reg...

Page 101: ...imento 2 10 Spostamento sulle pendenze L AVVERTENZA controllare la velocità Spostarsi sulle pendenze il più lentamente possibile L AVVERTENZA considerare le capacità dell accompagnatore Se l accompagnatore non ha forza sufficiente a controllare la carrozzina attivare i freni L AVVERTENZA rischio di ribaltamento Inclinarsi in avanti per spostare il baricentro in avanti Per migliorare la stabilità 1...

Page 102: ...onsentire alle ruote anteriori di superare lo scalino 3 Inclinarsi all indietro per spostare il baricentro sulle ruote posteriori 4 Portare le ruote anteriori sullo scalino 5 Far rotolare le ruote posteriori oltre lo scalino Gli scalini più alti vanno affrontati all indietro 1 Ruotare la carrozzina in modo che le ruote posteriori siano di fronte allo scalino 2 Inclinarsi all indietro per spostare ...

Page 103: ...e tirarlo verso l alto 2 13 Smontare le ruote Per agevolare il trasporto della carrozzina è possibile rimuovere le ruote posteriori 1 Accertarsi i freni siano in posizione off 2 Prendere la carrozzina dal telaio laterale dove si desidera rimuovere la ruota 3 Premere il pulsante al centro del mozzo della ruota 4 Estrarre la ruota dal telaio 2 14 Trasporto in auto L AVVERTENZA rischio di lesioni Con...

Page 104: ...inati 3 Se dotata di un sedile regolabile e o schienale reclinabile assicurarsi che l utilizzatore della carrozzina sia seduto in posizione il più eretta possibile Se le condizioni del paziente non lo consentono bisognerebbe valutare i rischi per evitare pericoli per il paziente durante il trasporto 4 Rimuovere tutti gli accessori montati come ad esempio equipaggiamenti respiratori o vassoi e ripo...

Page 105: ...5 dal piano orizzontale come mostrato in figura 5 È preferibile raggiungere un angolo maggiore per la zona indicata 6 Stringere la cintura come da istruzioni del costruttore del sistema di passanti secondo il comfort del paziente 7 Assicurarsi che la cintura di sicurezza sia attaccata in linea retta al punto di ancoraggio nel veicolo e che nessuna piega sia visibile nella cintura ad esempio nell a...

Page 106: ...nel presente manuale L AVVERTENZA La variazione delle regolazioni permesse può tuttavia cambiare la stabilità della vostra carrozzina piegandola indietro o lateralmente 3 1 Attrezzi Per montare la carrozzina sono necessari i seguenti strumenti Set di chiavi dal n 7 al n 22 Set di chiavi a brugola dal n 3 al n 8 Cacciavite n 4 e n 5 Cacciavite a stella 3 2 Modalità di consegna La carrozzina Vermeir...

Page 107: ...ile un impostazione diversa delle ruote anteriori e posteriori Nella tabella che segue sono riassunte le diverse altezze del sedile con un angolazione standard di 5 Altezza sedile Ruote posteriori Ruote anteriori Foro Foro Boccola Ⓑ relativa all alloggiamento dello stelo pressofusoⒸ 440 mm Sopra 470 mm Sotto 500 mm standard Sotto 530 mm Sotto Tabella 3 Altezze del sedile a un angolazione di 5 Alte...

Page 108: ... che non sia presente spazio per il movimento 9 Montare le ruote posteriori 10 Se installati correttamente gli assi rotanti delle ruote anteriori devono essere perpendicolari al suolo Verificare che lo siano 11 Regolare i freni in base a quanto riportato nel 3 5 Per altre combinazioni di inclinazione e altezza del sedile è possibile adottare la procedura seguente per regolare la forcella anteriore...

Page 109: ...3 Tabella 4 Profondità sedile È possibile modificare la profondità del sedile dalla crociera attenendosi alla procedura che segue 1 Rimuovere entrambi i morsetti 2 Spostare la crociera nella posizione desiderata vedere tabella 4 3 Sostituire entrambi i morsetti È possibile modificare la profondità del sedile dalla connessione dello schienale attenendosi alla procedura che segue 1 Rimuovere i bullo...

Page 110: ... la procedura precedente fino a quando i freni non siano regolati correttamente 3 6 Regolazione dei poggiapiedi 3 6 1 Lunghezza dei poggiapiedi L ATTENZIONE rischio di danni Evitare che i poggiapiedi siano a contatto con il suolo Tenere una distanza minima di 60 mm dal suolo Regolare la lunghezza dei poggiapiedi nel modo seguente 1 Rimuovere la vite sul retro dei poggiapiedi 2 Regolare i poggiapie...

Page 111: ...della carrozzina in altezza e in profondità L altezza del poggiabraccia è regolabile in tre posizioni Altezza del poggiabraccia rispetto al sedile Numero di blocchi sotto il tubo Numero di blocchi tra il tubo e i braccioli 220 mm standard 2 1 230 mm 1 2 240 mm 0 3 Tabella 5 Altezza del poggiabraccia La profondità del bracciolo è regolabile in tre posizioni Profondità del bracciolo Fori utilizzati ...

Page 112: ...one della profondità 3 8 Regolazione della stabilità e della manovrabilità È possibile regolare la stabilità e la manovrabilità spostando la piastra dell asse delle ruote posteriori Regolare la stabilità e la manovrabilità rispettando la procedura che segue 1 Allentare i bulloni della piastra dell asse 2 Spostare la piastra dell asse nella posizione desiderata 3 Serrare nuovamente i bulloni 4 Manu...

Page 113: ...a y desde la silla de ruedas 10 2 8 Posición correcta en la silla de ruedas 11 2 9 Conducción de la silla de ruedas 11 2 10 Desplazamiento por pendientes 11 2 11 Franqueo de peldaños y bordillos 12 2 12 Plegado de la silla de ruedas 13 2 13 Extracción de las ruedas 13 2 14 Transporte en coche 14 2 15 Uso de la silla de ruedas como asiento en un vehículo de motor 14 3 Instalación y ajuste 16 3 1 He...

Page 114: ... su silla de ruedas dependerá en gran medida de los cuidados y el mantenimiento que le dedique Este manual le permitirá familiarizarse con el funcionamiento de su silla de ruedas El seguimiento de las instrucciones para el usuario y de las instrucciones de mantenimiento son parte indispensable de la garantía Este manual incluye las mejoras de producto más recientes Vermeiren se reserva el derecho ...

Page 115: ...eso máx 130 kg el estado físico y psicológico las características de la vivienda el entorno Utilice la silla de ruedas únicamente en superficies que permitan que las cuatro ruedas estén en contacto con el suelo y donde haya suficiente contacto para propulsar las ruedas por igual Es necesario que practique para poder desplazarse por superficies irregulares adoquines etc pendientes curvas y para sup...

Page 116: ...stándar Estabilidad estática lateral 18 con la configuración estándar Superación de obstáculos 60 mm Ángulo plano del asiento 0 10 Profundidad útil del asiento 440 mm 520 mm Altura de la superficie del asiento en la parte delantera 440 mm 530 mm Ángulo del respaldo 5 Altura del respaldo 420 mm Distancia entre reposapiés y asiento 330 mm 500 mm Ángulo entre asiento y paleta 5 25 Ángulo entre el asi...

Page 117: ...0 10 Profundidad útil del asiento 440 mm 520 mm Altura de la superficie del asiento en la parte delantera 440 mm 530 mm Ángulo del respaldo 5 Altura del respaldo 420 mm Distancia entre reposapiés y asiento 330 mm 500 mm Ángulo entre asiento y paleta 5 25 Ángulo entre el asiento y el reposapiernas 105 Ángulo entre el reposapiernas y la paleta 80 Distancia entre reposabrazos y asiento 220 mm 240 mm ...

Page 118: ...ma 1 Reposabrazos 2 Soportes de reposabrazos 3 Reposapiés 4 Frenos 5 Ruedas de dirección ruedas delanteras 6 Ruedas de tracción ruedas traseras 7 Asiento 8 Respaldo 9 Tapón del extremo 10 Cruceta 11 Empuñaduras 1 4 Accesorios La V300 V300D cuenta con los siguientes accesorios Cinturón pélvico anterior B20 para su montaje en los tubos de la parte trasera consulte el manual Dispositivo antivuelcos B...

Page 119: ...tada por su distribuidor especializado Las instrucciones dirigidas al distribuidor especializado con respecto al montaje de la silla de ruedas se encuentran en el capítulo 3 2 1 Transporte de la silla de ruedas La mejor forma de transportar la silla es empujarla y utilizar las ruedas Si no es posible porque haya que levantar las ruedas traseras para cargarla en un coche por ejemplo cójala por el a...

Page 120: ...osapiés en posición vertical por la parte externa del chasis de la silla de ruedas e inserte el capuchón del tubo en el chasis 2 Gire el reposapiés hacia el interior hasta que encaje en su posición con un clic 3 Gire la base del estribo hacia abajo Para retirar los reposapiés 1 Tire del asa 2 Gire el reposapiés hacia la parte exterior de la silla de ruedas hasta que se afloje de la guía 3 Saque el...

Page 121: ...sión de la rueda que haya soltado 3 Tire de la palanca del segundo freno hacia atrás 2 6 Montaje y desmontaje de los soportes de brazos Los reposabrazos de la silla de ruedas pueden montaje con las instrucciones siguientes L ATENCIÓN Riesgo de que los dedos queden atrapados mantenga los dedos las hebillas y la ropa alejados de la parte inferior del reposabrazos 1 Monte el tubo posterior del reposa...

Page 122: ...lizar el traslado de forma segura pida a alguien que le ayude L ATENCIÓN Riesgo de volcar la silla de ruedas no se apoye en las bases de los estribos 1 Coloque la silla de ruedas lo más cerca posible de la silla sillón o cama a de la cual desea trasladarse 2 Compruebe que ambos frenos de la silla de ruedas están accionados 3 Pliegue las bases de los estribos hacia arriba para evitar apoyarse en el...

Page 123: ...e los frenos 2 Sujete los dos aros de propulsión por la parte superior 3 Inclínese hacia delante y empuje los aros de propulsión hacia delante hasta que los brazos queden estirados 4 Doble los brazos hacia atrás hacia la parte superior de los aros de propulsión y repita el movimiento 2 10 Desplazamiento por pendientes L ADVERTENCIA Controle su velocidad desplácese por las pendientes con la mayor l...

Page 124: ... ruedas de forma que las ruedas traseras queden orientadas al bordillo 2 Inclínese hacia delante para desplazar su centro de gravedad hacia delante 3 Desplace la silla de ruedas cerca del bordillo 4 Use el aro de propulsión para hacer rodar la silla de ruedas desde el bordillo de manera controlada 2 11 2 Subir peldaños y bordillos Para subir peldaños y bordillos con la ayuda de un acompañante haga...

Page 125: ... reposapiés 2 Un acompañante inclina la silla de ruedas ligeramente hacia atrás 3 El segundo acompañante sujeta la parte frontal del chasis 4 Mantenga la calma evite los movimientos bruscos y mantenga los brazos dentro de la silla de ruedas 5 Para desplazarse por las escaleras utilice las ruedas traseras de la silla 6 Vuelva a montar los reposapiés después de desplazarse las escaleras 2 12 Plegado...

Page 126: ...co de la silla de ruedas solo no es adecuado para un cinturón de sujeción del ocupante La silla se prueba mediante el sistema de cinturón de cuatro puntos y un sistema de restricción para los ocupantes de 3 puntos Siempre que sea posible utilice el asiento del vehículo y guarde la silla en la zona de carga Medidas de seguridad para la silla en un vehículo 1 Compruebe que el vehículo está equipado ...

Page 127: ...e los cinturones de sujeción del ocupante de acuerdo a las instrucciones del fabricante del sistema de correas 4 Lleve el cinturón pélvico bajo a través de la parte delantera de la pelvis de tal modo que el ángulo del cinturón pélvico está dentro de la zona preferencial de 30º a 75º respecto al horizontal similar a lo mostrado abajo 5 Un ángulo más pronunciado mayor dentro de la zona preferente es...

Page 128: ...ar ajustes en la silla puede variar su estabilidad inclinaciones hacia atrás o hacia los lados 3 1 Herramientas Para montar la silla de ruedas necesita las siguientes herramientas Juego de llaves inglesas del 7 al 22 Juego de llaves Allen del 3 al 8 Destornilladores del número 4 y 5 Destornillador con cabeza Phillips 3 2 Forma de suministro La silla Vermeiren V300 V300D se entrega con 1 chasis con...

Page 129: ...s En la siguiente tabla se detallan las diferentes alturas del asiento para un ángulo de asiento estándar de 5 Altura del asiento Ruedas traseras Ruedas delanteras Orificio Orificio Casquillo Ⓑ correspondiente al alojamiento de la varilla de rueda guía Ⓒ 440 mm Encima 470 mm Debajo 500 mm Estándar Debajo 530 mm Debajo Tabla 3 Altura de asientos para ángulo de asiento de 5 Rueda delantera Placa eje...

Page 130: ... pero sin dejar espacio para que haya juego 9 Monte las ruedas traseras 10 Si se han montado correctamente los ejes pivotantes de las ruedas delanteras deben estar perpendiculares al suelo Verifíquelo 11 Ajuste los frenos conforme a lo indicado en el apartado 3 5 Para las demás combinaciones de ángulo y altura del asiento siga el procedimiento anterior para ajustar la horquilla y la placa eje en l...

Page 131: ... mm Orificio 1 y 3 Posición 3 Tabla 4 Profundidad del asiento La profundidad del asiento se modifica mediante la cruceta siguiendo los pasos siguientes 1 Retire los dos clips 2 Desplace la cruceta a la posición deseada véase la tabla 4 3 Vuelva a colocar los dos clips La profundidad del asiento se modifica mediante la pieza de unión del respaldo siguiendo los pasos siguientes 1 Extraiga los tornil...

Page 132: ...anteriores hasta que los frenos estén correctamente ajustados 3 6 Ajuste de los reposapiés 3 6 1 Longitud de los reposapiés L ATENCIÓN Riesgo de desperfectos evite que los reposapiés entren en contacto con el suelo Mantenga una distancia mínima de 60 mm por encima del suelo Regule la longitud del reposapiés como se indica a continuación 1 Retire el tornillo de la parte posterior del reposapiés 2 A...

Page 133: ...tarse en altura y profundidad La altura del reposabrazos puede regularse en 3 posiciones Altura del reposabrazos al asiento Número de bloques bajo el tubo Número de bloques entre el tubo y el reposabrazos 220 mm estándar 2 1 230 mm 1 2 240 mm 0 3 Tabla 5 Altura del reposabrazos La profundidad del reposabrazos puede regularse en 3 posiciones Profundidad del reposabrazos Orificios utilizados Posició...

Page 134: ...ientes según el ajuste de profundidad 3 8 Ajuste de la estabilidad y la maniobrabilidad La estabilidad y la maniobrabilidad pueden ajustarse moviendo la placa eje de las ruedas traseras Ajuste la estabilidad y la maniobrabilidad de acuerdo con los pasos siguientes 1 Afloje los tornillos de la placa eje 2 Desplace la placa eje a la posición deseada 3 Vuelva a apretar los tornillos 4 Mantenimiento P...

Page 135: ...idzkiego 10 2 8 Prawidłowa pozycja w wózku inwalidzkim 11 2 9 Jazda na wózku inwalidzkim 11 2 10 Poruszanie się po powierzchniach pochyłych 11 2 11 Pokonywanie progów lub krawężników 12 2 12 Składanie wózka inwalidzkiego 13 2 13 Zdejmowanie kół 13 2 14 Transport wsamochodzie 14 2 15 Korzystanie z wózka inwalidzkiego jako siedzenie w pojazdach silnikowych 14 3 Montaż i regulacja 16 3 1 Narzędzia 16...

Page 136: ...trwałość wózka inwalidzkiego wynosząca 8 lat zależy w dużej mierze od odpowiedniej konserwacji i dbałości o jego stan Niniejsza instrukcja pomoże Państwu zapoznać się z obsługą wózka Postępowanie zgodnie z instrukcją użytkownika oraz instrukcją konserwacji stanowi zasadniczy warunek gwarancji Niniejsza instrukcja obsługi odzwierciedla aktualny stan produktu Firma Vermeiren zastrzega sobie jednak p...

Page 137: ...yczny i psychiczny warunki mieszkaniowe otoczenie muszą zostać wzięte pod uwagę Z wózka inwalidzkiego należy korzystać wyłącznie na powierzchniach na których wszystkie cztery koła dotykają podłoża oraz kontakt jest wystarczający aby odpowiednio napędzać koła Należy przećwiczyć pokonywanie przeszkód np krawężników oraz korzystanie z wózka na nierównych powierzchniach kostkach brukowych itp pochyłoś...

Page 138: ... Stabilność statyczna w poprzek 18 w konfiguracji standardowej Zdolność do wspięcia na przeszkodę 60 mm Kąt nachylenia siedziska 0 10 Głębokość użytkowa siedziska 440 mm 520 mm Wysokość przedniej krawędzi siedziska 440 mm 530 mm Kąt nachylenia oparcia 5 Wysokość oparcia 420 mm Odległość siedziska od podnóżka 330 mm 500 mm Kąt pomiędzy siedziskiem a płyta podnóżka 5 25 Kąt pomiędzy siedziskiem a po...

Page 139: ...achylenia siedziska 0 10 Głębokość użytkowa siedziska 440 mm 520 mm Wysokość przedniej krawędzi siedziska 440 mm 530 mm Kąt nachylenia oparcia 5 Wysokość oparcia 420 mm Odległość siedziska od podnóżka 330 mm 500 mm Kąt pomiędzy siedziskiem a płyta podnóżka 5 25 Kąt pomiędzy siedziskiem a podnóżkiem 105 Kąt pomiędzy podnóżkiem a płyta podnóżka 80 Odległość siedziska od podłokietnika 220 mm 240 mm P...

Page 140: ...łon 1 3 Rysunek 1 Podłokietniki 2 Oparcia na dłonie 3 Podnóżki 4 Hamulce 5 Koła skrętne przednie 6 Koła napędowe tylnie 7 Siedzisko 8 Oparcie 9 Zaślepka 10 Krzyżak 11 Uchwyty 1 4 Akcesoria Dla modelu V300 V300D dostępne są następujące akcesoria Pas stabilizujący miednicę od przodu B20 do zamocowania na rurach z tyłu wózka patrz instrukcja Urządzenie zapobiegające przewróceniu wózka B78 do zamocowa...

Page 141: ...żeniu przez wyspecjalizowanego sprzedawcę Instrukcje montażu wózka przeznaczone dla wyspecjalizowanego sprzedawcy zawiera 3 2 1 Przenoszenie wózka inwalidzkiego Najlepszym sposobem przenoszenia wózka inwalidzkiego jest prowadzenie go z wykorzystaniem jego kół Jeśli nie jest to możliwe np w przypadku demontażu tylnych kół w celach transportu wózka w samochodzie należy mocno chwycić wózek za ramę z ...

Page 142: ...tować podnóżki 1 Przytrzymaj podnóżek w poprzek po zewnętrznej stronie ramy wózka inwalidzkiego i zamontuj rurkę w ramie 2 Obróć podnóżek do wewnątrz aż wskoczy na miejsce 3 Obróć płytę podnóżka w dół Aby zdemontować podnóżki 1 Pociągnij za uchwyt 2 Obróć podnóżek na zewnątrz wózka inwalidzkiego aż do jego zwolnienia z szyny 3 Wyciągnij rurkę podnóżka z ramy 2 5 Obsługa hamulców L OSTRZEŻENIE Hamu...

Page 143: ...wolnij jeden hamulec pociągając dźwignię w tył 2 Przytrzymaj dłonią obręcz zwolnionego koła 3 Zwolnij drugi hamulec pociągając dźwignię w tył 2 6 Montaż i demontaż podłokietników Podłokietniki wózka inwalidzkiego można montaż zgodnie z instrukcją L PRZESTROGA Ryzyko przytrzaśnięcia trzymaj palce zapięcia i odzież z dala od spodniej części podłokietnika 1 Zamontuj tylną rurkę podłokietnika w ramie ...

Page 144: ... bezpiecznie wsiąść lub zsiąść z wózka inwalidzkiego należy poprosić kogoś o pomoc L PRZESTROGA Ryzyko przewrócenia wózka nie wolno stawać na płytach podnóżka 1 Ustaw wózek jak najbliżej krzesła kanapy lub łóżka na z którego przenosi się użytkownik 2 Upewnij się że oba hamulce wózka inwalidzkiego są zaciągnięte 3 Odchyl płyty podnóżka w górę uniemożliwiając stanięcie na nich 4 Jeśli przemieszczani...

Page 145: ...y otoczenia 1 Zwolnij hamulce 2 Uchwyć obie obręcze w najwyższych punktach 3 Pochyl się w przód i popchnij obręcze do przodu aż do wyprostowania rąk 4 Luźno odchyl ręce do tyłu aż do górnych krawędzi obręczy i powtórz ruch 2 10 Poruszanie się po powierzchniach pochyłych L OSTRZEŻENIE Ogranicz prędkość na powierzchniach pochyłych poruszaj się jak najwolniej L OSTRZEŻENIE Weź pod uwagę możliwości op...

Page 146: ...żytkownik może samodzielnie pokonywać wyższe krawężniki Najłatwiej tego dokonać poruszając się do tyłu 1 Obróć wózek inwalidzki zwracając go tylnymi kołami w stronę krawężnika 2 Pochyl się w przód aby przesunąć środek ciężkości do przodu 3 Zbliż wózek do krawędzi krawężnika 4 Przy użyciu obręczy w kontrolowany sposób zsuń wózek z krawężnika 2 11 2 Wjazd na progi lub krawężniki Aby wjechać na próg ...

Page 147: ...wywrócenia zawsze pokonuj schody z pomocą 2 opiekunów 1 Wymontuj podnóżki 2 Jeden z opiekunów musi nieznacznie odchylić wózek w tył 3 Drugi opiekun łapie za przód ramy wózka 4 Zachowaj spokój unikaj nagłych ruchów i trzymaj ręce wewnątrz wózka inwalidzkiego 5 Pokonuj schody na tylnych kołach wózka 6 Po pokonaniu schodów ponownie zamontuj podnóżki 2 12 Składanie wózka inwalidzkiego L PRZESTROGA Moż...

Page 148: ...STRZEŻENIE Sam pas biodrowy nie nadaje się jako pas zabezpieczający pasażerów Wózek inwalidzki jest przetestowany przy użyciu czterech punktów mocujących i z 3 punktowym system mocowania pasażera Gdy jest to możliwe należy użyć siedzeń pojazdu a wózek przewozić w przestrzeni ładunkowej pojazdu Czynności aby zabezpieczyć wózek w pojeździe 1 Sprawdź czy pojazd jest wyposażony w odpowiedni system prz...

Page 149: ...eństwa użytkownikowi wózka inwalidzkiego 1 Wyjmij oba podłokietniki 2 Jeśli występuje dołącz wózka pas biodrowy 3 Dołącz pasy zabezpieczające pasażera zgodnie z instrukcją producenta pasów 4 Pas biodrowy powinien być tak zamontowany aby kąt pasa znajdował się w strefie 30 do 75 do poziomu tak jak pokazano poniżej 5 Preferowany jest większy kąt zapięcia 6 Dostosuj naciąg pasa ściśle według instrukc...

Page 150: ...esów opisanych w niniejszej instrukcji L OSTRZEŻENIE Modyfikacja w ramach dopuszczalnego stopnia regulacji może prowadzić do zmiany stabilności wózka inwalidzkiego może powodować przechylenie w tył lub na bok 3 1 Narzędzia Do regulacji ustawień wózka inwalidzkiego wymagane są następujące narzędzia Zestaw kluczy nr 7 22 Zestaw kluczy imbusowych nr 3 8 Wkrętak nr 4 5 Wkrętak krzyżakowy 3 2 Sposób do...

Page 151: ... konfiguracja przednich i tylnich kół Poniżej przedstawiono poszczególne wysokości siedziska dla standardowego kąta nachylenia 5 Wysokość siedziska Tylne koła Przednie koła Otwór Otwór Tuleja Ⓑ względem obudowy nóżki kółka Ⓒ 440 mm Nad 470 mm Pod 500 mm Standard Pod 530 mm Pod Tabela 3 Wysokości siedziska przy kącie nachylenia 5 Przednie koło Płyta osi tylnich kół Wysokość siedziska 440 mm Wysokoś...

Page 152: ... ruchy 9 Zamontuj tylne koła 10 Jeśli ośki skrętne przednich kół są zamontowane prawidłowo to będą ułożone prostopadle do podłoża Upewnij się że tak jest 11 Wyreguluj hamulce zgodnie z 3 5 W przypadku innych kombinacji kąta nachylenia i wysokości siedziska można skorzystać z powyższej procedury aby odpowiednio ustawić przednie widełki i płytę osi Jeśli występują trudności ze znalezieniem odpowiedn...

Page 153: ...ory 1 i 3 Pozycja 2 480 mm Otwory 2 i 4 Pozycja 2 520 mm Otwory 1 i 3 Pozycja 3 Tabela 4 Głębokość siedziska Aby zmienić głębokość siedziska przy użyciu krzyżaka 1 Usuń oba zaciski 2 Ustaw krzyżak w żądanej pozycji patrz Tabela 4 3 Załóż oba zaciski Aby zmienić głębokość siedziska przy użyciu złącza oparcia 1 Wykręć śruby 2 Przesuń złącze oparcia do żądanej pozycji patrz Tabela 4 3 Dokręć śruby 4 ...

Page 154: ...lców 7 W razie potrzeby powtórz powyższe czynności aż do poprawnego wyregulowania hamulców 3 6 Regulacja podnóżków 3 6 1 Długość podnóżków L PRZESTROGA Ryzyko uszkodzenia należy unikać kontaktu podnóżków z podłożem Zachowaj minimalny odstęp 60 mm 2 36 cala od podłoża Aby wyregulować długość podnóżków 1 Wykręć śrubę na tyle podnóżków 2 Ustaw podnóżki na wygodną długość 3 Odpowiednio dokręć śrubę 3 ...

Page 155: ...tników wózka inwalidzkiego Wysokość podłokietników można ustawić w 3 pozycjach Wysokość podłokietnika względem siedziska Liczba bloczków pod rurką Liczba bloczków pomiędzy rurką i podłokietnikiem 220 mm Standard 2 1 230 mm 1 2 240 mm 0 3 Tabela 5 Wysokość podłokietnika Głębokość podłokietników można ustawić w 3 pozycjach Głębokość podłokietnika Wykorzystane otwory Pozycja przednia Tylny i środkowy...

Page 156: ...powiednich otworach aby dostosować głębokość 3 8 Regulacja stabilności i manewrowości Stabilność i manewrowość wózka można wyregulować przesuwając płytę osi tylnich kół Aby wyregulować stabilność i manewrowość 1 Poluzuj śruby płyty osi 2 Ustaw płytę osi w żądanej pozycji 3 Dokręć śruby 4 Konserwacja Instrukcje dotyczące konserwacji wózka inwalidzkiego znajdziesz na stronie internetowej firmy Verme...

Page 157: ...l vostro distributore di fiducia che presentera al produttore il tagliando RISERVE Questa garanzia non potra essere applicata nei seguenti casi danno dovuto al cattivo ed improprio utilizzo della carrozzina danno subito durante il trasporto incidente o caduta smontaggio modifica o riparazione effettuate in proprio usura abituale della carrozzina invio del tagliando di garanzia con la data di acqui...

Page 158: ...o en nuestra página web http www vermeiren be registration à renvoyer dans les 8 jours après achat ou régistrer votre produit sur notre site http www vermeiren be registration please return within 8 days of date of purchase or register your product at our website http www vermeiren be registration zurückschicken innerhalb von 8 Tagen nach kauf oder registrieren Sie Ihr Produkt auf unserer website ...

Page 159: ... Timbro del rivenditore Sello del distribuidor Dealerzy pieczęć Date Datum Data Fecha Dealer s stamp Cachet du revendeur Stempel van de handelaar Händlerstempel Timbro del rivenditore Sello del distribuidor Dealerzy pieczęć Date Datum Data Fecha Dealer s stamp Cachet du revendeur Stempel van de handelaar Händlerstempel Timbro del rivenditore Sello del distribuidor Dealerzy pieczęć Date Datum Data ...

Page 160: ...le Industrie 5 I 20020 Arese MI Tel 39 02 99 77 07 Fax 39 02 93 58 56 17 website www vermeiren it e mail info vermeiren it Hühnerhubelstraße 59 CH 3123 Belp Tel 41 0 31 818 40 95 Fax 41 0 31 818 40 98 website www vermeiren ch e mail info vermeiren ch Poland Spain Portugal Vermeiren Polska Sp z o o Vermeiren Iberica S L ul Łączna 1 PL 55 100 Trzebnica Tel 48 0 71 387 42 00 Fax 48 0 71 387 05 74 web...

Reviews: