background image

13

Merrimack Large Insert

30004671

Maintenance

keep your Merrimack Large Insert 

Looking New and working Its best

care of the cast Iron Surface

An occasional dusting with a dry rag will keep the 

painted cast iron of your Merrimack Large Insert looking 

new.  
If the paint needs retouching, first allow the surface to 

cool completely. Mask glass, trim parts and enamelled 

areas. Wire-brush those areas to be painted.   Touch-up 

with high temperature stove paint available from your 

local dealer. Apply the paint sparingly. Two light coats 

are better than one heavy one.

care of the porcelain enamel Surface

Use a soft brush as necessary. Do not use water or 

other liquids on your Merrimack Large Insert. Finger-

prints usually can be buffed off porcelain enamel with 

a dry, soft cloth. If marks remain, allow the Merrimack 

Large Insert to cool completely, then buff with a slightly 

damp, soft cloth. Dry completely before starting a fire to 

avoid streaking.
Never use abrasives or harsh chemical cleaners on 

the porcelain enamel finish; the enamel may scratch 

and expose the cast iron, which can then stain or 

rust.  If you must remove spills or stains from porcelain 

surfaces, make sure the fire is out and the Merrimack 

Large Insert has cooled completely before cleaning.  

Use a kitchen appliance cleaner and/or polish specifi-

cally formulated for enamel surfaces.  Apply the cleaner 

sparingly with a soft cloth, and buff away all traces.

cleaning the glass 

The Merrimack Large Insert glass system requires a 

minimum amount of cleaning. Most carbon deposits 

that accumulate will burn off during hot fires.
Ash residue that accumulates on the glass should be 

removed periodically to prevent etching. To clean the 

glass, use the following procedure.

  Be sure the glass is completely cool.

  Cleaning with water will work in most cases.  Use 

a glass cleaner especially made for this purpose 

only if deposits are specially heavy.  (If heavy 

deposits are a frequent occurrence, however, 

evaluate your operating techniques.)  Do not use 

abrasive cleaners.

  Rinse the glass thoroughly.

  Dry the glass completely.

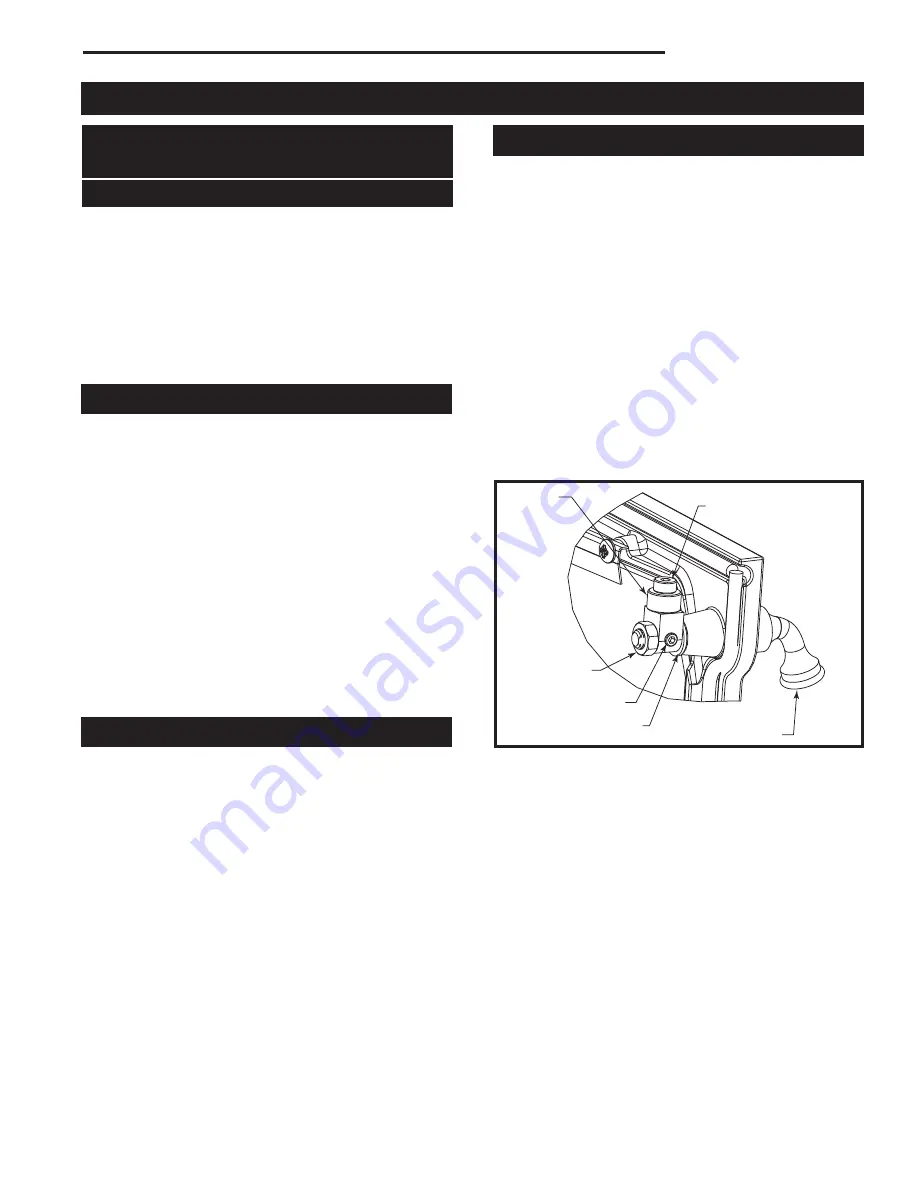
adjust the Door Latch periodically

The front door of the Merrimack Large Insert should 

close securely to prevent accidental opening and 

should close tightly to prevent air from leaking into the 

fire chamber. The door handle will be positioned verti-

cally when the door is closed.
Over a period of time, the gasket around the door will 

compress and the latch may need adjustment.  To ad-

just the handle, follow this procedure:  
1.  Remove and retain the lock nut with a 9/16” wrench. 

(Fig. 13)

.  Loosen the set screw with a 1/8” Allen wrench.
3.  Rotate the pawl 180°. Replace the lock nut. Tighten 

the set screw.

4.  Additional adjustment can be made by removing the 

flat washer. Or any combination of washer removal 

and/or pawl rotation. 

Test the door seal. Close the door on a dollar bill and 

attempt to pull it free. If the bill is freed with little re-

sistance, the gasket isn’t snug enough at that spot.  

Continue to make small adjustments until the setting is 

right.
If additional adjusting of the latch does not enable the 

door to seal sufficiently in one area, try “adjusting” the 

gasket in that area. Pack more cement or a smaller 

diameter gasket into the channel beneath the gasket so 

the main gasket is raised and makes contact with the 

door frame. If this procedure doesn’t solve the problem, 

replace the gasket. Instructions for gasket replacement 

are given later in this section.

ST1154
door pawl

Roller

Lock Nut

Set Screw

Shoulder Screw

Handle Stub

ST1154

Fig. 13

  Rotate pawl and/or remove flat washer to adjust 

latch.

Flat Washer

Summary of Contents for Merrimack

Page 1: ...roperty damage bodily injury or even death Contact local building officials about restrictions and installation inspection requirements in your area Homeowner s Installation and Operating Manual Nous recommandons que nos appareils de chauffage au bois soient installés et entretenus apr des professionnels qui ont été accrédités aux É U par le National Fireplace Institute NFI comme étant des spécial...

Page 2: ...traditional masonry fireplace into a powerful heater You can count on years of comfortable heating and pleasurable fire viewing if you operate and maintain it according to the directions in this Owner s Guide This Insert has been tested and listed by OMNI Test Laboratories of Portland Oregon to ANSI UL 1482 for the United States and ULC S628 for Canada This Insert is listed to and in compliance wi...

Page 3: ...s operated and the type and moisture content of the fuel used The figure shown is based on maximum fuel con sumption obtained under laboratory conditions and with average efficiencies These values are based on operation in building code conforming homes under typical winter climate conditions in New England If your home is of nonstan dard construction e g unusually well insulated not in sulated bu...

Page 4: ...iffer for the U S and Canada Specifications for each are listed below Connect the insert to the chimney in accordance with local codes and the requirements of the listing agency as specified in this manual Chimney Height U S and Canada Chimney height should be no less than 15 4 5 m above the hearth and no more than 35 10 5 m The chimney should extend at least 3 914 mm above the highest point where...

Page 5: ... be installed from the insert to the chimney top and securely attached to both The damper may be removed to accommo date the liner The opening of the fireplace around the insert must be sealed to prevent room air passing to the fireplace cavity Existing air circulation chambers in a fireplace with a steel liner may not be blocked Provision must be made for removal of the insert to clean the chimne...

Page 6: ...e trim extends more than 1 38 mm from the fire place facing the side clearance must be no less than 31Z v 794 mm this is also the required side wall clearance Measure the side clearance C from the exact center of your fire place opening on the hearth X Measure the top trim B and or mantel clearances A from the finished hearth surface Measure the front clearance to furnishings etc from the fireplac...

Page 7: ...e a floor protector that satisfies the above requirements In all cases the hearth must be completely noncombustible in front of the insert to the dimensions shown The hearth must also be 1Z x thick with k factor of 0 84 In the US if the insert is elevated 2Z x 64 mm or more no ther mal or ember protection is necessary beyond 16 406 mm R x T 1 K x 12 r ft2 hr F Btu in 1 k Btu ft ft2 hr F K k K x 12...

Page 8: ...he same method Install the connector pipe or liner so that the height measured from the finished hearth surface to the center bar of the flue collar is 20Z x 521 mm Fig 7 This will allow an easy connection once the stove is rolled into place 4 Route the blower power cord Run the power cord out the left or right side of the insert Remove the two 2 louvre doors Fig 9 or access doors Remove the screw...

Page 9: ... Your Insert s Controls and What They Do All Merrimack Large Insert controls are conveniently lo cated on the front Fig 9 ThreecontrolsregulatetheperformanceofyourMerrimack Large Insert The primary air control supplies oxygen for the fire The variable speed fan control or rheostat regulates the warm air flow into the room An automatic setback control provides a high air setting of restarting or re...

Page 10: ... when freshly added wood does not ignite readily For maximum efficiency and performance the Merrimack insert should always have visible flames in newly added wood either within the fuel pile or near the roof of the firebox Wood moisture piece size draft weather and firebox temperature will all have an effect on how quickly flaming occurs The automatic setback air control is a convenient feature al...

Page 11: ...e drawn out of the fireplace opening creating risks of both fire and smoke Follow these guidelines as you start and maintain the fire and remove the ashes Prior to starting a fire with a cold stove it is recommended to clear the lower primary air hole located at the nose of the front brick To do this remove the andiron and lift out the front refractory brick Sweep any ash accumulation out of the a...

Page 12: ...can heat a given area A well insulated home located in a moderate climate and with the Merrimack Large Insert located centrally in an open floor plan will be easier to heat than a drafty home in the far north in which a Merrimack Large Insert is installed on an exterior wall at the end of a long house In Fireplace Insert installations over sized chimneys can produce less effective results than tho...

Page 13: ... glass use the following procedure Be sure the glass is completely cool Cleaning with water will work in most cases Use a glass cleaner especially made for this purpose only if deposits are specially heavy If heavy deposits are a frequent occurrence however evaluate your operating techniques Do not use abrasive cleaners Rinse the glass thoroughly Dry the glass completely Adjust the Door Latch Peri...

Page 14: ...eplaceable Merrimack Large Insert Fiberglass Gaskets Gasket Size And The Parts It Seals 3 8 1203564 Door to the front 5 6 3 8 30002422 Firebox parts 3 16 1203556 Glass to the door 5 2 To change a gasket wait until the fire is out and the stove has cooled Wear protective eyewear and a dust mask The procedure is the same for all gaskets 1 Remove the existing fiberglass gasket by grasping an end and ...

Page 15: ...ing season as part of a regular maintenance schedule To inspect the chimney let the Merrimack Large Insert cool completely Then using a strong light sight up through the flue collar into the chimney flue The fiber baffle will need to be removed gently to view inside the connector pipe If it is necessary to remove the firechamber to inspect or clean the chimney this is how to do it Let the Merrimac...

Page 16: ...ce damaged sections of prefabricated chimney Your local Vermont Castings dealer or a chimney sweep can help determine when replacement is necessary Thoroughly clean the chimney For parts and information about your insert contact your Vermont Castings authorized dealer For the name of the dealer nearest you contact MHSC 149 Cleveland Drive Paris KY 40361 800 668 5323 Optional Accessories In the eve...

Page 17: ...ice Front Bottom Refer to Enamel Chart Ref Description Part Number 17 Mantel Refer to Enamel Chart 18 Air Cover Plate 30004640 19 Collar Flue 30004317 20 Fan Kit Assy 30004669 20a Replacement Blower Only 30004412 20b Snapstat Wire Assy 30004406 20c Rheostat and Wire Assy 30004407 20d Power Cord 1601482 20e Snapstat 30005236 20f D Knob 1604419 21 Side Panel Left Refer to Enamel Chart 22 Side Panel ...

Page 18: ...ound 30004675 45 Cover Power Cord 30004379 46 Automatic Air Setback Assy 30004999 47 Bracket Mantel 30004679 48 Front Hinge TR BL 30004945 49 Front Hinge TL BR 30004950 50 Disk 30005050 51 Throttle Lever 30005051 52 Spring 30005052 53 Bracket Upper Lattice 30004676 54 Bracket Door Hinge 30004947 Merrimack Large Insert continued Ref Description Part Number 55 Glass Right IR coated 30004654 56 Glass...

Page 19: ...urning salt saturated wood chemically treated wood or any fuel not recommended in the Owners Guide 4 This warranty does not cover a stove repaired by someone other than a Vermont Castings Authorized Dealer 5 Damage to the unit while in transit is not covered by this warranty but is subject to a claim against the common carrier Contact Vermont Castings Autho rized Dealer from whom you purchased you...

Page 20: ...MHSC 149 Cleveland Drive Paris Kentucky 40361 www mhsc com ...

Reviews: