SSI30 Wood Insert
63D4004
11
INSTAllATION
uNpACkINg ANd INSTAllATION INSTRuC-
TIONS
NOTE:
The insert is extremely heavy. Do not attempt to
move it without assistance.
• Please read all instructions carefully before
beginning. To remove the insert from the pallet you
will need a 7/16" wrench or socket.
• If you are placing the insert on a raised hearth you
might consider moving the complete unit close to the
raised hearth to save some lifting later.
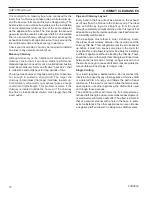
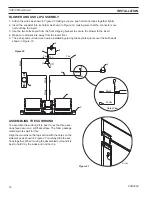
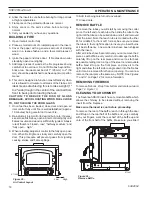
• Remove the two brackets on the front of the insert by
removing the four bolts (save the two bolts removed
from the front of the insert).
Figure 6
ST1067
remove brackets
Bracket
ST1067
Figure 6
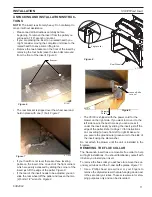
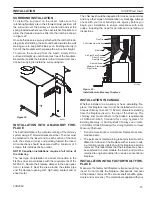
• The rear bracket is slipped over the wheel axel and
held in place with one (1) bolt.
Figure 7
ST1068
Rear bracket
Figure 7
ST1068
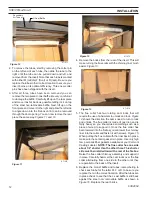
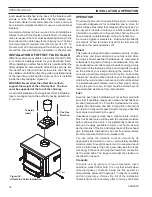
• If your hearth is not level there are three leveling
points on the insert. One on each of the front corners
which are easily accessed by sliding the corner of the
insert just off the edge of the pallet.
Figure 8
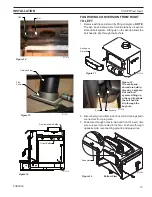
• If the rear of the insert needs to be adjusted you can
slide the rear wheel off the pallet and loosen the two
(2) bolts (1/2" wrench).
Figure 9
ST1069
leg leveller
Leg Leveller
Rear Wheel
ST1069
Figure 8
ST1070
rear leveller
Loosen Bolts
to Level
Shipping
Pallet
ST1070
Figure 9
• The VCI30 is shipped with the power cord for the
blower on the right side. If you want to move it to the
left side now is the best time as you can access it
under the insert easily by sliding the insert just off the
edge of the pallet. Refer to
Page 13
for instructions
on converting fan wire from left to right. Make sure
you secure the ground wire (green wire) to the side of
the insert using the star washer.
Do not attach the blower until the unit is installed in the
fireplace.
REMOvINg ThE FluE COllAR
The Savannah insert has a removable flue collar to help
with tight installations. You should familiarize yourself with
it before you install your insert.
To remove the flue collar you will have to remove the sec-
ondary air tubes and the C-cast baffle plates.
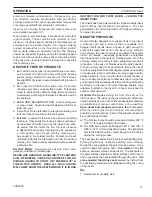
Figure 10
1. Use a Phillips head screw driver or your fingers to
remove the drywall screws that are hanging down next
to the secondary air tubes. These screws were for ship-
ping purposes only and can be discarded.


