background image

4.3 Power Controls, Cold Water Function

With the water level indicator showing the main tank full,

start operation by producing cold water first. Drain some water
from the cold tank through the dispensing spigot, to remove
entrapped air-you may have to do this several times. Then press
the “Cold Power” button on the front panel. The compressor will
start and water will start chilling.  

CAUTION: IF YOU TURN

COLD POWER OFF, WAIT AT LEAST 3-MINUTES
BEFORE TURNING IT ON AGAIN.

This is to protect the

compressor from being damaged. 

CAUTION: IF THE POWER IS UNPLUGGED WHILE OPERATING, WAIT

10-MINUTES AFTER THE POWER IS PLUGGED IN BEFORE PRESSING THE
COLD POWER BUTTON.

4.4 Hot Water Safety Lock

The HOT WATER FAUCET is supplied with a safety

lock. The red tab must first be lifted up then the lever under-
neath depressed to dispense hot water.

4.5 Dispensing

To obtain hot, warm or cold water, place cup or glass onto

cup base directly under desired water type. Press down release
lever for water to flow until cup or glass is full.

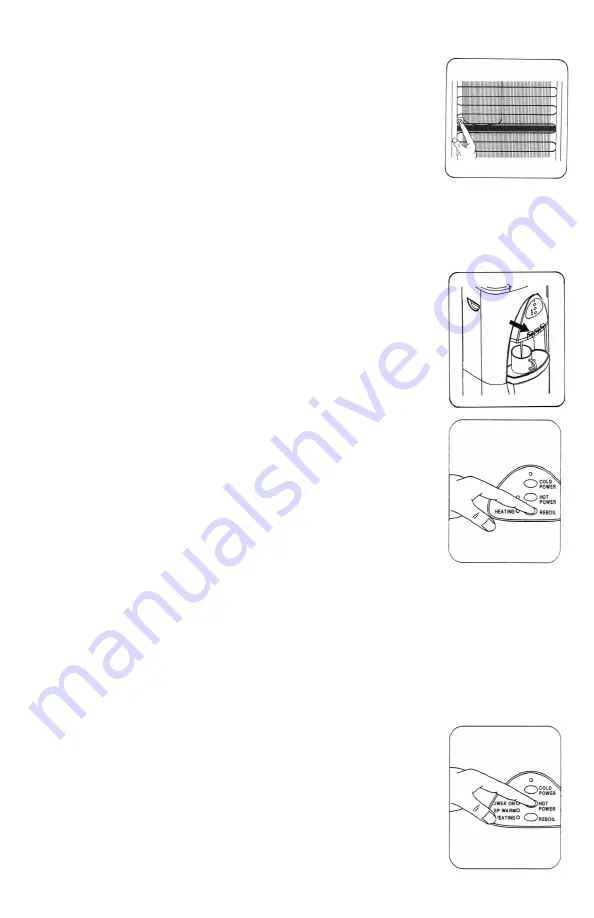
4.6 Hot Water Function

To activate hot water press the HOT POWER  button. CAUTION: MAKE SURE

THERE IS WATER IN THE HOT TANK AND IT CAN BE DISPENSED FROM THE
FAUCET BEFORE TURNING ON HOT POWER. Check by opening the hot water
spigot to see that water runs out of the spigot.

The POWER ON indicator will light up and heating starts automatically

Once water reaches set temperature the indicator lights on the control panel will

switch form “HEATING” to “KEEP WARM”.

The hot water tank refills and the water is re-heated  at varying

intervals automatically, ensuring a continuous supply of hot water.

When hotter water is needed (up to 212

˚

F) press the REBOIL

button. The REBOIL cycle will stop automatically two minutes
later and  the indicator lights will return to KEEP WARM.
(2000 Models only)

– 11 –

Summary of Contents for PureWaterCooler P WC-1 000

Page 1: ...X Water Products PureWaterCooler Water Dispenser OWNERS INSTALLATION MANUAL VERTEX WATER PRODUCTS Models PWC 600 2000 3500 3 Temp Room Hot Cold PWC 500 1000 1010 1500 1800 2 Temp Hot Cold Montclair CA...

Page 2: ...ff valve accessory be installed as well Vertex P N LC 8021 2 Water supply connection to coolers are to be made with the flexible plastic LDPE tubing If connecting a hard copper line to cooler connecti...

Page 3: ...pg 21 11 0 Specifications pg 22 12 0 Warranty pg 23 List of Figures Figure 1 Assembly Drawing Model PWC 2000 and PWC 3500 pg 4 Figure 2 Flow Schematic pg 5 Figure 3 Filter Schematic pg 5 Figure 4 Ins...

Page 4: ...cron filter and a 50 gal lon per day RO membrane The filters remove sediment and dirt and the taste and odor of chlorine and other contaminants The reverse osmosis stage removes mole cular contaminant...

Page 5: ...rom the mounting Inspect filter system to see that nothing is damaged or dis lodged from shipping 3 0 Description Model 2000 and 3500 3 1 Description The assembly drawing is shown in Figure 1 The Mode...

Page 6: ...r is converted into good tasting clean safe drinking water 4 Figure 1 Assembly Drawing PWC 2000 PWC 3500 COVER SNAP ON TOP COVER STEAM EXHAUST COVER HOT WATER TANK COVER HOT WATER TANK MAIN WATER TANK...

Page 7: ...e Water Level Control Main Water Tank Cold Tank Electric Heating Coil Inside Tank Check Valve Drain Water Spigots Purified Water Inlet from filters Hot Room Cold Figure 3 Filtration Schematic Front of...

Page 8: ...or kitchen sink Flexible 1 4 inch plastic tubing may be used for the feed and discharge connections Normally these connections should be with in 25 feet of the cooler 6 Do not touch STEAM HOLE or open...

Page 9: ...ions must be removed before making water connections To remove the tube sections see figure 7 Disconnect The 1 4 plastic tubing should be used for making the Feed Water and Drain connections If hard c...

Page 10: ...e hooked to the drain line ahead of the normal sink water trap See Figure 6 below Place the 2 part drain saddle on the drain pipe before the drain trap Allow proper space for the drilling operation Ti...

Page 11: ...shed into the tube stop Push the tube into the fitting to the tube stop The collet gripper has stain less steel teeth which hold the tube firmly in position while the O ring pro vides a permanent leak...

Page 12: ...ureWaterCooler Pull the cover off exposing the main tank cover Remove this cover to expose the inside of the main tank Plug in the power cord to115 volt wall socket to activate the solenoid shut off v...

Page 13: ...ressed to dispense hot water 4 5 Dispensing To obtain hot warm or cold water place cup or glass onto cup base directly under desired water type Press down release lever for water to flow until cup or...

Page 14: ...reverse osmosis R or standard filter F versions 5 2 Position Cooler Same procedure as for Model 2000 see3 2 5 3 Water Connections Fig 9 shows the back of the 1000 cooler which has the same water conne...

Page 15: ...with tube is on Check all connections to assure there are no leaks CAUTION DO NOT TURN ON HOT OR COLD POWER CON TROLS YET Remove the top cover of the PureWaterCooler by removing 2 screws from back of...

Page 16: ...th the filtered water When full drain water again through the drain ports located on the back as well as through the dis pensing spigots When the tank has filled again automatically with filtered wate...

Page 17: ...ribed In Section 3 0 It does not have space for the filter package there fore purified water must be supplied to it An optional filter for the back of the unit can be ordered as noted above 6 3 Model...

Page 18: ...t Tank Inner Lid of Cold Water Tank Key Lock Safety Button Cold Water Button Hot Water Button 2 Placing Cooler Same as for Model PWC 2000 see sec 3 2 Control Panel 3 Water Connections The figure at th...

Page 19: ...as well as through the dispensing spigot The dispense function will only work if the cooler is plugged in When the tank has filled again automatically with fil tered water the cooler is ready to disp...

Page 20: ...rvals to maintain the quality of the water The 1000F 1010F 2000F and 3500F versions have 2 stages of mechanical filtration A 1st stage 5 micron sediment filter and a 2nd stage activated carbon filter...

Page 21: ...of pliers remove the RO element from the housing by grasping the tube end and pulling it out e Use RO filter replacement P N ma 4203 50gpd TFC membrane Insert the element into the housing with double...

Page 22: ...ake sure that power cord is pulled out of socket 9 2 Remove the top cover hot water tank cover and the water outlet tube on main water tank Drain all remain ing water inside hot water tank and main wa...

Page 23: ...n this case send unit to local distributor for repair Heating cycle is more frequent than normal Too little water in hot water tank Refill main water tank Cold Water not cold enough The dispenser is p...

Page 24: ...0W Cold Water 100W 6Ft PWC 3000 AC110V L 16 x W 16 x H 42 52 lb 2 2 gal 8 gal 1 gal Hot Water 500W Cold Water 100W 6Ft Model No Voltage Frequency Dimensions Weight empty Hot Water Tank Capacity Cold W...

Page 25: ...AR LIMITED WARRANTY PERIOD Some states do not allow limitations on how long an implied warranty lasts so the above limitation may not apply to purchaser WHAT IS COVERED BY THIS WARRANTY This limited w...

Page 26: ...anty Manufacturer will provide parts to the Dealer at no charge labor is not included in this limited warranty The Dealer may in his or her sole and absolute discretion decide to repair the unit on si...

Page 27: ...VERTEX WATER PRODUCTS Montclair Calif PWCM 1 Rev B 1a 5 07 Copyright 2015 VERTEX Industrials Inc...

Reviews: