background image

2015/5/6V1.2+V1.1 

2.3. ADD SILICONE 


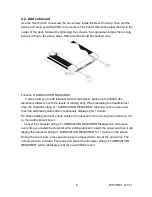
Time of add SILICONE 

When suggested time of adding SILICONE is achieved, please extend your hand to the 

center of the running board to make sure whether there is any SILICONE before adding. If 

no SILICONE on the running board, please add 30cc SILICONE to the running board. If 

there is still a little SILICONE, add 15cc SILICONE to the running board. 


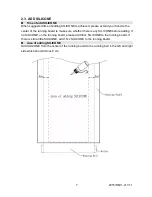
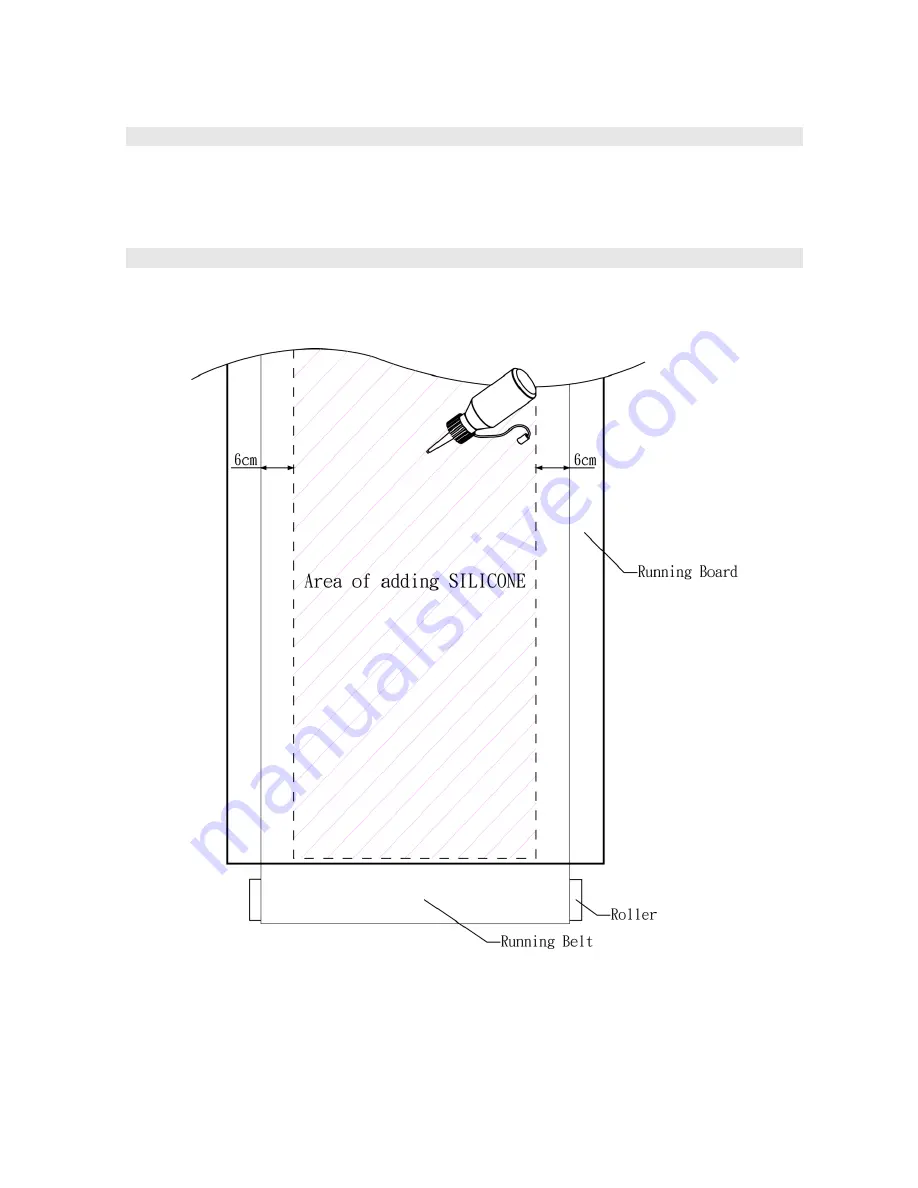
Area of adding SILICONE 

Add SILICONE from the center of the running board to the running belt 

’s the left and right 

side which should minus 6 cm. 


Summary of Contents for T22.1

Page 1: ...TREADMILL T22 1 OWNER S MANUAL...

Page 2: ...ower Switch 8 2 6 Running Belt Adjustment 9 3 Assembly Instructions 10 3 1 Pre Assembly Check List 10 3 2 Hardware Pack 11 3 3 Assembly Steps 12 4 COMPUTER OPERATION INSTRUCTION 15 4 1 Computer struct...

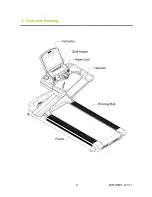
Page 3: ...2015 5 6V1 2 V1 1 2 1 Overview Drawing...

Page 4: ...rn the product to the service center of seller for examination and repair 5 Do not carry this product by the supply cord or use the cord as a handle 6 Keep the cord away from hot surfaces or ground 7...

Page 5: ...folded at the same time Required to confirm the device completely stopped before folding 21 the safety level of the equipment can be maintained only if it is examined regularly for damage and wear 22...

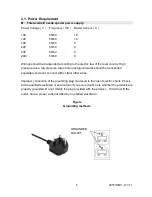
Page 6: ...res low pressure wires and underground wires should be transported separately and can t connect with or twist other wires Improper connection of the grounding plug can result in the risk of electric s...

Page 7: ...treadmill next time the character string of LUBRICATION REQUIRED will show on the screen and then into start ready status after continuously displaying for 1 minute Ps When adding lubricant check whe...

Page 8: ...oard to make sure whether there is any SILICONE before adding If no SILICONE on the running board please add 30cc SILICONE to the running board If there is still a little SILICONE add 15cc SILICONE to...

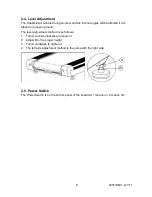
Page 9: ...laced on uneven ground The level adjustment method is as follows 1 Turn A counter clockwise to loosen it 2 Adjust B to the proper height 3 Turn A clockwise to tighten it 4 The left side adjustment met...

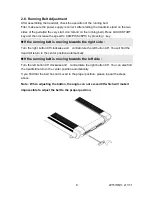
Page 10: ...towards the right side Turn the right button 90 clockwise and contrarotate the left button 90 You will find the treadmill return to the center position automatically If the running belt is moving tow...

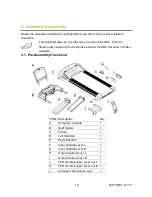
Page 11: ...er can wear the chest pulse belt and the HRC will show in Pulse windows 3 1 Pre Assembly Check List ITEM Description Qty A Computer Console 1 B Stuff Holder 1 C Frame 1 D Left Handrail 1 E Right Handr...

Page 12: ...hilips Screw M5xP0 8x12 4 d Screw 4x16 4 e Philips screw M5xP0 8x15 4 f Truss hex screw M8xP1 25x20 2 g Spring washer M8 2 h L hex wrench Philips Screwdriver 5mm 1 i L hex wrench 10mm 1 j L hex wrench...

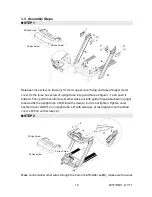
Page 13: ...ntrol wire other wires out with guide thread attached in upright tube and fix the upright tube L R D E with screw a but do not tighten Tighten outer handrail cover L R H I on upright tube L R with scr...

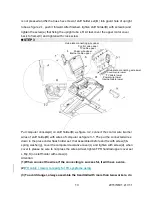
Page 14: ...down to the place under flask holder set that assembled before and fix with screw f spring washer g cover the computer decorative cover L and tighten with screw d when cover it please be sure to not p...

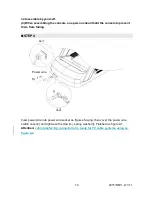
Page 15: ...nsole to prevent them from falling STEP 4 Inset power wire into power wire socket as figure showing then cover the power wire switch cover n and tighten with screw m spring washer I Finished as figure...

Page 16: ...et through the computer 4 1 Computer structure A WORKOUT PROFILE WINDOW It shows the change status of slope Cursor represents the percentage of inclination B MESSAGE CENTER Display the related informa...

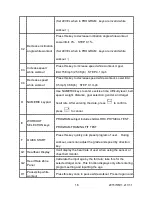
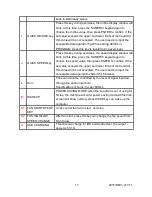
Page 17: ...difficulty level belt speed weight distance goal selection gender and target heart rate After entering the date press to confirm press to cancel E WORKOUT SELECTION keys PROGRAM subject includes GOAL...

Page 18: ...hoose the speed value then press ENTER to confirm If the set value exceeds the upper and lower limits of the treadmill this value will be not accepted The user needs to input the acceptable data again...

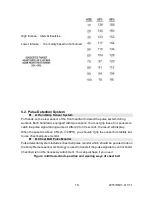
Page 19: ...ed heart rate range and conduct aerobics to improve cardiovascular Function On the right is the picture shows age and its corresponding heart beat times Heart rate exercise includes three modes Hill H...

Page 20: ...pulse signal during workout After 20 to 30 seconds the result will display When the speed is above 4 5mph 7 2KPH you shouldn t grip the sensor for stability but to use chest belt pulse monitor B Chest...

Page 21: ...belt and pull it out to wet directly When setting heart rate exercise user needs to set the start speed of the treadmill If system detects no chest belt pulse monitor the max speed is 4 5mph 7 2Km If...

Page 22: ...n heart rate goals in the program among which three goals are varied respectively being 70 75 and 80 The rest goals maintain 65 as the bottom limit See the following picture After three minutes standa...

Page 23: ...rate control program and the differences are firstly the heart rate goals are 80 of the maximum heart rate Target heart rate will be obtained based on user s information provided Secondly the maintai...

Page 24: ...rate sensor on the handler Set the program to determine the heart rate goal and choose the walk speed and jog speed After three minutes preparation warm up exercise the electronic meter of the runnin...

Page 25: ...r finishing the stipulated miles The program enters the cooling stage and the time of cooling relies on the test time If the test time is less than 5 minutes the cooling time is 1 minute if between 5...

Page 26: ...Therefore there is no prompt displayed to test the heart rate In the running period the user shall wear the breast belt sensor or grasp the heart rate sensor on the handler Warm up Gradually increase...

Page 27: ...adjust the speed to the default value FAT BURN The low intensity exercise program is mainly featured by burning the fat and makes the heart rate of the user keep at 65 HRmax namely the heart rate goal...

Page 28: ...the test process the user must wear the breast belt sensor or handle the sensor When the program is in the 5 incline for continuous five minutes the controller computer will immediately read the heart...

Page 29: ...beats per minute Body weight less than 75lbs 34 kg or greater than 400lbs 180 kg Age below 10 or over 99 years Data input exceeds human potential If you make an error when entering any Fit Test data y...

Page 30: ...40 49 30 2 30 2 33 5 33 6 38 9 39 0 43 7 43 8 48 0 48 0 50 59 26 1 26 1 30 9 31 0 35 7 35 8 40 9 41 0 45 3 45 3 60 20 5 20 5 26 0 26 1 32 2 32 3 36 4 36 5 44 2 44 2 Table Reference The Physical Fitne...

Page 31: ...switch is closed Turn on the power switch 2 The indicator light of power switch is not on Use the ammeter to inspect whether the socket is set with power supply Inspect whether the commercial power i...

Page 32: ...y converter E08 The frequency converter is grounded abnormally Replace the frequency converter E21 The frequency converter is in flash fault Replace the frequency converter E22 The frequency converter...

Page 33: ...frequency converter E0E The frequency converter is in braking fault Replace the braking resistance of frequency converter E29 The frequency converter displays high temperature Add lubricating oil in...

Page 34: ...1 2 V1 1 33 3 Press ENTER key and enter metric imperial modification screen after 2 sub seconds 4 Use SPEED key to convert metric imperial system 5 Press ENTER key and the 4th screen can return to sta...

Page 35: ...2015 5 6V1 2 V1 1 34...

Reviews: