Vertiv™ NetSure™ 512
NGBB
-48 VDC Power System User Manual
Proprietary and Confidential © 2022 Vertiv Group Corp.
38
Replacing a Distribution Panel in a List 7 Distribution Cabinet
DANGER!
All sources of AC and DC power must be completely disconnected from this power system before performing this
procedure. Use a voltmeter to verify no DC voltage is present on the system busbars before proceeding.
Procedure
NOTE!
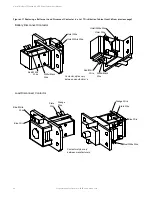
Refer to Figure 4.9 as this procedure is performed.
Removing the Distribution Panel
1.
Disconnect all system load, sub-system load, and battery wiring from the circuit breaker/fuse positions on the distribution
panel.
2.
Refer to “IB2 (Controller Interface Board) and EIB (Controller Extended Interface Board) Replacement in a List 7 or List 27
Distribution Cabinet” on page 34 and remove the IB2 and EIB assemblies.
3.
Remove access panel(s) as required to access the following connections.
4.
Refer to Figure 4.9 and locate the three position in-line alarm wiring connector. Separate the two halves of this connector.
5.
Refer to Figure 4.9 and remove the hardware securing the system load distribution device busbar to the panel.
6.
Refer to Figure 4.9 and remove the hardware securing the sub-system load distribution device busbar to the panel.
7.
Refer to Figure 4.9 and remove the hardware securing the battery disconnect device busbar to the panel.
8.
Refer to Figure 4.9 and remove the hardware securing the distribution panel to the distribution cabinet. Remove the
distribution panel from the distribution cabinet.
Installing the Distribution Panel
NOTE!
In the following procedure, before making busbar-to-busbar connections, apply a thin coating of electrical anti-
oxidizing compound to the mating surfaces of the busbars.
1.
Orient the replacement distribution panel into distribution cabinet, checking to ensure no wires are pinched. Replace the
hardware securing the distribution panel to the distribution cabinet (10-32 x 5/8” bolt, #10 flat washer, 4-places).
2.
Replace the hardware securing the system load distribution device busbar to the distribution panel (1/4-20 x 7/8” bolt, 1/4”
Belleville lock washer, 1/4” hardened flat washer, 2-places). Torque to 60 in-lbs.
3.
Replace the hardware securing the sub-system load distribution device busbar to the distribution panel (1/4-20 x 7/8” bolt,
1/4” Belleville lock washer, 1/4” hardened flat washer, 2-places). Torque to 60 in-lbs.
4.
Replace the hardware securing the battery disconnect device busbar to the distribution panel (1/4-20 x 7/8” bolt, 1/4”
Belleville lock washer, 1/4” hardened flat washer, 2-places). Torque to 60 in-lbs.
5.
Plug the two halves of the three position in-line alarm wiring connector together.
6.
Replace the access panel(s) removed above.
7.
Refer to “IB2 (Controller Interface Board) and EIB (Controller Extended Interface Board) Replacement in a List 7 or List 27
Distribution Cabinet” on page 34 and replace the IB2 and EIB assemblies.
8.
Reconnect the load distribution, sub-system load distribution, and battery wiring to the circuit breaker/fuse positions on the
distribution panel.
9.
Transfer the plug-in circuit breakers or fuses from the old distribution panel to the replacement distribution panel.


