background image

9 Maintenance

WARNING! All maintenance operations must be carried out strictly observing the European and National
accident prevention regulations, especially the accident prevention regulations concerning electrical
systems, refrigerators and manufacturing resources. Maintenance may be done to air conditioning
equipment only by authorized and qualified technicians. To keep all warranties valid, the maintenance must
adhere to the manufacturer’s instructions.

WARNING! The work should be done on the system only when it is at switched-off. Stop the system by
switching off the air conditioner at the controller and the main switch. Check that the electrical components
of device are off and not receiving a power supply.

NOTICE

Only original spare parts made by Vertiv may be used. Using third-party material can invalidate the warranty.
When the spare parts must be brazed, be careful not to damage the internal parts (gaskets, seals, o-rings, etc.).

NOTICE

Risk of release of hazardous substances into the environment. Can cause environmental pollution and violation
of environmental regulations.

9.1 Maintenance Schedule

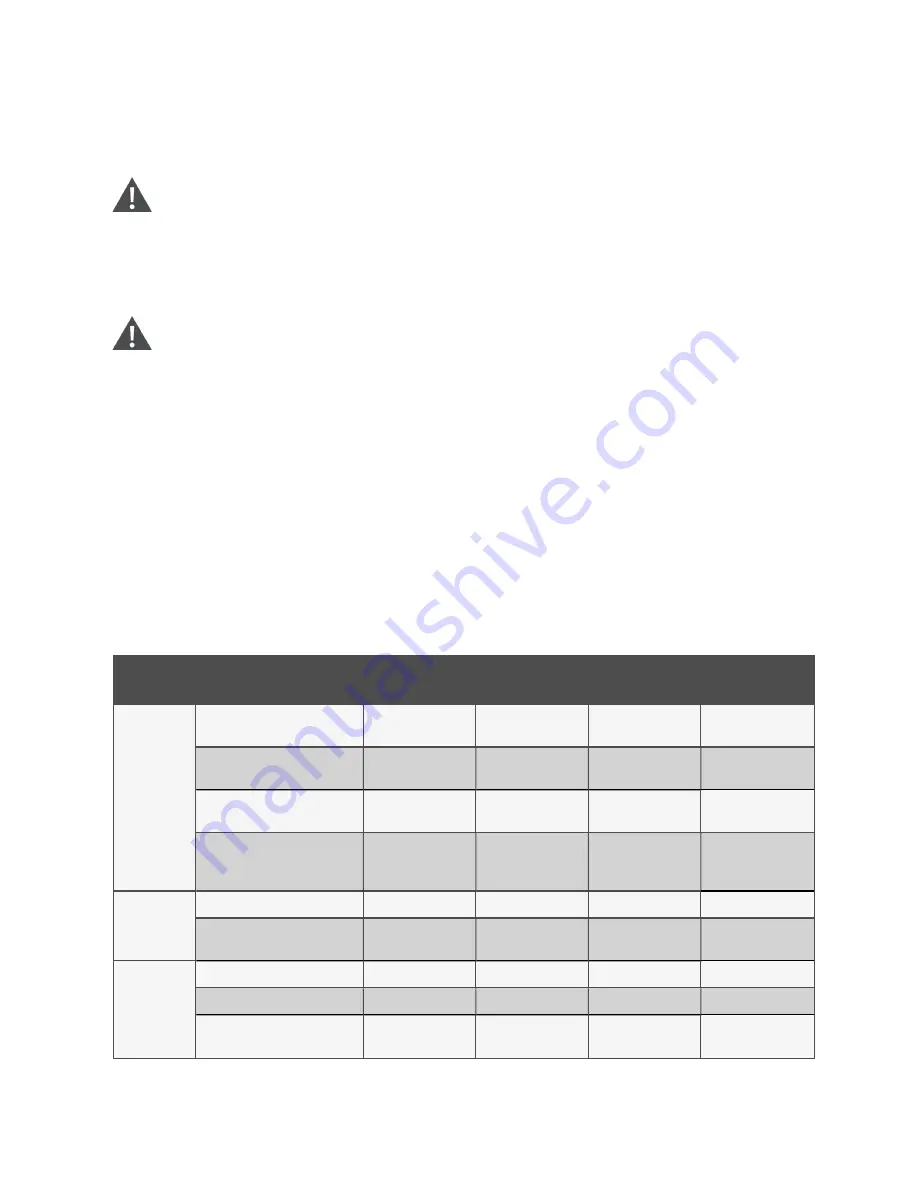
Conduct monthly, quarterly, biannual and annual checks according to the following guidelines.

Component

Check Items

Maintenance Period

Monthly by user

3 months

6 months

1 year

General

Check unit/remote display for
clogged-filter warning

X

Check for irregular noise from unit
fans

X

Check for irregular noise from
compressor

X

Check for irregular noise from
remote condenser fans (if
applicable)

X

Filters

Check the state of filters

X

Clean or replace air filters if
necessary

X

Fan

Verify that impellers move freely

X

Check bearings

X

Check that motor supports are
fixed securely

X

9 Maintenance

61

Vertiv™ Liebert® CRV CRD25 and CRD35 Row-Based Cooling System User Manual

Summary of Contents for Liebert CRV CRD25

Page 1: ...Liebert CRV CRD25 and CRD35 User Manual Original Instructions 25 kW and 35 kW 50 Hz Row Based Cooling System...

Page 2: ...ors or omissions Refer to local regulations and building codes relating to the application installation and operation of this product The consulting engineer installer and or end user is responsible f...

Page 3: ...the Main Grounding Point 21 4 5 Removing Compressor Fixing Plates 22 4 6 Installing Top Frame and Front Frame Optional 24 4 6 1 Installing the Top Frame without the Front Frame 24 4 6 2 Installing th...

Page 4: ...cedure 54 7 2 1 First Start up or After Long Standstill 54 7 2 2 Automatic Restart 54 8 HMI Display 55 8 1 Appearance 55 8 2 Main Functions 56 8 2 1 Home Page 56 8 2 2 Control Mode 58 8 3 Menu Structu...

Page 5: ...moving installing or servicing this unit please read the Safety Instructions sheet provided as a separate document shipped with the unit 1 Important Safety Instructions 1 Vertiv Liebert CRV CRD25 and...

Page 6: ...1 Important Safety Instructions 2 This page intentionally left blank Vertiv Liebert CRV CRD25 and CRD35 Row Based Cooling System User Manual...

Page 7: ...Nomenclature The following tables describe the model number for the Vertiv Liebert CRV CRD25 and CRD35 cooling units Model Number 1 2 3 4 5 6 7 8 9 10 11 12 C R D 2 5 5 P D 0 0 A Table 2 1 CRD25 Mode...

Page 8: ...Components Figure 2 1 Name Plate Location Item Description 1 Front door 2 Name plate on the side cover of the electrical box 2 2 Product Overview 4 Vertiv Liebert CRV CRD25 and CRD35 Row Based Cooling...

Page 9: ...UNIT Unit defined by 6 digits WEIGHT NET GROSS Net weight and gross weight of the unit MODEL Model defined by 12 digits REFRIGERANT CHARGE The amount of refrigerant charged on site REFRIGERANT Type of...

Page 10: ...on 1 Side panel 8 Electrical box 2 2 Top panel 9 Compressor 3 Filter 10 Heat exchanger 4 Rear door 11 Humidifier 5 Bottom panel 12 EC fan 6 Leveling foot 13 Front door 7 Caster 14 Human machine interf...

Page 11: ...essor 3 Filter 10 Heat exchanger 4 Rear door 11 Humidifier 5 Bottom panel 12 EC fan 6 Leveling foot 13 Front door 7 Caster 14 Human machine interface HMI display 2 4 Accessories The accessories provid...

Page 12: ...8 Cabinet guide rail 2 User manual 1 Unit circuit diagram 1 EUdeclaration of conformity 1 Product inspection report 1 Table 2 3 Accessories 2 5 System Data Parameter CRD25 CRD35 Width mm in 300 11 8...

Page 13: ...ertiv NOTE For information about the height between evaporator and condenser with low ambient kit see Vertical Distance between Condenser and Evaporator on page 37 Parameter CRD25 CRD35 Return air con...

Page 14: ...59 7 60 2 60 6 CRD35 100 73 8 Front 77 1 62 7 65 57 7 60 1 62 6 66 7 67 5 67 Left 69 4 57 4 60 8 52 6 55 8 58 1 59 2 59 9 59 2 Right 70 7 56 59 2 55 3 58 9 60 5 60 6 61 61 2 Model Fan Speed Average S...

Page 15: ...installation plans prior to moving the unit to verify clearances NOTICE Risk of damage from forklift Can cause unit damage Keep tines of the forklift level and at a height suitable to fit below the sk...

Page 16: ...t mm in Net Weight kg lb Shipping Weight kg lb CRD25 300 1132 2000 11 8 x 44 6 x 78 7 776 x 1276 x 2228 30 6 x 50 2 x 87 7 272 599 6 352 776 0 CRD35 600 1146 2000 23 6 x 45 1 x 78 7 776 x 1276 x 2228...

Page 17: ...wall or to other obstacles for service clearance 3 4 Inspecting the Unit Upon arrival of the unit and before unpacking Verify that the labeled equipment matches the bill of lading Inspect that there a...

Page 18: ...over When moving the packaged unit do not lift it any higher than 102 mm 4 in off the ground Exercise great care if the unit must be lifted higher than 102 mm 4 in Refer to the following figure for th...

Page 19: ...it and pallet are located on a flat surface before loosening the hardware securing the unit to the pallet WARNING Two or more properly trained and qualified personnel are required to move the unit to...

Page 20: ...four leveling feet under the unit Lift the unit one corner at a time a Use an adjustable wrench to loosen the fixing nut on each foot in counterclockwise direction b Use an adjustable wrench to turn t...

Page 21: ...g Feet Item Description 1 Fixing nut 2 Hex bolt 5 Move the unit to its installation location using the built in casters 3 Pre installation Preparation 17 Vertiv Liebert CRV CRD25 and CRD35 Row Based C...

Page 22: ...3 Pre installation Preparation 18 This page intentionally left blank Vertiv Liebert CRV CRD25 and CRD35 Row Based Cooling System User Manual...

Page 23: ...t and Fixing the Unit Optional NOTE If the machine room has a mounting bracket and its width does not exceed 30 mm 1 2 in you can remove the feet and fix the unit onto the mounting bracket To remove t...

Page 24: ...e the unit with adjacent cabinets 1 Open the front door Install two baying brackets with M6 x 10 countersunk screws on the left frame Fix each screw on position A Install two baying brackets with M6 x...

Page 25: ...the left frame A Position to install the screwon the right frame 4 4 Location of the Main Grounding Point The main grounding point is located on the top panel as shown in the figure below Figure 4 4 L...

Page 26: ...the fastening plate above the lower filter and remove the plate Then remove the lower filter Figure 4 5 Removing the Upper and Lower Filters Item Description Item Description 1 The handle in the midd...

Page 27: ...lates from the compressor To remove each fixing plate loosen the M8 x 60 screw on it so as to remove the plate Then torque the screw at 12 1 Nm 8 85 0 74 ft lb Figure 4 7 Removing Compressor Fixing Pl...

Page 28: ...t can be installed with both the top frame and front frame 4 6 1 Installing the Top Frame without the Front Frame Figure 4 8 Dimensions of the Top Frame CRD25 Unit mm in Item Description 1 Top frame 4...

Page 29: ...Item Description 1 Top frame To install the top frame 1 Install the top frame and fixed it with four M12 30 screws 2 Move the V logo to the top frame 4 Installing in Enclosure Row 25 Vertiv Liebert C...

Page 30: ...ple Item Description Item Description 1 Top frame 3 M12 30 screw 2 V logo NOTE After the top frame is installed use plastic caps to cover the unused holes on the top plate 4 Installing in Enclosure Ro...

Page 31: ...Front Frame Figure 4 11 Dimensions of the Top Frame and the Front Frame CRD25 Unit mm in Item Description 1 Top frame 2 Front frame 4 Installing in Enclosure Row 27 Vertiv Liebert CRV CRD25 and CRD35...

Page 32: ...er cable and the communications cable from the HMI by unplugging the two connectors from the PWR port and the CAN1 port 2 Remove the front door by removing three hinges that connect the door to the ve...

Page 33: ...he front frame to the unit with ten M5 12 screws six on the left and right frames and four on the top and bottom frames Figure 4 14 Installing the Front Frame CRD35 as An Example Item Description 1 M5...

Page 34: ...ion 1 M12 30 screw 5 Install back the front door Connect the power cable and communications cable to the HMI 6 Move the V logo to the top frame NOTE After the top frame is installed use plastic caps t...

Page 35: ...damage Liebert CRV systems require the use of POE polyolester oil POE oil absorbs water at a much faster rate when exposed to air than previously used oils Because water is the enemy of a reliable re...

Page 36: ...or 10 Filter drier 3 High pressure sensor 11 Sight glass 4 High pressure switch 12 Electronic expansion valve 5 Schrader valve 13 Evaporator coil 6 Ball valve 14 Suction temperature sensor 7 Check val...

Page 37: ...ween the pipe and the wall needs to be sealed 2 Inverted trap 7 Heat insulation floor 3 Liquid pipe 8 Floor 4 Gas pipe 9 Condensate pipe 5 Oil trap 10 Evaporator indoor NOTE The unit can be top piped...

Page 38: ...5 Heat insulation floor 2 Liquid pipe 6 Floor 3 Gas pipe 7 Condensate pipe 4 The gap between the pipe and the wall needs to be sealed 8 Evaporator indoor NOTE The unit can be top piped as well 5 Pipi...

Page 39: ...escription Item Description A Top plate 3 Condensate Pump outlet B Bottom plate 4 Humidifier Supply 1 Gas pipe 5 Gravity Drain outlet 2 Liquid pipe 6 Inlets for power cable and communications cable 5...

Page 40: ...escription Item Description A Top plate 3 Condensate Pump outlet B Bottom plate 4 Humidifier Supply 1 Gas pipe 5 Gravity Drain outlet 2 Liquid pipe 6 Inlets for power cable and communications cable 5...

Page 41: ...er and Lower Filters on page 22 2 Unscrew the connector between the soft pipe and the drainage copper pipe Route the soft pipe through the Condensate Pump outlet on the base plate to your drainage sys...

Page 42: ...ends to a minimum The bend must be of large radius at least equal to pipe diameter If not using preformed curves bend the pipes as follows Soft copper by hand or bending device Hard copper use preform...

Page 43: ...3 Lay the pipes between the evaporator and condenser 4 Connect a nitrogen cylinder to the Schrader valve Purge the pipe with nitrogen to flow through the pipe while welding the pipe NOTE A pure dry n...

Page 44: ...Item Description 1 Liquid pipe 2 Gas pipe Figure 5 7 Location of Liquid Pipe and Gas Pipe for Bottom Routing CRD35 Item Description 1 Liquid pipe 2 Gas pipe 5 Piping and Refrigeration Connections 40...

Page 45: ...maintenance work must be performed only by properly trained and qualified personnel and in accordance with applicable regulations and manufacturers specifications Opening or removing the covers to an...

Page 46: ...and power supply 2 on the main circuit breaker NOTE Dual power supplies are provided to the unit with power supply 1 as the primary power feed and power supply 2 as secondary When power supply 1 fails...

Page 47: ...y 2 2 Connecting to power supply 1 6 2 Connecting Communications Cables 6 2 1 General Arrangement NOTE Take anti static measures when connecting communications cables NOTE The RJ45 port on the back of...

Page 48: ...orator 41 42 Static pressure sensor B CRD35 evaporator 24 51 Water leakage sensor A2 B2 RS485 75 76 Common alarm 37 38 Remote on off device Figure 6 4 Communications Ports 6 Electrical Connections 44...

Page 49: ...and 42 terminals on the terminal block 6 2 5 Connecting the Monitor Device to Unity Card Optional The monitor device is not provided with the unit To connect the monitor device connect it to the Ether...

Page 50: ...nals on the terminal block These two terminals have been connected with a jumper in factory and you need to remove this jumper before connecting to the remote on off device NOTE If the jumper between...

Page 51: ...r Unit 1 OFF ON ON ON ON ON ON ON Subordinate Unit 1 2 ON OFF ON ON ON ON ON ON Subordinate Unit 2 3 OFF OFF ON ON ON ON ON ON Subordinate Unit 3 4 ON ON OFF ON ON ON ON ON Subordinate Unit 4 5 OFF ON...

Page 52: ...ON ON ON Subordinate Unit 13 14 ON OFF OFF OFF ON ON ON ON Subordinate Unit 14 15 OFF OFF OFF OFF ON ON ON ON Subordinate Unit 15 Table 6 3 Address Settings of CAN ID continued NOTE The iCOM Edge can...

Page 53: ...ubricating Oil Charge with Low Ambient Kit m ft kg lb kg lb ml oz ml oz 10 32 8 10 22 05 25 55 1 3650 123 42 15 49 2 10 9 23 97 25 9 57 3650 123 42 20 65 6 11 7 25 89 26 7 59 3650 123 42 25 82 13 7 30...

Page 54: ...3650 123 42 35 114 8 19 6 43 3 34 6 76 3 147 4 97 3797 128 39 40 131 2 20 9 46 35 9 79 294 9 94 3944 133 36 45 147 6 22 1 48 7 37 1 81 8 441 14 91 4091 138 33 50 164 23 3 51 4 38 3 84 5 588 19 87 423...

Page 55: ...quid pipe kg m Total length of liquid pipe m 30 m 1000 x 12 Extra lubricating oil charge oz Base lubricating oil charge oz Refrigerant charge per meter of each size of liquid pipe lb ft Total length o...

Page 56: ...E Never use the compressor to evacuate the system This invalidates its guarantee Figure 7 1 Schrader Valves in the System Item Description Item Description 1 Condenser coil 11 Schrader valve 2 Ball va...

Page 57: ...stem on the previous page Charge the refrigerant and keep the refrigerant cylinder inverted to ensure liquid refrigerant is being drawn into the unit NOTE Do not over charge the unit Charge the unit d...

Page 58: ...kers 6 Check if the supply voltage is normal If so switch on all the circuit breakers 7 Ensure that the compressor has been preheated for at least 4 hours before starting the unit 8 Start the unit by...

Page 59: ...e below Indicator Color Description Blue Display is starting Yellow Unit is shut down or the display fails to communicate with iCOM Edge Green Unit is running normally Red An alarm has been generated...

Page 60: ...press Enter The home page will be displayed You can power on or off the unit by pressing and holding the ON OFF button for three seconds NOTE If no password is entered you can only view the menu sett...

Page 61: ...g fan electric heater humidifier dehumidifier fan speed heating status and humidifier status 7 Alarm list Showcurrent alarms and the time when they are generated 8 Toggle button 2 Switch between the s...

Page 62: ...nt data 6 Desired supply air temperature return air temperature or remote temperature set by user 7 Supply air temperature return air temperature or remote temperature depending on the control mode Ta...

Page 63: ...wn power fail alarm Normal alarms high discharge temperature alarm air flow temperature sensor failure air flow loss alarm discharge temperature sensor failure suction temperature sensor failure low p...

Page 64: ...8 HMI Display 60 This page intentionally left blank Vertiv Liebert CRV CRD25 and CRD35 Row Based Cooling System User Manual...

Page 65: ...party material can invalidate the warranty When the spare parts must be brazed be careful not to damage the internal parts gaskets seals o rings etc NOTICE Risk of release of hazardous substances into...

Page 66: ...n X Check fan speed controller operation X 9 2 Air Filters Check the air filters monthly to maintain efficient air distribution through the evaporator coil To replace filters 1 Open the rear door and...

Page 67: ...eriodically clean coil surface with dedicated degreasing products Inspect fans motors and controls for proper operation Check all piping and capillaries for proper support Inspect for leaks 9 5 Fan WA...

Page 68: ...intain the electric heater 1 Open the rear door and disconnect the main circuit breaker 2 Open the front door 3 Remove the fan frame assemblies For CRD25 remove four assemblies For CRD35 remove all th...

Page 69: ...op the two on bottom Take out the heater 6 Inspect and clean heating elements 7 Inspect and tighten support hardware Figure 9 2 Removing Electric Heater for CRD25 Item Description 1 Electric heater tw...

Page 70: ...2 Drain all the water from the cylinder by turning the power switch to 1 on the electrical control box near the humidifier 3 Disconnect the steam hose made of non conductive rubber 4 Disconnect the p...

Page 71: ...9 8 Refrigeration Circuit Note the following when maintaining the refrigerant circuit When repairing the refrigeration circuit collect all refrigerant in a container and do not allow the refrigerant t...

Page 72: ...the operating condition and maintenance that they receive 9 10 Troubleshooting The following table lists possible issues and their cause and corrective steps Problem Possible Cause Corrective Action...

Page 73: ...ad distribution Enhance racks heat load distribution Remote temperature sensor s issue Call Vertiv Technical Support Unsteady air delivery temperature Faulty temperature sensor Call Vertiv Technical S...

Page 74: ...9 Maintenance 70 This page intentionally left blank Vertiv Liebert CRV CRD25 and CRD35 Row Based Cooling System User Manual...

Page 75: ...rds of maintenance activities in a dedicated log book e Recovery for the purpose of recycling reclamation or destruction of the fluorinated greenhouse gases pursuant to Art 8 of the Regulation shall t...

Page 76: ...quirements on the basis of the quantity of f gas contained the required information about refrigerant charge quantities has to be listed separately for each individual circuit e For equipment with sep...

Page 77: ...emp 3 Avg Supply Temp Avg Supply Hmd Remote Temp 1 Remote Temp 2 Remote Temp 3 Remote Temp 4 Remote Temp 5 Remote Temp 6 Remote Temp 7 Remote Temp 8 Remote Temp 9 Remote Temp 10 Avg Remote Temp Switch...

Page 78: ...Status Unit 05 Status Unit 06 Status Unit 07 Status Unit 08 Status Unit 09 Status Unit 10 Status Unit 11 Status Unit 12 Status Unit 13 Status Unit 14 Status Unit 15 Status Alarm Information Active Ala...

Page 79: ...mwork Mode Unit Address Unit Quantity Standby Quantity Rotation Quantity Rotation Cycle Rotate Every Rotate At Manual Rotation Active Standby Switch Delay Cascade Mode Cascade Start Point 11 Appendice...

Page 80: ...Alarm Attribute High Return Temp LowReturn Temp High Return Hmd LowReturn Hmd High Supply Temp Supply LowTemp High Remote Temp LowRemote Temp Communication Settings Monitor Protocol Monitor Baudrate M...

Page 81: ...er About Version Information Control Software Model Control Software Version Display Software Model Display Software Version Service Information 11 Appendices 77 Vertiv Liebert CRV CRD25 and CRD35 Row...

Page 82: ...Humidity The humidity of the return air is higher than the set value LowReturn Humidity The humidity of the return air is lower than the set value Power Loss Power supply is off and is then restored P...

Page 83: ...nsor Alarm Fire Sensor Alarm or Remote Shutdown Or it can be customized Outdoor Fan 1 Communication Failure Outdoor Fan 2 Communication Failure The outdoor fan cannot communicate with the iCOM Edge bo...

Page 84: ...cante declara que este producto es conforme a las directivas Europeas O Fabricante declara que este produto est em conformidade com as directivas Europeias Tillverkare f rs krar h rmed att denna produ...

Page 85: ...Europe the Middle East and Africa For technical support please contact your local Vertiv or Partner office You can also contact us using the contact details on our website https www vertiv com en eme...

Page 86: ...11 Appendices 82 This page intentionally left blank Vertiv Liebert CRV CRD25 and CRD35 Row Based Cooling System User Manual...

Page 87: ...Vertiv Liebert CRV CRD25 and CRD35 Row Based Cooling System User Manual...

Page 88: ...e trade names trademarks or registered trademarks of their respective owners While every precaution has been taken to ensure accuracy and completeness here Vertiv Group Corp assumes no responsibility...

Reviews: