background image

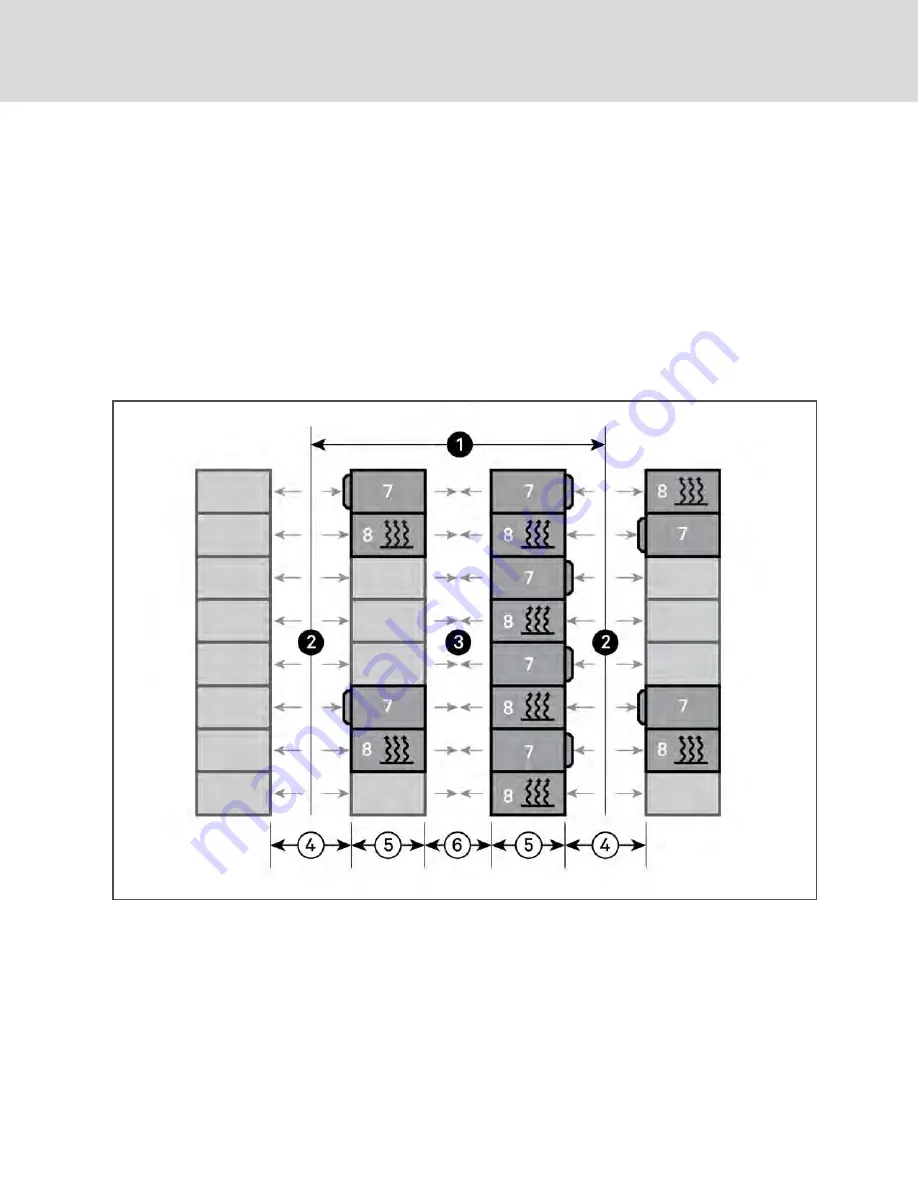
3.3 Implementing a Hot Aisle/Cold Aisle Equipment Layout

Best practice is to place equipment racks in alternating rows of cold aisles and hot aisles. This is best accomplished when
planning the layout of the file server farm area. It is more difficult to accomplish when the computer room is already
populated with operating hardware.

In the cold aisle, the equipment racks are arranged face-to-face so the cooling air discharged from the cooling unit is
discharged up through perforated floor tiles, drawn into the face of the computer hardware and exhausted out the back of
the equipment rack into the adjacent hot aisles. Hot aisles are literally hot because the alternating cold and hot-aisle design
separates the source of cooling air from hot air discharge, which returns to the computer room cooling unit. No perforated
tiles should be placed in the hot aisles, which mixes hot and cold air, lowering the temperature of the air returning to the
cooling units and reducing usable capacity.

Figure 3.1 XDU Layout in Hot/Cold Aisle Application

Vertiv | XDU™ Liquid to Air Heat Exchanger for Chip Cooling

12

Summary of Contents for Liebert XDU 060

Page 1: ...Liebert XDU Liquid to Air Heat Exchanger for Chip Cooling Installer User Guide 600 mm Wide ...

Page 2: ...d disclaims all liability for damages resulting from use of this information or for any errors or omissions Refer to other local practices or building codes as applicable for the correct methods tools and materials to be used in performing procedures not specifically described in this document The products covered by this instruction manual are manufactured and or sold by Vertiv This document is t...

Page 3: ... 5 Installing in Enclosure Row 23 5 1 Adjusting Base Supports Leveling Feet 23 6 Piping Requirements 25 6 1 Fluid Volume for Unit and Connection Piping 25 6 2 Water Quality Requirements 26 6 3 Connecting the Closed Loop System 28 6 4 Leak Check before Commission and Operation 29 6 5 Filling the System 30 6 5 1 Fluid Fill Source 31 6 5 2 Flushing the Cooling System 32 6 5 3 Filling the Complete Sys...

Page 4: ... 24 Inch Models 43 10 6 Checking and Cleaning the Strainer 45 10 7 Flow Sensor 46 11 Preventive Maintenance Worksheet 49 Appendices 53 Appendix A Technical Support and Contacts 53 Appendix B Performance Curves 55 Appendix C Technical Specifications 57 Appendix D Submittal Drawings 59 Vertiv XDU Liquid to Air Heat Exchanger for Chip Cooling ii ...

Page 5: ...luded and check the nameplate to be sure the voltage matches available utility power The Liebert controller does not isolate power from the unit even in the Unit Off mode Some internal components require and receive power even during the Unit Off mode of the controller The factory supplied optional disconnect switch is inside the unit The line side of this switch contains live high voltage The onl...

Page 6: ...nit before attempting to move lift remove packaging from or prepare the unit for installation WARNING Risk of unsecured unit rolling off of pallet Can cause equipment damage injury or death The unit is on casters Ensure that the unit and pallet are located on a flat surface before loosening the hardware securing the unit to its shipping pallet WARNING Risk of hair clothing and jewelry entanglement...

Page 7: ...s and the variations of required treatment programs make it extremely important to obtain the advice of a competent and experienced water treatment specialist and follow a regularly scheduled coolant fluid system maintenance program Water chemistry varies greatly by location as do the required additives called inhibitors that reduce the corrosive effect of the fluids on the piping systems and comp...

Page 8: ...ns freely through the drain system and that lines are clear and free of obstructions and in good condition with no visible sign of damage or leaks This unit may also require an external water supply to operate Improper installation application and service practices can result in water leakage from the unit Water leakage can result in catastrophic and expensive building and equipment damage and los...

Page 9: ...rd 60 Hz units are CSA Certified to the harmonized U S and Canadian product safety standard CSA C22 2 No 236 UL 1995 for Heating and Cooling Equipment and are marked with the CSA c us logo 1 Important Safety Instructions 5 ...

Page 10: ...Vertiv XDU Liquid to Air Heat Exchanger for Chip Cooling 6 This page intentionally left blank ...

Page 11: ...20 21 22 23 24 25 X D U 0 6 0 A C W 1 D A Table 2 1 Liebert XDU Model Number Example Digit Description Digits 1 2 The base unit XD Extreme Heat Density System Digit 3 System Type U Coolant distribution unit Digit 4 5 6 Nominal Capacity 060 60 kW Digit 7 Heat Rejection A Air fin type heat exchanger Digit 8 Supply Power C 208 V 3 ph 60 Hz Digit 9 Coolant Fluid Type W Water Digit 10 Pump Configuratio...

Page 12: ...nfiguration S SFA Digit 23 24 35 Factory Configuration Placeholder Table 2 2 Model Number Digit Definitions for Liebert XDU continued 2 2 Component Location The unit component locations are described in the submittal documents included in the Submittal Drawings on page 59 The following table lists the relevant documents by number and title Document Number Title DPN004931 Component Location Diagram...

Page 13: ...2 3 Cooling Configuration Figure 2 1 Liquid to Air Cooling System Overview Item Description 1 XDU 2 Heat load 3 Pump 4 Heat exchanger 2 Nomenclature and Components 9 ...

Page 14: ...Vertiv XDU Liquid to Air Heat Exchanger for Chip Cooling 10 This page intentionally left blank ...

Page 15: ...han 5 of total air circulated in the room Install the units as close as possible to the largest heat load Allow at least the minimum recommended clearances for maintenance and service See the appropriate submittal drawings for dimensions We recommend installing an under floor leak detection system Contact your Vertiv representative for information 3 1 Planning Dimensions The unit and floor stand d...

Page 16: ... is discharged up through perforated floor tiles drawn into the face of the computer hardware and exhausted out the back of the equipment rack into the adjacent hot aisles Hot aisles are literally hot because the alternating cold and hot aisle design separates the source of cooling air from hot air discharge which returns to the computer room cooling unit No perforated tiles should be placed in th...

Page 17: ...escription 1 Aisle pitch 7 tiles 14 ft 4 3 m 2 Cold aisle 3 Hot aisle 4 Front aisle 4 ft 1 2 m 5 Rack 42 in 1067 mm 6 Back aisle 3 ft 0 91 m 7 XDU 8 Heat load 3 Pre installation Preparation and Guidelines 13 ...

Page 18: ...Vertiv XDU Liquid to Air Heat Exchanger for Chip Cooling 14 This page intentionally left blank ...

Page 19: ... to fit below the skid and or unit to prevent exterior and or underside damage NOTICE Risk of improper storage Keep the unit upright indoors and protected from dampness freezing temperatures and contact damage Upon arrival of the unit and before unpacking Verify that the labeled equipment matches the bill of lading Carefully inspect all items for visible or concealed damage Report damage immediate...

Page 20: ...mm When moving the packaged unit do not lift the unit any higher than 2 to 4 inches 51 to 102 mm All personnel except those moving the unit must be kept 12 feet 3 7 m or more from the unit while it is being moved If the unit must be lifted higher than 4 inches 102 mm all personnel not directly involved in moving the unit must be 20 feet 5 m or farther from the unit 4 4 Unpacking the Export Shipped...

Page 21: ...Figure 4 1 Metal Clips and Wood Screws on Crate Item Description 1 Metal clips typical 12 places 2 Wood screws minimum 34 places 4 Equipment Inspection and Handling 17 ...

Page 22: ...e unit from the pallet 2 Remove the exterior packaging from around the unit NOTE The bag may remain in place to protect from dust and to protect the unit panels or it may be removed for immediate installation 3 Remove the bag from the unit when ready to move off the pallet and install the unit See Removing Units from the Pallet on the facing page Figure 4 2 Lag Screws that Secure Ramps Vertiv XDU ...

Page 23: ... and structure damage Unit may be too tall to fit through a doorway while on or off pallet Measure unit and doorway heights and refer to installation plans prior to moving unit for clearance verification NOTICE Risk of unit damage if improperly stored Keep unit vertically upright indoors and protected from dampness freezing temperatures and contact damage IMPORTANT Two or more properly trained and...

Page 24: ... feet open fan door Use a large flat blade screwdriver to rotate three latches See Expanded View of Latches below To access rear stabilizer feet open the rear hinged door and remove cover below coil Figure 4 4 Expanded View of Latches Item Description 1 Stabilizer feet 2 Shipping bracket screws lag screws 3 Latches Vertiv XDU Liquid to Air Heat Exchanger for Chip Cooling 20 ...

Page 25: ...h Expanded View of Shipping Screw and Lag Screw below Figure 4 5 Expanded View of Shipping Screw and Lag Screw 4 Equally adjust the four stabilizer feet to raise the unit off of the shipping blocks Remove shipping blocks from pallet See Metal Clips and Wood Screws on Crate on page 17 5 Locate and attach the ramps to pallet using hook and loop strips See Attaching Ramps to Pallet on the next page 4...

Page 26: ...e rear hinged door See Figure 4 4 on page 20 7 It is recommended that a minimum of two trained personnel move the unit from the pallet to ramps to floor and then to the final installation location 8 Once the unit is in its final installation location re attach the perforated panel Open top panel door with mounted control Attach the perforated panel with the removed fasteners using a 5 16 inch hex ...

Page 27: ... is in its final installation position open the display door and remove the lower front baffle panel using a 5 16 inch 7 9 mm hex head or slotted screwdriver to prepare for installation 2 Open the rear panel 3 Using an adjustable wrench adjust the four base supports or feet shown in Figure 5 1 below Ensure that the unit is level 4 Turning the base supports leveling feet clockwise extends them and ...

Page 28: ...Figure 5 2 Adjust Leveling Feet Item Description 1 Nut on top of foot 2 Adjust foot with wrench Vertiv XDU Liquid to Air Heat Exchanger for Chip Cooling 24 ...

Page 29: ...on the inlet and outlet pipes to ease maintenance Install optional thermostats and pressure gauges on the inlet and outlet pipes Install a water drain tap at the lowest point in the circuit Locate air vents at tops of all risers and any intermediate system high points The pipe connection locations piping general arrangement and schematics are described in the submittal documents included in the Su...

Page 30: ...ibes the typical fluid volumes depending on pipe diameter Line Size O D in Fluid Volume gal ft l m 1 1 8 0 043 0 532 1 3 8 0 065 0 811 1 5 8 0 092 1 148 Table 6 5 Piping Fluid Volume Gallon per Foot Liter per Meter Reference Type L Copper 6 2 Water Quality Requirements To safeguard the maximum lifetime of air water heat exchangers the water used for cooling purposes must meet the VGB Cooling Water...

Page 31: ...ommended Purity Levels pH values 7 10 5 Carbonate hardness 3 8 dH Free carbon dioxide 8 15 mg dm3 Combined carbon dioxide 8 15mg dm3 Aggressive carbon dioxide 0mg dm3 Sulfides 10mg dm3 Oxygen 50mg dm3 Chloride ions 250mg dm3 Sulphate ions 10mg dm3 Nitrates and nitrites 7mg dm3 COB 5mg dm3 Ammonia 5mg dm3 Iron 0 2mg dm3 Manganese 0 2mg dm3 Conductivity 30S cm Solid residue from evaporation 500mg dm...

Page 32: ...alves and trap of the cooling fluid circuit on a bottom connected system A top connected XDU Cooling System would use item 6 as a high point vent for the removal of air from the system Figure 6 1 Top and Bottom Connection Locations Item Description 1 Top connections 2 Rear of unit 3 Bottom connections 4 Bottom inlet EFB 5 Bottom outlet LFB 6 High point vent air bleed valve 7 Top outlet LFT 8 Top i...

Page 33: ...are correct 2 Confirm that all isolating valves are open 3 The fluid systems in the Liebert XDU is factory checked for leaks and may be shipped with an inert gas holding charge At installation check all fluid circuits for leaks 4 Repair any leaks NOTE We recommend isolating the unit with field installed shut off valves during leak checking of field installed piping When the units are included in a...

Page 34: ...out adjustment Bleeding the air from the system is accomplished through three 1 4 inch SEA connections on the top of the XDU When filling bleed air from the coil bleed connection nearest the back of the unit first until a steady stream of fluid is observed Bleed air from the remaining two connections as needed See Figure 6 1 on page 28 Units piped from the top supply and return connections will be...

Page 35: ...nd provide 10 12 psig Guidelines Pump should be capable of 15 psi 30 feet H2O max head Elevate the fluid receptacle above the pump to provide net positive suction head NPSH required by pump Prime the pump and hoses to avoid pump damage and minimize the introduction of air to the system Place free end of the bleed hose into the fluid receptacle to minimize loss of treated fluid Follow transfer pump...

Page 36: ... on page 26 To fill the system 1 Make connections to the heat load 2 Open the rear door of the XDU 3 Connect the water fill source to the fill valve and a drain hose to the high point vent at the top of the unit See Figure 6 1 on page 28 and Figure 6 3 on page 30 4 Turn on the water fill source and allow to run until all of the air is purged from the hose connected to the high point vents Failure ...

Page 37: ...istry varies greatly as do the required additives called inhibitors that reduce the corrosive effect of the fluids on the piping systems and components The chemistry of the coolant fluid used must be considered because some sources may contain corrosive elements that reduce the effectiveness of the inhibited formulation Sediment deposits prevent the formation of a protective oxide layer on the ins...

Page 38: ...Vertiv XDU Liquid to Air Heat Exchanger for Chip Cooling 34 ...

Page 39: ...ect switches and verify with a voltmeter that power is off before working within any electric connection enclosures Service and maintenance work must be performed only by properly trained and qualified personnel and in accordance with applicable regulations and manufacturers specifications Opening or removing the covers to any equipment may expose personnel to lethal voltages within the unit even ...

Page 40: ...larm the power supply must be switched Off for 20 minutes once motor is at standstill Input power under voltage detection If the utility power falls below the trip value of the below table typical value for five seconds or longer the motor is switched Off electronically with no potential for separation and the status relay is released When the utility voltage returns to a correct value the motor r...

Page 41: ...nit NOTE The default setting for the Liebert iCOM control is for stand alone operation The stand alone mode lets you turn on the unit by rotating the main switch on the electrical panel The yellow LED on the iCOM display panel lights after the unit is turned on because electrical power is present If the LED does not light Check the electrical panel power supply Check the protection devices for exa...

Page 42: ...Vertiv XDU Liquid to Air Heat Exchanger for Chip Cooling 38 This page intentionally left blank ...

Page 43: ...lace pump Pumpis rotatingin reverse Check wiring phase Pumpsuddenly stops Loss of power When power is restored the XDU Liquid to Air Heat Exchanger for Chip Cooling automatically restarts Cloggedstrainer or impeller Clean out debris Pipe rattle Loose pipe connections Check pipe connections Leavingwater temperature high Low fluidflow Check alarm history for flowrelated alarms Clean strainer Check p...

Page 44: ...ply issue Contact Vertiv Technical Support Control boardissue Contact Vertiv Technical Support Main 24 VAC fuse trips Shorts or loose connections Check the wiring connections of the 24 VAC circuit Faulty circuit board Replace the circuit board XDU Liquidto Air Heat Exchanger for Chip Coolingnot makingcapacity Air in the system Check for adequate charge in system see Filling the System on page 30 P...

Page 45: ...NO voltage inside the unit is to install and open a remote disconnect switch Refer to unit electrical schematic Follow all local codes WARNING Risk of contact with high speed rotating fan blades Can cause serious injury or death Open all local and remote electric power supply disconnect switches verify with a voltmeter that power is off and verify that all fan blades have stopped rotating before w...

Page 46: ...upplied with the equipment and specify the model number serial number and if available the part number NOTE When replacing a faulty component follow the relevant manufacturer instructions NOTE When the spare parts must be brazed be careful not to damage the internal parts gaskets seals O rings etc 10 4 Maintenance Schedule Conduct monthly quarterly biannual and annual checks according to the follo...

Page 47: ... If control voltage is applied the fan motor can restart without warning after a power failure Do not operate the unit with any or all cabinet panels removed To replace the fan 1 Shut off all power to the unit by opening the main disconnect switch on the electrical panel on the front of the Liebert XDU 2 Remove the lower front panel 3 Open the panel assembly that contains the fans using the quarte...

Page 48: ...e 10 1 Fan Assembly Components 600 mm 24 Inch Models Item Description 1 Corner brace with four bolts 2 Bolts five around fan 3 Mounting plate 4 Fan Vertiv XDU Liquid to Air Heat Exchanger for Chip Cooling 44 ...

Page 49: ...urn the XDU Off 2 Disconnect the supply and return lines hoses from the load 3 With the free end in a bucket connect a hose to the Schrader downstream of the strainer to relieve pressure and drain the fluid from the unit 4 Remove the plug from the strainer to remove fluid from the strainer 5 Remove the strainer cap and gently remove the strainer element 6 Rinse any debris from the strainer element...

Page 50: ...r on the fan assembly If control voltage is applied the fan motor can restart without warning after a power failure Do not operate the unit with any or all cabinet panels removed Fluid flow is sensed and reported to the unit control by an ultrasonic flow sensor The sensor is clamped to the unit piping without penetrating the pipe or obstructing the flow To replace the flow sensor 1 Shut off all po...

Page 51: ...e unit and close the display door Quick Code and Parameter Settings Quick setting code 7003 0200 Response time 0 5 seconds Analog output lower limit 0 lpm Analog output upper limit 115 lpm Figure 10 3 Flow Sensor Item Description 1 Flowsensor 2 Cable connection 3 Mounting screws 4 Mounting bracket 10 Maintenance 47 ...

Page 52: ...Vertiv XDU Liquid to Air Heat Exchanger for Chip Cooling 48 This page intentionally left blank ...

Page 53: ...nit operation Vertiv recommends the use of trained and authorized service personnel extended service contracts and factory certified replacement parts Contact your local Vertiv Representative for more details Cabinet and Coil 1 Wipe inlet and out grills clean 2 Wipe fans and fan inlets clean 3 Verify coil is clean Electrical Panel 1 Check fuses 2 Check re torque wire connections Controls 1 Check v...

Page 54: ...y fan safety switch door switch 5 Check fan amp draw 1 L1 L2 L3 2 L1 L2 L3 Other 1 Verify expansion tank air pressure is above 10 psi 2 Verify proper water maintenance is being performed 3 Check for water leaks 4 Compare pump and fan amps to nameplate amps Vertiv XDU Liquid to Air Heat Exchanger for Chip Cooling 50 ...

Page 55: ...es for your records Compare readings information to previous maintenance worksheet To locate your local Vertiv representative for Vertiv engineered parts check https www Vertiv com en us support or Call 1 800 543 2778 11 Preventive Maintenance Worksheet 51 ...

Page 56: ...Vertiv XDU Liquid to Air Heat Exchanger for Chip Cooling 52 This page intentionally left blank ...

Page 57: ...Liebert Thermal Management Products 1 800 543 2778 Liebert Channel Products 1 800 222 5877 Liebert AC and DC Power Products 1 800 543 2378 A 2 Locations United States Vertiv Headquarters 1050 Dearborn Drive Columbus OH 43085 USA Europe Via Leonardo Da Vinci 8 Zona Industriale Tognana 35028 Piove Di Sacco PD Italy Asia 7 F Dah Sing Financial Centre 3108 Gloucester Road Wanchai Hong Kong 53 ...

Page 58: ...Vertiv XDU Liquid to Air Heat Exchanger for Chip Cooling 54 This page intentionally left blank ...

Page 59: ...Appendix B Performance Curves Figure B 1 Liebert XDU Performance Test Results 45 C 113 F LFT 55 ...

Page 60: ...Figure B 2 Liebert XDU Performance Test Results 50 C 122 F LFT Vertiv XDU Liquid to Air Heat Exchanger for Chip Cooling 56 ...

Page 61: ...low 12 2 USGPM 46 2 l min Maximum fluid flow 19 9 USGPM 46 2 l min Nominal air flow 1663 CFM at 50 fan speed 2825 m3 h Maximum air flow 3325 CFM 5650 m3 h Performance Data at 122 F 50 C Water Delivery and75 F 24 C Air Inlet Nominal cooling capacity 32 1 kW at 50 fan speed Maximum cooling capacity 63 0 kW at 100 fan speed Nominal fluid flow 14 4 USGPM 54 5 l min Maximum fluid flow 24 0 USGPM 90 8 l...

Page 62: ...Vertiv XDU Liquid to Air Heat Exchanger for Chip Cooling 58 This page intentionally left blank ...

Page 63: ...600 mm 24 in Model Floor StandPlanningDimensions DPN004933 Floorstand Dimensional Data 600 mm 24 in Model PipingSchematics DPN004928 Piping Arrangement Liquid to Air 60 kW 600 mm 24 in Model PipingConnections DPN004932 Primary Connection Locations Liquid to Air 60 kW 600 mm 24 in Model ElectricalConnections DPN004935 Electrical Field Connections Descriptions 60 kW 600 mm 24 in Models Table D 1 Sub...

Page 64: ...Vertiv XDU Liquid to Air Heat Exchanger for Chip Cooling 60 This page intentionally left blank ...

Page 65: ...uires only front and rear access 1 Top High Voltage Entrance 2 Air Bleed Valve 3 Top Supply Return Connections 4 EC Plug Fans 5 Pump qty 2 6 Expansion Tank 7 Y strainer 8 Bottom High Voltage Entrance 9 Check Valves 10 Fluid Coil 11 Liebert iCOM Display 12 Fluid Flow Meter 13 Serial Tag located inside door 14 System Fluid Fill Line Connection 15 Top Low Voltage Entrance 16 Bottom Low Voltage Entran...

Page 66: ...9 16 650mm 13 3 4 349mm 35 9 16 903mm 25 9 16 649mm TOP VIEW TO PROVIDE MAXIMUM SERVICE CLEARANCE ALIGN THE FRONT CORNER OF THE LIEBERT XDU WITH THE FRONT CORNER OF NEIGHBORING SERVER RACKS NOTE iCOM DOOR AND PERFERATED AIR INLET PANEL REMOVED FOR CLARITY MODEL DRY OPERATING WATER XDU060 796 361 847 384 XDU060 UNIT WEIGHT 5 Lbs kg All service and maintenance is performed through the front and rear...

Page 67: ... ANCHORING DIMENSIONS TOP VIEW ISO VIEW OF UNIT ON FLOORSTAND Notes 1 To level the unit lower the four stabilizing feet until they make contact with the floorstand 2 DO NOT use this document for installation see the XDU060 manual A H 9 1 2 241mm 4 6 117mm Foot Detail Foot provides u0 25in 6 4mm of adjustment from nominal height H 12 12 305 8 3 4 222 18 18 457 14 3 4 375 24 24 610 20 3 4 527 in mm ...

Page 68: ...LACES Floorstand anchoring Base of unit Front of XDU unit Rear of XDU unit with door open Notes 1 To level the unit lower the four stabilizing feet until they make contact with the floorstand SEE DETAIL A 2 Anchor the bracket to the unit and the floorstand using the screws that are provided SEE DETAIL A 3 The same mounting bracket is used in the front and rear of the unit 4 This document is not to...

Page 69: ...ad Top of Unit Connection Plug Pipe Fluid Return from Heat Load Bottom of Unit Connection Air Bleed Valve Top of Unit Expansion Tank Fluid Coil SERVICE SCHRADER ACCESS CONNECTION WITH VALVE CORE NOTE SCHEMATIC REPRESENTATION SHOWN DO NOT USE FOR SPECIFIC CONNECTION LOCATIONS Pump 1 Pump 2 Check Valve Check Valve Y Strainer Flow Sensor Supply Fluid Temperature Thermistor T T Fluid Fill Return Fluid...

Page 70: ...w Voltage Bottom Connection K O Ø1 3 8 35mm Air Bleed Valve 5 5 16 135mm 9 1 8 232mm 1 15 16 50mm 2 13 16 71mm 1 15 16 49mm LVB HVB LVB2 EFB LFB 9 9 16 243mm 3 11 16 94mm 5 126mm 1 7 16 37mm Top view showing bottom connections possible with raised floor EFB LFB Notes 1 Piping and Electrical connections available through the top or bottom of the unit not shown for clarity 2 Top and bottom fluid con...

Page 71: ...en dry contact is closed across terminals 75 76 for remote indication 1 AMP 24VAC max load Use Class 1 field supplied wiring 10 Base comms cable ethernet Cable provided by others for connection to the BMS No special considerations are required when using Cat5e Cat6 for connection between the unit and BMS which is not greater than 328ft 100m If the 328ft 100m must be exceeded an active component wi...

Page 72: ...mote indication The LiquiTect sensor notifies iCOMTM of indication through terminals 60 61 1 AMP 24VAC max load Use Class 1 field supplied wiring 14 Customer alarm inputs Terminals for field supplied normally closed contacts having a minimum 75VA 24VAC rating between terminals 24 50 51 55 or 56 Use field supplied Class 1 wiring The terminals are available for customer alarm inputs such as smoke se...

Page 73: ...igh volt K O 7 8 22mm Field low volt K O 1 3 8 35mm Field low volt K O 4 4 3 Unit Top PS PS 8 14 Factory Terminals 37 38 24 50 51 29 56 28 76 75 30 31 9 13 A DETAIL A Field Connections 55 58 59 7 7 6 5 Low Voltage connection through bottom of electric box High Voltage connection through bottom of electric box 1 2 11 10 B DETAIL B COMMs Connections 10 11 ...

Page 74: ...Vertiv XDU Liquid to Air Heat Exchanger for Chip Cooling ...

Page 75: ... names and logos referred to are trade names trademarks or registered trademarks of their respective owners While every precaution has been taken to ensure accuracy and completeness herein Vertiv Group Corp assumes no responsibility and disclaims all liability for damages resulting from use of this information or for any errors or omissions Specifications are subject to change without notice SL 70...

Reviews: