background image

Vertiv™ NetSure™ 2100 Series -48 VDC Power System User Manual 

Proprietary and Confidential © 2022 Vertiv Group Corp. 

13 

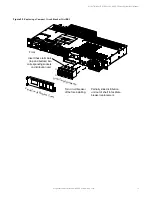
Figure 5.9  

Replacing a Compact Circuit Breaker (List BB) 


Turn circuit breaker

off before installing.

Front

Load C

ircuit Break

ers

Front Circ

uit Break

er Cover

On

Off

Insert these terminals

(top and bottom) into

corresponding sockets

on distribution unit.

Partially slide distribution

unit out of shelf to facilitate

breaker replacement.

Summary of Contents for NetSure 2100 Series

Page 1: ...NetSure 2100 Series 48 VDC Power System User Manual Specification Number 582138000 Model Number 2100 ...

Page 2: ...dures not specifically described in this document The products covered by this instruction manual are manufactured and or sold by Vertiv This document is the property of Vertiv and contains confidential and proprietary information owned by Vertiv Any copying use or disclosure of it without the written permission of Vertiv is strictly prohibited Names of companies and products are trademarks or reg...

Page 3: ...ing and Repair 5 5 1 Contact Information 5 5 2 Controller and Rectifier 5 5 3 Controller Configuration 5 5 4 System Troubleshooting Information 5 5 4 1 Contact Information 5 5 4 2 General 5 5 4 3 Troubleshooting Alarm Conditions on the Controller 5 5 4 4 Checking the Controller s Current Limit Point after Adding or Removing a Rectifier 5 5 4 5 Clearing a Rectifier Communications Fail Alarm after R...

Page 4: ...derate injury if not avoided ANSI OSHA This admonition is not used for situations that pose a risk only to equipment data or service even if such use appears to be permitted in some of the applicable standards OSHA ALERT Alerts the reader to an action that must be avoided in order to protect equipment software data or service ISO ALERT Alerts the reader to an action that must be performed in order...

Page 5: ...monishments used in this document are listed under Admonishments Used in this Document on page iv Safety and Regulatory Statements Refer to Section 4154 provided with your customer documentation for Safety and Regulatory Statements Déclarations de Sécurité et de Réglementation Reportez vous à la Section 4154 fourni avec les documents de votre client pour les déclarations de sécurité et de réglemen...

Page 6: ...Vertiv NetSure 2100 Series 48 VDC Power System User Manual Proprietary and Confidential 2022 Vertiv Group Corp vi This page intentionally left blank ...

Page 7: ... Per configuration file loaded into controller Mini Control Unit Configuration Drawing C drawing Printed Document and PDF File UM582138000 Power System User Instructions PDF files are provided on a supplied USB drive See also Note 1 SAG582138000 Power System System Application Guide UM1R481000e3 Rectifier Instructions Section 4154 Contact Information Page SD582138000 Power System Schematic Diagram...

Page 8: ...d programmable relay outputs The controller also supports rectifier temperature compensation if the system is equipped with a temperature probe s Temperature probe s may also be designated to monitor ambient temperature and or battery temperature The controller also provides data acquisition system alarm management and advanced battery and energy management The controller contains a front panel di...

Page 9: ...ing or further damages to the battery the controller can be programmed to limit the battery current to a preset level by limiting the charging voltage of the rectifiers Should the battery current still exceed a higher preset value an alarm is issued The controller limits the current going to the batteries based on the Battery Current Limit set point which is a percentage of the battery capacity in...

Page 10: ...lation openings for obstructions such as dust papers manuals etc Inspect and tighten all installer s connections IM582138000 4 2 Adding a Rectifier To increase system current capacity a rectifier module can easily be added if an empty rectifier module mounting position is available Refer to rectifier instructions UM1R481000e3 for a rectifier installation procedure 4 3 Field Installing Compact Type...

Page 11: ...ys alarm conditions as listed in the Resolving Alarms section of the controller s user manual Programmable external alarm relays are also available Refer to the system installation instructions IM582138000 and the controller configuration drawing C drawing supplied with your power system documentation for your alarm relay configurations The controller s Active Alarm and Alarm History submenus allo...

Page 12: ...uld be cleared Refer to the mini control unit instructions UM1M831ANA for a procedure to clear the alarm 5 4 6 Clearing a Rectifier Lost Alarm If the controller resets while a rectifier communications fail alarm is active the rectifier communications fail alarm is replaced with a rectifier lost alarm Refer to the mini control unit instructions UM1M831ANA for a procedure to clear the alarm 5 5 Repl...

Page 13: ...system application guide SAG582138000 for part numbers Procedure 1 Refer to Figure 5 1 Figure 5 2 Figure 5 3 or Figure 5 4 and replace the fuse Ensure a safety fuse cover is installed on the replacement fuse as shown in Figure 5 5 2 Verify no alarms are active Figure 5 1 GMT Distribution Fuse Replacement List AA Figure 5 2 GMT Distribution Fuse Replacement List CA GMT Fuse Safety Cover Front GMT F...

Page 14: ...onfidential 2022 Vertiv Group Corp 8 Figure 5 3 GMT Distribution Fuse Replacement List BA Figure 5 4 GMT Distribution Fuse Replacement List BB Figure 5 5 Installation of Safety Fuse Covers GMT Fuse Safety Cover Front GMT Fuse Safety Cover Front Safety Cover P N 248898700 GMT X ...

Page 15: ...firmly outward until the breaker is free from the distribution unit 5 Ensure that the replacement circuit breaker is in the OFF position and is of the correct rating 6 Orient the replacement circuit breaker as shown in Figure 5 6 or Figure 5 7 Insert the terminals on the rear of the circuit breaker into their corresponding sockets on the distribution unit Ensure the alarm contact on the back of th...

Page 16: ...Load Disconnect Circuit Breakers Front Components removed in illustration for clarity only Insert these terminals into corresponding sockets on distribution unit Insert these terminals into corresponding sockets on distribution unit Shorter Side of Breaker Shorter Side of Breaker OFF Position Towards Center Longer Side of Breaker Turn circuit breaker off before installing ...

Page 17: ... off before installing Battery Disconnect Circuit Breaker OFF Position Towards Left Shorter Side of Breaker Longer Side of Breaker OFF ON Front Front Circuit Breaker Cover Insert these terminals into corresponding sockets on distribution unit Insert these terminals into corresponding sockets on distribution unit Partially slide distribution unit out of shelf to facilitate breaker replacement ...

Page 18: ...t breaker is in the OFF position and is of the correct rating 6 Orient the replacement circuit breaker as shown in Figure 5 8 and Figure 5 9 Insert the terminals on the rear of the circuit breaker into their corresponding sockets on the distribution unit Push distribution device in firmly until fully seated in the distribution unit 7 Slide the distribution unit back into the shelf and secure with ...

Page 19: ... 5 9 Replacing a Compact Circuit Breaker List BB Turn circuit breaker off before installing Front Load Circuit Breakers Front Circuit Breaker Cover On Off Insert these terminals top and bottom into corresponding sockets on distribution unit Partially slide distribution unit out of shelf to facilitate breaker replacement ...

Page 20: ...ol unit this will retract the latch mechanism located on the bottom of the mini control unit This unlocks the mini control unit from the shelf Slide the mini control unit partially out from the shelf 4 Carefully label the connectors plugged into the assembly These connectors must be plugged into the same connectors on the replacement assembly 5 Unplug all connectors plugged into the assembly 6 Rep...

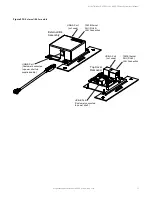
Page 21: ...Corp 15 Figure 5 10 External IB4 Assembly 10M Ethernet Port RJ 45 LAN Connection USB B Port Customer connected to power shelf USB A Port not used External IB4 Assembly Top Cover Removed 10M Ethernet Port RJ 45 LAN Connection USB B Port Customer connected to power shelf via supplied cable USB A Port not used ...

Page 22: ...Vertiv NetSure 2100 Series 48 VDC Power System User Manual Proprietary and Confidential 2022 Vertiv Group Corp 16 This page intentionally left blank ...

Page 23: ...er System User Manual Proprietary and Confidential 2022 Vertiv Group Corp Connect with Vertiv on Social Media https www facebook com vertivI https www instagram com vertiv https www linkedin com company vertiv https www twitter com vertiv ...

Page 24: ...s or registered trademarks of their respective owners While every precaution has been taken to ensure accuracy and completeness here Vertiv Group Corp assumes no responsibility and disclaims all liability for damages resulting from use of this information or for any errors or omissions Specifications rebates and other promotional offers are subject to change at Vertiv s sole discretion upon notice...

Reviews: