Vertiv
|
NetSure -48V DC Bulk Output Power System Installation and User Instructions (UM582127100)
|
Rev. E
37
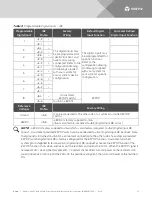
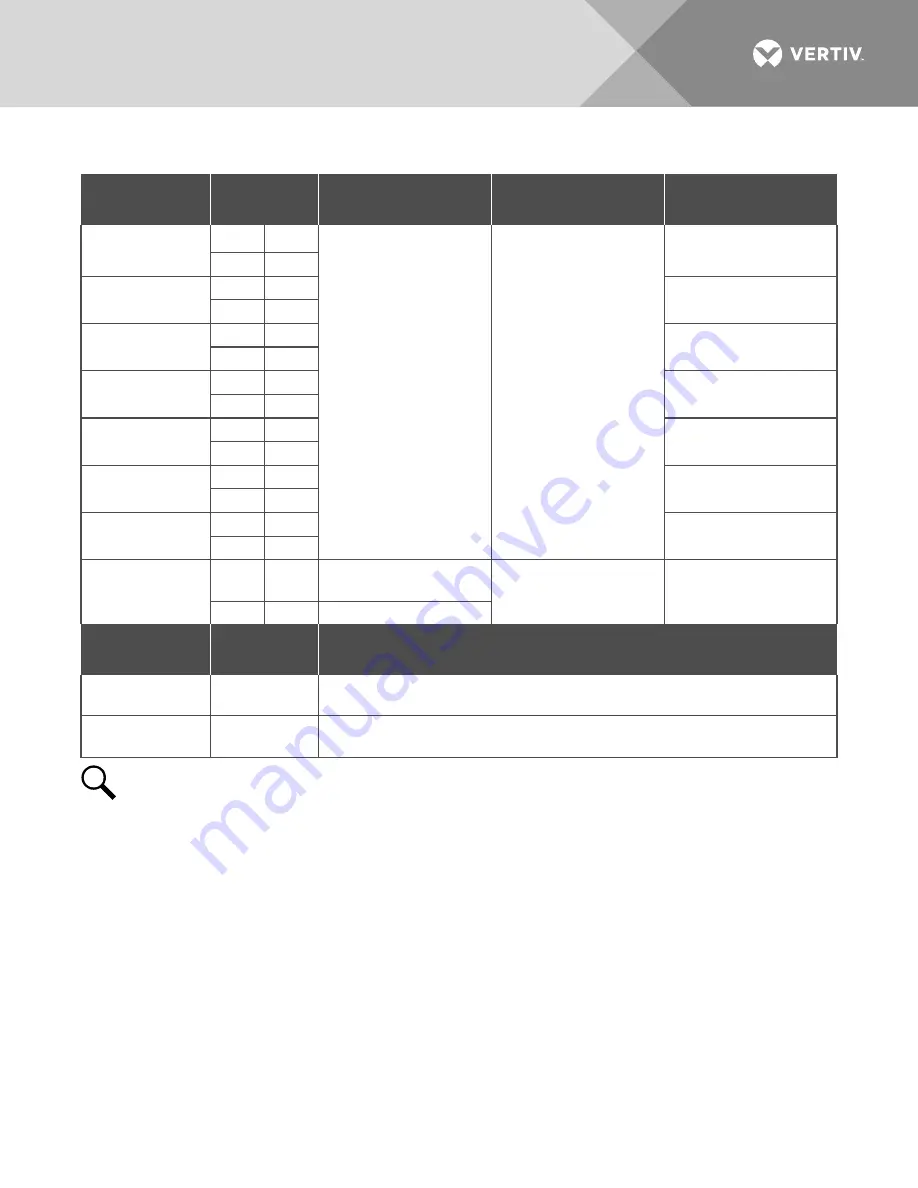
Table 3:
Programmable Digital Inputs – IB2
Programmable
Digital Input
IB2
Pin No.
Factory
Wiring
Default Digital
Input Function
Customer Defined
Digital Input Function
1
J3-2
+
The digital inputs may
be preprogrammed for
specific functions and
have factory wiring
connected. Refer to the
configuration drawing
(C-drawing) supplied
with your system for
your system’s specific
configuration.
The digital inputs may
be preprogrammed for
specific functions.
Refer to the
configuration drawing
(C-drawing) supplied
with your system for
your system’s specific
configuration.
J3-1
–
2
J3-4
+
J3-3
–
3
J3-6
+
J3-5
–
4
J4-2
+
J4-1
–
5
J4-4
+
J4-3
–
6
J4-6
+
J4-5
–
7
J5-2
+
J5-1
–
8
J5-4
+
(to customer
ESTOP switch)
ESTOP
J5-3
–
to J5-6 (-48VDC)
Reference
Voltages
IB2
Pin No.
Factory Wiring
Ground
J5-5
(can be connected to the other side of a customer furnished ESTOP
switch)
-48VDC
J5-6
-48VDC is factory supplied to J5-6.
J5-6 is also factory jumpered to J5-3 (Digital Input #8, minus)
NOTE!
-
48VDC is factory supplied to J5-6 which is also factory jumpered to J5-3 (Digital Input #8,
minus). A customer provided ESTOP switch can be connected to J5-4 (Digital Input #8, positive). Note
that ground is furnished on J5-5 for a convenient connection to the other side of a customer provided
ESTOP switch. Digital Input #8 is factory configured for the ESTOP function. Customer-furnished
system ground applied to terminal J5-4 (Digital Input #8, positive) activates the ESTOP function. The
ESTOP function shuts down and locks out the rectifiers and opens the LVD’s. When the ESTOP signal is
removed, LVD’s close (if battery present). To restart the rectifiers; turn AC power to the rectifiers OFF,
wait 30 seconds or more (until the LEDs on the rectifier extinguish), then turn AC power to the rectifiers
ON.

