11
power supply socket and give the tool for repair to authorized
service workshop.
SWITCHING ON / SWITCHING OFF
The mains voltage must match the voltage on the rating plate of
the saw.
Switch on the tile saw only when the material that is to be cut is
away from the cutting blade.
Switching on
•
Press the switch button (
9
) to “
I
” position (
fig. B
).
Switching off
•
Press the switch button (
9
) to “
O
” position.
CUTTING TO DEFINED WIDTH
Fence (
1
) should always be used for lengthwise cutting. You can install
fence on both sides of the work table (
5
) and adjust to required size
with scales located on the work table top.
MITRE CUTTING
Disconnect the tool from power supply.
•
Loosen the work table locking knobs (
8
) located on both sides of
the saw.
•
Set the work table (
5
) at desired angle. You can read the defined
angle on the scale (
b
) (
fig. B
).
•
Tighten the work table locking knobs (
8
).
•
Set the fence (1) to required width of cutting.
•
Switch on the tile saw and make a cut.
CUTTING NARROW PIECES OF MATERIAL
•
Set the fence (
1
) to appropriate cutting width.
•
Use both hands to move material pressed against the fence towards
the cutting blade (advance rate should be matched with the cutting
blade capacity).
•
Always use the push stick (included) when working in proximity of
the cutting blade (
11
).
When cutting short and narrow objects, use the push stick from
the beginning.
CUTTING MATERIAL AT 45
0
ANGLE
When cutting at
45
0
angle always use the fence (
1
) and the angle bar
(
2
).
•
Set the angle bar (
2
) along the fence (
1
).
•
Set the fence (
1
) to desired distance and secure with fence fixing
knobs (
10
).
•
Put material to the angle bar.
•
Switch on the saw and move the angle bar (
2
) with the material
along the fence (
1
) towards the cutting blade (
11
).
•
Switch the saw off when cutting is finished.
WET CUTTING
•
Lift slightly one side of the tile saw.
•
Place water container (
7
) by sliding it under the cutting blade
bottom shield (
6
).
•
Fill ¾ of the water container with water.
Before each cut and during cutting make sure the water level
covers bottom part of the cutting blade.
INSTRUCTIONS FOR CUTTING
• Install appropriate cutting blade, depending on the task at
hand (dry or wet cutting).
• It is recommended to make a try cut after each adjustment to
ensure the new settings are correct and check dimensions.
• After switching the saw on, wait until cutting blade reaches its
top maximum speed running idle, only then you can proceed
with cutting.
• Wait until cutting blade comes to a complete stop, only then
you can remove cut off pieces.
OPERATION AND MAINTENANCE
Disconnect the tool from power supply network before starting
any adjustment, maintenance or repair.
•
When the work is finished, carefully remove all pieces of material
and sawdust from the work table, area around cutting blade and
its shields.
•
Clean the tile saw with a cloth or stream of compressed air.
•
Do not clean the tile saw with water or chemical cleaning agents.
•
Store the saw in a dry place, beyond reach of children.
•
Keep ventilation holes of the motor unobstructed.
•
Regularly check that all bolts and fixing screws are tightened. They
may get loosened after some time of the tile saw operation.
•
Entrust replacement of power cord and other repairs only to
authorized service workshop.
CUTTING BLADE REPLACEMENT
Disconnect the tool from power supply.
•
Lift slightly one side of the tile saw and remove the water container
(
7
).
•
Undo fixing screws (
c
) on both sides and remove the cutting blade
bottom shield (
6
) (
fig. C
).
•
Remove separator located under cutting blade bottom shield (
6
).
•
Use the ring spanner to undo a nut (
d
), while blocking the spindle
with flat spanner (
fig. D
).
•
Important! Turn the nut counter-clockwise, accordingly to direction
of rotation of the cutting blade.
•
Remove the outer flange (
e
) and remove cutting blade (
11
) by
sliding it down off the inner flange.
•
Carefully clean surfaces of the mount flanges and fix new cutting
blade, following above described procedure in reverse order
(observe correct direction of cutting blade rotation).
•
Place separator under cutting blade bottom shield (
6
).
•
Install the cutting blade bottom shield (
6
) on the separator and fix
those two pieces with screws (
c
) to side surface of the tile saw.
All faults should be repaired by service workshop authorized by the
manufacturer.
Summary of Contents for 52G281
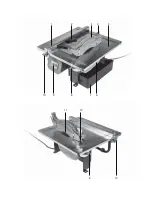
Page 2: ...1 12 11 3 2 4 6 7 8 9 10 10 8 5...
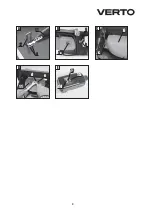
Page 3: ...3 A a 3 5mm 12 11 B b 9 8 C c 6 D 11 e d E 14 15 13...
Page 16: ...16 1 2 3 4 5 6 7 8 9 10 11 12 13 14 RESET 15 TEST 1 1 2 2 3 1 4 1 5 2 3 12 4 3 12...
Page 19: ...19 52G281 30 30 UA 1 2 3 4 5 6 7 8 9 10 11 12 13 14 RESET 15 TEST...
Page 48: ...48 1 2 3 4 5 6 7 8 9 10 11 12 13 14 RESET 15 TEST 1 1 2 2 3 1 4 1 5 2 3 12 4 3 12 3...
Page 58: ...58 1 2 3 4 5 6 7 8 9 10 11 12 13 14 RESET 15 TEST...
Page 60: ...60 8 5 b B 8 1 1 11 450 450 1 2 2 1 1 10 2 1 11 7 6 7 6 c C 6 d D e 11 6 6 c...
Page 68: ......


