background image

20

4

5 Sale Street, Freemans Bay,  

Auckland, New Zealand.  

Phone +64 9 950 4848  

info@vespermarine.com   www.vespermarine.com

www.facebook.com/vespermarine

CortexH1QuickStart0618

200-522310-01

Copyright © 2020, Vesper Marine Ltd.

Vesper Marine, Vesper, Cortex, VHF Reimagined, WatchMate, AIS 

WatchMate, WatchMate Vision, deckWatch, smartAIS and Always 

On Always Visible Always Watching are trademarks or registered 

trademarks of Vesper Marine Ltd.


All other products are trademarks or registered trademarks of their 

respective owners. 

Unless otherwise indicated, all documentation and operating software 

contained within this product or distributed with this product is 

copyrighted by Vesper Marine Ltd. All rights are reserved. 

Portions of this product may use software licensed under open source 

license agreements. Source code for the applicable software is 

available upon request from Vesper Marine Ltd.

Summary of Contents for CORTEX H1

Page 1: ...1 QUICK START GUIDE H1 TETHERED HANDSET H1P PORTABLE HANDSET ...

Page 2: ...Radio key 12 Power light Red Also ambient light sensor for auto dimming 13 Touchscreen 14 Microphone 15 Call Hold down for DSC menu shortcut 16 Enter 17 Channel 16 18 Man Overboard MOB 8 9 10 11 12 Hold down for DSC menu shortcut Otherwise use when a target is selected or on a Colision avoidance or MOB screen to initiate a call 4 5 6 2 1 3 7 16 15 14 13 17 18 ...

Page 3: ...uestions and FAQ s 1 Turn Cortex M1 ON Switch the vessel s batteries ON to power the M1 2 Turn the handset ON Press and hold the Power button for 2 seconds 3 Select WiFi from the Status Bar 4 From the list of available WiFi identify and select the M1 WiFi SSID Note The WiFi SSID is identified by the M1 serial number eg CORTEX 95211616 Note The Cortex V1 package M1 H1 ships with the handset pre con...

Page 4: ...F Radio Instruments GPS integrated sensors and NMEA data Situational functions Anchor watch Monitor the vessel at anchor Collision avoidance Assess and manage a potential collision scenario MOB Man Overboard monitoring The Configuration Menu is used for initial setup and system monitoring including AIS programming network settings and sensor setup Main Menu touch on the wrench icon to open the Con...

Page 5: ...mple pictured Transponder receive only mode Stealth mode is controlled on off from within this menu 4 WiFi status Select connect and confirm M1 WiFi 5 Battery status H1P only The Power light above touchscreen indicates 6 GPS status Satellite view and GPS settings 7 Alarm status 1 2 5 4 3 6 7 Solid Idle mode Charging Pulsing Discharging off cradle Flashing Discharging on cradle ...

Page 6: ...ls 2 Transmission Power 3 Push to Talk 4 Last Channel 5 Channel Presets 6 Change Channel Or via touchscreen 7 VHF VHF Radio key 8 Selected Channel Swipe to change or use click wheel 9 VHF Mute alarms still active 10 Dual Watch 11 VHF Settings 12 Call Initiate DSC Call 13 Channel 16 1 2 3 4 5 6 8 11 12 13 10 7 9 ...

Page 7: ... channel is already selected to bypass steps 1 and 2 3 Verify the channel is clear You cannot obstruct the communications of other channel users due to Federal Communications Commission FCC and international guidelines 4 Press the Push To Talk PTT key Transmitting is displayed 5 Speak into the handset 6 Release the PTT key To make a VHF call Push To Talk PTT ...

Page 8: ...DSC Individual Call screen monitors the status of your DSC call If your Individual DSC call is unanswered you may RESEND If your Individual DSC call is answered you may CONTINUE CALL or select END CALL END CALL ends the DSC call and opens the VHF screen on the requested channel Fig 3 Fig 2 Fig 1 Note DSC can also be swiftly accessed from the Plotter Directory and Situational screens The CALL butto...

Page 9: ...strument Fields Each field is customizable from available sensors on board Options include Depth COG SOG Heading Speed Apparent Wind True Wind Ground Wind Water temp UTC Position Voltage 2 Field Lock Select the icon to lock and unlock each instrument view Swipe through available instruments 3 Instrument Settings Select an instrument layout 3 1 1 1 2 ...

Page 10: ...ss A Vessel 3 Target Speed 4 Class B Vessel 5 Your Vessel 6 Vector Line Position a target will be in 10 minutes 7 Range Markers 8 Plotter Settings Orientation Declutter Collision Profile Alarm settings Plotter 6 7 8 1 2 3 4 5 5 Knots 5 9 Knots 10 14 Knots 15 19 Knots 20 Knots Class A Class A Towing Class B Power Class B Sail ...

Page 11: ...CPA and TCPA 9 Heading Your vessel s heading Heading up orientation 10 Selected Target Highlighted with boxed corners 11 Crossing Situation 12 Range zoom IN OUT 13 Center Boat 14 Selected Target Details AIS Symbol Name CPA TCPA location to your vessel 15 Target location relevant to your vessel Displayed by the lower right hand icon 14 12 13 9 10 11 15 ...

Page 12: ...atic and dynamic AIS information Select the following functions 1 Call Initiate an individual DSC call 2 Find Moves to the Plotter screen to locate the target 3 Add Remove Add the target to Favorites in the Directory 4 Avoid Moves to the Collision Avoidance screen 1 4 3 2 ...

Page 13: ...orites 1 Favorites 2 Man Overboard 3 Target Type 4 Target Name 5 Add Vessels to Favorites Manually enter individual or a group target View in favorites 6 Recent Calls and alarms from recent targets 7 Nearby Live AIS targets 8 Target location relative to your vessel 8 1 2 3 4 5 6 7 ...

Page 14: ...he Guard Zone radius the alarm will sound alerting that your anchor is dragging Eg See the position of the vessel 12 The alarm has sounded the radius is red indicating the vessel has dragged outside of the set radius Select the Drop or Weigh Anchor icon 5 as you weigh anchor to deactivate Anchor watch Anchor watch via the Cortex Onboard App Anchor watch can be accessed and controlled from your pho...

Page 15: ...Your vessel track markers every 15 sec 5 Drop or Weigh Anchor 6 Anchor Move 7 Change Guard Zone Radius 8 Depth via NMEA input 9 Heading 10 Guard Zone 11 Equivalent Scope For current guard radius 12 Your vessel 13 Range and Bearing to Anchor 14 Change anchor orientation Anchor watch 1 3 2 4 5 6 7 11 8 9 10 12 13 14 ...

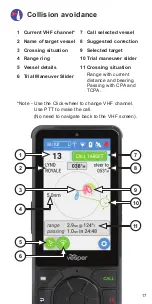
Page 16: ...d at what distance you will be closest to the target vessel at current course and speed Selecting CALL TARGET 7 opens a window to make an individual DSC call to that vessel The DSC screen will pre populate the vessel channel and call type From this screen you can initiate a DSC call add them to your Favorites or return to the Collision avoidance screen Selecting Vessel Details 5 displays all vesse...

Page 17: ...aneuver Slider 7 Call selected vessel 8 Suggested correction 9 Selected target 10 Trial maneuver slider 11 Crossing situation Range with current distance and bearing Passing with CPA and TCPA 10 7 8 9 11 1 4 3 5 6 2 Note Use the Click wheel to change VHF channel Use PTT to make the call No need to navigate back to the VHF screen ...

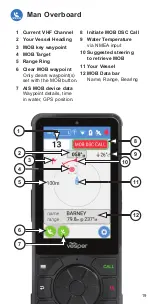
Page 18: ... alarm is acknowledged or canceled An MOB data bar providing Name Range and Bearing to the MOB since the MOB was initiated is displayed along the bottom of the screen 12 The MOB data bar persists across all pages and remains visible until the MOB alarm is canceled The track back will automatically treat the MOB target 4 position with a higher priority than the MOB waypoint 3 Note 7 The MOB alarm d...

Page 19: ...6 Clear MOB waypoint Only clears waypoint s set with the MOB button 7 AIS MOB device data Waypoint details time in water GPS position 8 Initiate MOB DSC Call 9 Water Temperature via NMEA input 10 Suggested steering to retrieve MOB 11 Your Vessel 12 MOB Data bar Name Range Bearing 5 6 7 2 4 8 9 12 11 3 1 10 ...

Page 20: ... Visible Always Watching are trademarks or registered trademarks of Vesper Marine Ltd All other products are trademarks or registered trademarks of their respective owners Unless otherwise indicated all documentation and operating software contained within this product or distributed with this product is copyrighted by Vesper Marine Ltd All rights are reserved Portions of this product may use soft...

Reviews: