29
Maintenance
Cleaning the rear filter
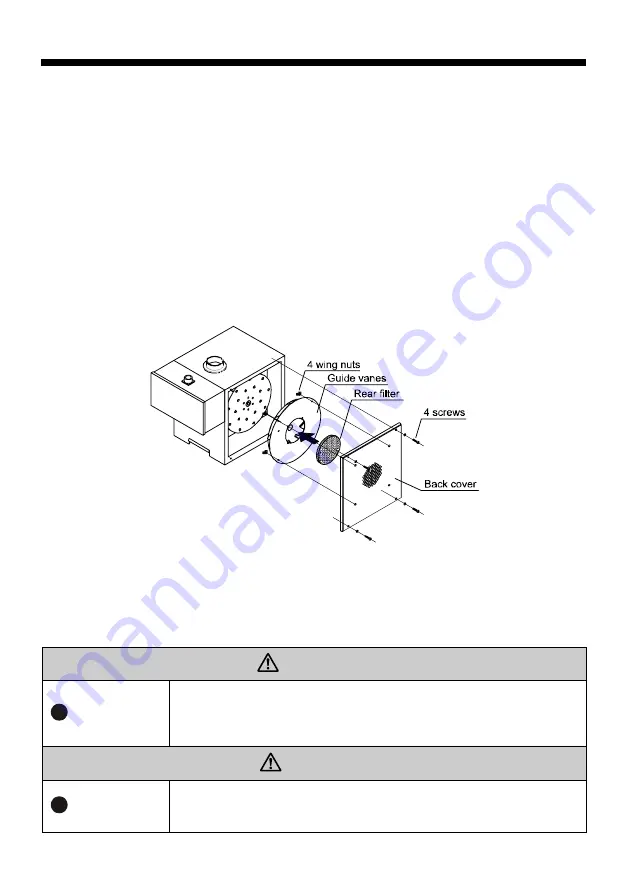
The rear filter is located inside the rear cover. Clean it as required.
(1) Turn off the power.
Switch the main switch to OFF (
○
) to turn off the power and always
confirm that the fan has completely stopped rotating. Not doing so
could stir up the fine dust that has been collected.
(2) Loosen the screws.
Loose the 4 screws on the rear cover and remove the rear cover.
(3) Loosen the wing nuts. Loosen the 4 wing nuts inside the rear cover.
(4)
Remove the rear filter.
Remove the rear filter that is inserted into the guide vanes.
(5) Remove the dust.
(6) Clean up the dust.
(7) Reinstall the rear filter.
Reinsert the rear filter into the guide vanes.
(8) Attach the guide vanes
to the rear cover.
Tighten the 4 wing nuts to attach the guide vanes to the rear cover.
(9) Close the rear cover.
Tighten the 4 screws to attach the rear cover.
Filter Replacement
If the filter has become damaged or if after long use the vacuum force does not recover even after the
dust is removed, use the following procedure to replace the filter. (Filters can be purchased through
the product was purchased.)
WARNING
Remember
Make sure the fan has completely stopped rotating before replacing the
filter. In addition, sufficiently monitor the power so that the fan is not
accidentally turned on while the filter is being replaced. If the fan is on, it will
vacuum in things or blow them around, which could cause an accident.
CAUTION
Remember
If the front cover is not attached properly, the vacuum force could drop or
overloading could cause the motor to burnout, so make sure the cover is
attached properly.
Summary of Contents for IPC40-E
Page 9: ...9 Dimensions ...

