background image

- 44 -

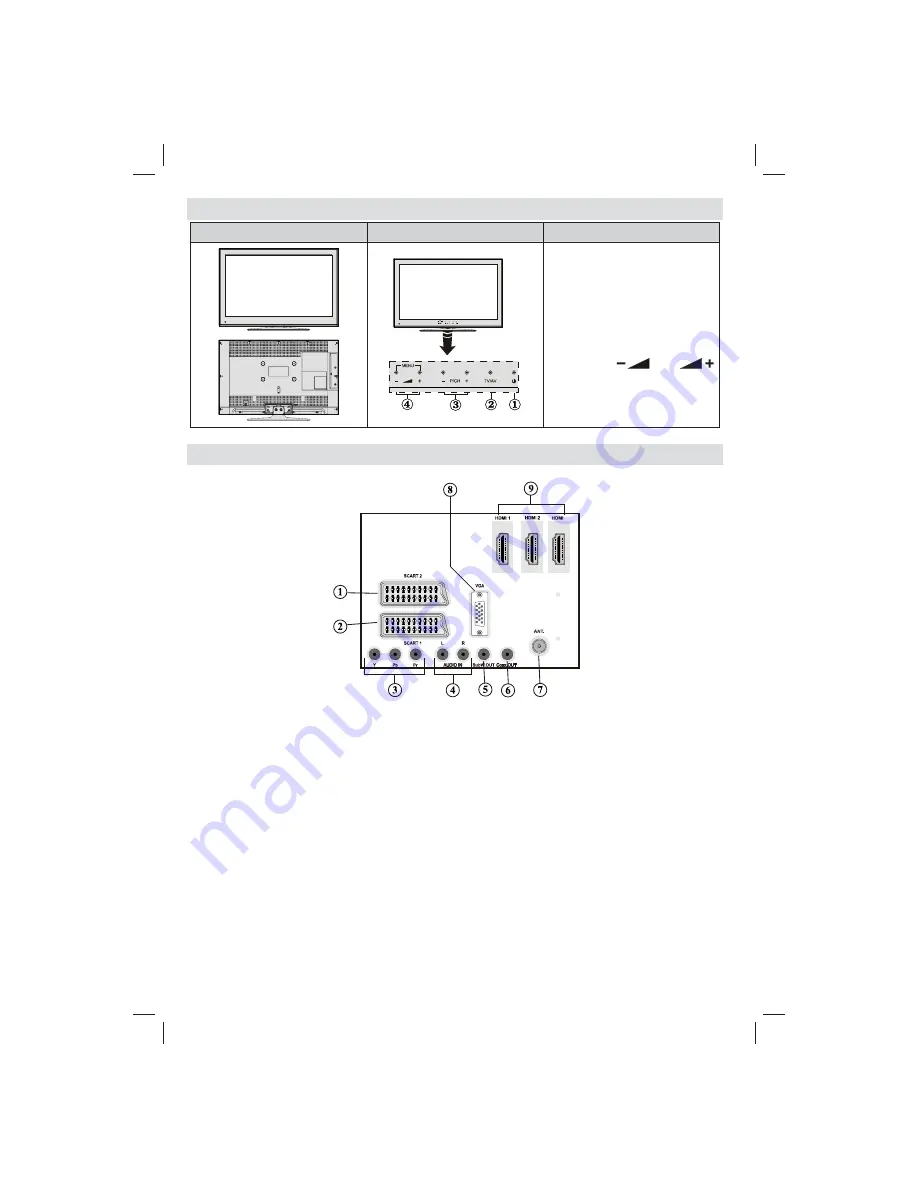
TV and Operating Buttons

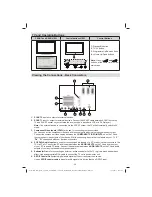
FRONT and REAR VIEW

Control buttons VIEW

Control Buttons

1. 

Standby/On button

2. 

TV/AV button

3. 

Programme Up/Down buttons

4. 

Volume Up/Down buttons

Note: Press  “

” and 


buttons at the same time to view 
main menu.

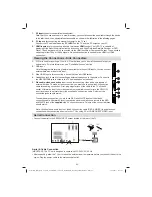
Viewing the Connections - Back Connectors

3

SCART 2

1. 

 inputs or outputs for external devices.

SCART 1 

2. 

input or output for external devices. Connect the SCART cable between SCART socket on 

TV and SCART socket on your external device (such as a decoder, a VCR or a DVD player). 

Note: If an external device is connected via the SCART socket, the TV will automatically switch to AV 
mode. 

Component Video Inputs (YPbPr)

3. 

 are used for connecting component video.

You can connect the component video and audio sockets with a device that has component output. 
Connect the component video cables  between the 

COMPONENT VIDEO INPUTS

 on on the TV and 

the component video outputs of your device. While connecting, be sure that the letters on your TV, “

Y

”, 

Pb

”, “

Pr

” correspond with your device’s connectors.

PC/YPbPr Audio Inputs

4. 

 are used for connecting audio signals of a PC or a device that connects to the 

TV via YPbPr. Connect the PC audio cable between the 

AUDIO INPUTS

 on the TV and audio output  

of your PC to enable PC audio. Connect the audio cable between 

AUDIO INPUTS

 on the TV and audio 

outputs of your device to enable component audio.

Subwoofer Out

5. 

 is for connecting an external, active subwoofer to the TV to give a much deeper bass 

effect. Use an appropriate RCA cable to connect the TV set to a subwoofer unit.

S/PDIF Coaxial Out

6. 

 outputs digital audio signals of the currently watched source. 

Use an 

SPDIF coaxial cable

 to transfer audio signals to a device that has S/PDIF input

02_MB65_[GB]_DVB_TC_PVR_PLATINIUM7_5110UK_32965WLED_10076346_50201230.indd   Ksm1:44

02_MB65_[GB]_DVB_TC_PVR_PLATINIUM7_5110UK_32965WLED_10076346_50201230.indd   Ksm1:44

30.12.2011   14:11:42

30.12.2011   14:11:42

Summary of Contents for DESIGN 32PF6213

Page 1: ...2 2 KULLANIM KILAVUZU OPERATING INSTRUCTIONS DESIGN 32PF6213 32 LED TV...

Page 2: ...nal Listesini S ralama 19 Ekran Bilgileri 19 Ortam Taray c Kullanarak Medya Oynat c 19 USB zerinden Foto raf G r nt leme 20 Slayt G sterisi Se enekleri 20 USB zerinden Video Oynat m 21 Kay t K t phane...

Page 3: ...n saklay n Cihaz bir ba kas na satarken veya verirken bu kullan m talimatlar n da mutlaka birlikte verin Bu r n se ti iniz i in te ekk r ederiz Bu k lavuz TV nizi do ru al t rmak i in sizi y nlendirec...

Page 4: ...ektedir Y ld r m F rt na ve y ld r m halinde veya tatile karken g kablosunu prizden kar n z Yedek Par alar Yedek par a gerekti inde servis teknisyeninin retici taraf ndan belirtilen veya asl yla ayn t...

Page 5: ...r nt l ve a k ileti im ile tam bir s r kleyici zellik a s ndan zengin bir surround ses deneyimi olu turur Lisans Bildirimi opsiyonel Dolby Laboratories in lisans ile retilmi tir T CAR MARKA B LG S Dol...

Page 6: ...i ini prizden ekiniz Bu da enerji t ketimini azaltacakt r Uzun s re uzakta kalacaksan z prizden kar n z Y ll k olarak TV nizi G Tasarrufu Modunda kullanman n TV nizi prizden ekmek yerine bekleme modun...

Page 7: ...video modunda Elektronik Program Rehberi 21 Otomatik Kapanma 22 Men a k kapal 23 OK Se Tut TXT modunda Kanal Listesi 24 Sesi Artt r Azalt 25 Y n Tu lar 26 AV Kaynak 27 nceki program imdi EPG modunda...

Page 8: ...t ba lant s yapmak i in kullan l r Bile en videosunu ve ses soketlerini bile en k olan bir ayg ta ba layabilirsiniz Bile en video kablolar n TV zerinde bulunan B LE EN V DEO G R LER NE COMPONENT VIDEO...

Page 9: ...ir cihaz ba lamak i indir 3 Kulakl k giri i harici bir kulakl sisteme ba lamak i in kullan l r TV yi kulakl klardan 4 dinlemek i in KULAKLIK yuvas na ba lay n z opsiyonel Yan ses video ba lant s giri...

Page 10: ...TV niz kapal durumdaykenbirUSBdiskiba lamal s n z Sonra kay t zelli ini etkinle tirmek i in TV nizi a mal s n z NEML Yeni bir USB sabit disk s r c s n kullanmaya ba lamadan nce TV nizin Disk Bi imlen...

Page 11: ...emin hepsiyle ba lant ger ekle tirmek gerekli de ildir HDMI Giri i Scart soketi DVD Oynat c Skart Kablosu tedarik edilmemi tir HDMI Kablosu HDMI SCART tedarik edilmemi tir otomatik olarak kapat l r Te...

Page 12: ...sterilen k s mdan nazik e geriye ekerek kart n z ine iki AAA R3 veya e de er tip piller yerle tiriniz Pilleri takarken kutupland rmay do ru yap n ve pil kapa n de i tirin Not Uzaktankumandaaletiuzuns...

Page 13: ...TV nize ba lad ktan sonra farkl giri kaynaklar na ge ebilirsiniz Kaynaklar do rudan de i tirebilmek i in kumanda zerindeki SOURCE tu una bas n z TV nizi hem uzaktan kumanda hem de TV zerindeki tu lar...

Page 14: ...uygun olarak EPG verilerini g sterir Mavi tu Filtre Filtreleme se eneklerini g sterir Kay t TV se ilen program kaydedetmeye ba layacakt r Kayd durdurmak i in bu d meye tekrar basabilirsiniz K rm z tu...

Page 15: ...iptal olacakt r Not Mevcut kanal zerinde aktif bir kay t varsa her hangi ba ka bir kanal veya kayna a amazs n z Zamanlay c Ayar Zamanlay c y Sil EPG men de bir program se tikten sonra OK tu una bas n...

Page 16: ...nda zerinde bulunan rakam tu lar n kullanarak ayarlayabilirsiniz Bu uygulamadan sonra Arama A amas n 8000 KHz ya da 1000 KHz olarak ayarlayabilirsiniz 1000 KHz se erseniz televizyon arama i lemini det...

Page 17: ...s n z B yle bir durumda bulunan kanallar haf zaya al nacakt r Manuel Ayarlama PUCU Bu zellik do rudan yay n giri i i in kullan l r ve OK tu lar n kullanarak Kurulum men s nden ManualChannelScan Manuel...

Page 18: ...ar n kullanarak ayarlayabilirsiniz Bu uygulamadan sonra Arama A amas n 8000 KHz ya da 1000 KHz olarak ayarlayabilirsiniz 1000 KHz se erseniz televizyon arama i lemini detayl olarak yapacakt r Bu neden...

Page 19: ...stedi iniz kanal se iniz ve Edit Name Ad D zenleme se ene ini se iniz Devam etmek i in OK tu una bas n z veya tu una bas ld nda bir nceki bir sonraki karaktere ge ilir veya tu lar na bas lmas o andaki...

Page 20: ...rilerini b t n kanallar yay nlamaz Program ad ve zaman mevcut de ilse bilgi ba l bo g r nt lenir Se ilen kanal kilitli ise kanal g r nt lemek i in d rt basamakl rakamsal kodu girmeniz gerekir varsay l...

Page 21: ...i sarar Altyaz Ses D L tu u Altyaz y Sesi ayarlar Atla YE Ld me Bir zaman atlar stedi iniz zaman girmek i in say sal tu lar kullan n ve devam etmek i in tekrar YE L d meye bas n Sar Alt yaz zaman d ze...

Page 22: ...nle tirirseniz ayn m zik veya video dosyas tekrar tekrar al nacakt r oynat lacakt r tekrar fonksiyonu E er oynat m veya OK d mesi ile ba lat r ve sembol n etkinle tirirseniz m zik veya video dosyas ka...

Page 23: ...esine basarak zaman kayd rma modundan kabilirsiniz E zamanl zaman kayd rma kayd n n s resi ba l USB diskinin boyutuna ve Kay t Yap land rma men s nde tan mlanm olan makismum Zaman Kayd rma s resine ba...

Page 24: ...De i tirme Resim Formatlar Farkl yak nla t rma zoom modlar nda resim g r nt lemek i in TV nin g r n m oran n resim boyutunu de i tirebilirsiniz Resim boyutunu de i tirmek i in SCREEN butonuna tekrar...

Page 25: ...ideo ayarlar n optimize eder ve daha iyi bir g r nt kalitesinin elde edilmesine yard m eder Bu ekilde Pixellence Demo Modu ten tonu tespiti boyunca kontrast keskinli i renk iyile tirmesini ve ten tonu...

Page 26: ...I PC FUL MODU se ene i A k olmal d r Bu e baz z n rl klerde aktif olmayabilir Not Bir HDMI cihaz na ba lan rsan z ve TV yi HDMI moduna getirirseniz bu zellik g r nebilir hale gelir 1080i 1080P z n rl...

Page 27: ...AVL i levi programlar aras nda sabit bir k seviyesi elde etmek i in sesi ayarlar rne in reklamlar n ses seviyesi genellikle programlardan daha y ksektir Dinamik Bas Dinamik Bas TV cihaz n n bas efekti...

Page 28: ...k simgeyi se iniz Ayarlar men s n g r nt lemek i in OK tu una bas n z Conditional Access Ko ullu Eri im i vurgulamak i in veya tu una bas n z ve men elerini g r nt lemek i in OK tu una bas n z Dil Ter...

Page 29: ...e iniz Bir e ayarlamak i in veya tu unu kullan n z Daha fazla se enek g r nt lemek i in OK tu una bas n z lk kurulumda lke se ene ini ngiltere olarak ayarlaman z halinde Eri kin Kilidi g r n r olmayac...

Page 30: ...lerini ve ebeveyn ayarlar n belirler Zamanlay c y kaydetmek i in YE L tu a bas n z ptal etmek i in KIRMIZI tu a bas n z Bir Zamanlay c y D zenleme veya tu una basarak d zenlemek istedi iniz zamanlay c...

Page 31: ...TOMAT K veya MAN EL olarak ayarlanabilir OTOMAT K se ildi inde Tarih Zaman ve Zaman Dilimi se eneklerini ayarlamak m mk n olmayacakt r E er Saat DilimiAyar olarak MAN EL se ilirse Saat Dilimi de i tir...

Page 32: ...tenilen yay n tipini veya tu lar n kullanarak ayarlad n zda televizyon ilgili kanal listesini g sterecektir E er ilgili kaynak hi bir kay tl kanal i ermezse ekranda Bu tip i in hi bir kanal bulunamam...

Page 33: ...z K t G r nt Do ru TV sistemini se tiniz mi TV setiniz veya ev anteniniz topraklanmam ses cihazlar na veya neon klar na vs yak n m yerle tirilmi Da lar ve y ksek binalar ift g r nt lere veya hayalet r...

Page 34: ...0Hz O 720P 60Hz O 1080I 50Hz O 1080I 60Hz O 1080P 50Hz O 1080P 60Hz O 1080P 24 HZ O X Mevcut de il O Mevcut Baz durumlarda LED TV sinyali d zg n g r nt lenemeyebilir Sorun kaynak ekipmandaki standartl...

Page 35: ...1024x768 75Hz 14 1152x864 75Hz 15 1280x768 60Hz 16 1360x768 60Hz 17 1280x768 75Hz 18 1280x960 60Hz 19 1280x960 75Hz 20 1280x1024 60Hz 21 1280x1024 75Hz 22 1400x1050 60Hz 23 1600x1200 60Hz 24 1920x108...

Page 36: ...g sterilir Y kleme ba ar ile tamamland nda yeni yaz l m aktive etmek i in yeniden ba latma mesaj g r n r Yeniden ba latma operasyonunun devam i in OK tu una bas n 2 3 AM arama ve y kseltme modu E er...

Page 37: ...18 6 ve UK DTT profili ile uyumlu Yaln zca Birle ik Krall k i in Frekans aral Sadece ngiltere modelleri i in 474 850 MHz II VIDEO H 264 MPEG 4 k s m 10 ana ve y ksek seviye 4 1 MPEG 2 MP HL video z c...

Page 38: ...veya mavi olabilir Tip 2 S rekli s n k alt piksel siyah bir ekilde g r n r ISO 13406 2 standard na g re a a daki zet tablo alt piksel hatalar i in belirlenmi tir Tipi A klama Adet Not Tip1 Rastgele 5...

Page 39: ...arda resimde mozaiklenme veya resim netlik ve keskinli i az g r nt de ekranda baz efektler olu abilir Bu bir ar za de ildir E er r n n z y ksek z n rl destekleyen bir r n ise iyi bir g r nt performans...

Page 40: ...type is set and selected and confirmed the installation process will start and the progress bar will move along Press MENU button to cancel process Located channels are not stored if the process is c...

Page 41: ...tended or unauthorized modifications have been made To operate your LED TV in extreme ambient conditions may cause the damage of the device Preparation For ventilation leave a free space of at least 1...

Page 42: ...he mains and therefore it must remain readily operable Headphone Volume Excessive sound pressure from earphones and headphones can cause hearing loss Installation To prevent injury this device must be...

Page 43: ...vironmental Information This television is designed to consume less energy to save the environment You not only help to save the environment but you can also save money by reducing electricity bills t...

Page 44: ...r video mode Electronic Programme Guide 21 Sleep timer 22 Menu on off 23 OK Select Hold in TXT mode Channel List 24 Volume up down 25 Navigation buttons 26 AV Source 27 Previous programme Now in EPG m...

Page 45: ...the TV and the component video outputs of your device While connecting be sure that the letters on your TV Y Pb Pr correspond with your device s connectors PC YPbPr Audio Inputs 4 are used for connect...

Page 46: ...ck to listen to the TV from headphones optional Side audio video connection 5 input is used for connecting video and audio signals of external devices To make a video connection you must use the suppl...

Page 47: ...d especially the USB device itself Do not pull out USB module while playing or recording a file Programme Recording To record a programme you should first connect a USB disk to your TV while the TV is...

Page 48: ...HDDs are supported until two partitions Some stream packets may not be recorded because of signal problems so sometimes video may freezes during playback Record Play Pause Display for PlayListDialog...

Page 49: ...located on the back of the handset by gently pulling backwards from the indicated part Insert two AAA R3 or equivalent type batteries inside Observe the correct polarity when inserting batteries and...

Page 50: ...ol and onset buttons Operation with the Buttons on the TV Volume Setting Press button to decrease volume or button to increase volume a volume level scale slider will be displayed on the screen Progra...

Page 51: ...tabase in accordance with the genre Info available in the programme guide will be searched and results matching your criteria will be listed Now Shows the current programme RECORD the TV will start to...

Page 52: ...Set Timer Delete Timer After you have selected a programme in EPG menu press the OK button and and Options screen will be displayed Select Set Timer on Event option and press OK button You can set a t...

Page 53: ...you select AERIAL option from the Search Type screen the television will search for digital and analogue TV broadcasts Note You can press MENU button to cancel After all the available stations are sto...

Page 54: ...iplex or frequency number using the numeric buttons and press OK button to search Digital Cable Manual Search In cable manual scan you can enter frequency modulation symbol rate and network channel sc...

Page 55: ...ton to select the channel that will be processed Press or button to select a function on Channel List menu Use P P buttons to move page up or down Press BLUE button to view filtering options Press MEN...

Page 56: ...nnel to the favourites list Press OK button again to remove Button Functions OK Add remove a station YELLOW Tag untag a channel GREEN Tag untag all channels BLUE Displays filtering options Managing St...

Page 57: ...named as USB Drive1 Select a device by using or button and press OK Viewing Videos via USB When you select Videos from the main options the available video files will be filtered and listed on this sc...

Page 58: ...Title Artist or Album Loop Shuffle GREEN button Press once to disable Loop Press again to disable both Loop and Shuffle Press once more to enable only Shuffle Press again to enable all You can follow...

Page 59: ...able recording feature Otherwise recording feature will not be available Press PAUSE button while watching a broadcast for switching to timeshifting mode In timeshifting mode the programme is paused a...

Page 60: ...Resume Recommences the recordings Play from offset Specifies a playing point Note Viewing main menu and menu items will not be available during the playback Press STOP button to stop a playback and r...

Page 61: ...as this is its original size Panoramic This stretches the left and right sides of a normal picture 4 3 aspect ratio to fill the screen without making the picture appear unnatural The top and bottom of...

Page 62: ...al colours select Normal option Setting Warm option gives white colours a slight red stress Picture Zoom Sets the picture size to Auto 16 9 Subtitle 14 9 14 9 Zoom 4 3 Panoramic or Cinema Movie Sense...

Page 63: ...an be changed to Music Movie Speech Flat Classic and User Press the MENU button to return to the previous menu Note Equalizer menu settings can be changed manually only when the Equalizer Mode is in U...

Page 64: ...card is activated When no module is inserted No Common Interface module detected message appears on the screen Refer to the module instruction manual for details of the settings Viewing Conditional Ac...

Page 65: ...displayed Parental Settings Menu Operation Select an item by using or button Use or button to set an item Press OK button to view more options If you set Country option as UK in the first time instal...

Page 66: ...ding Configuration item in the Settings menu to configure recording settings The following menu is displayed for recording configuration The following options are available for adjustments Start Early...

Page 67: ...and press OK button Press or buttons to select a source Use or button to enable or disable the selected source Changes are automatically stored Configuring Other Settings To view general configuration...

Page 68: ...ressing PRESETS button you can change Picture Mode settings in accordance with your viewing requirements Available options are Dynamic Natural Cinema and Game Displaying Subtitles If there is any subt...

Page 69: ...used to connect the aerial If you are in doubt consult your dealer No Picture means that your TV is not receiving a transmission Have you selected the correct button on the remote control Try once mor...

Page 70: ...1080I 50Hz O 1080I 60Hz O 1080P 50Hz O 1080P 60Hz O 1080P 24 HZ O X Not Available O Available In some cases a signal on the LED TV may not be displayed properly The problem may be an inconsistency wit...

Page 71: ...68 72Hz 13 1024x768 75Hz 14 1152x864 75Hz 15 1280x768 60Hz 16 1360x768 60Hz 17 1280x768 75Hz 18 1280x960 60Hz 19 1280x960 75Hz 20 1280x1024 60Hz 21 1280x1024 75Hz 22 1400x1050 60Hz 23 1600x1200 60Hz 2...

Page 72: ...MA LBR 10Mbit sec MPEG4 PCM MP3 avi MS ISO MPEG4 PCM MP3 Support SP and ASP MJPEG PCM 30fps VGA Music m4a Sample Rate 8K 48KHz Bit Rate 24kbps 384Kbps mp3 MPEG 1 2 Layer 1 2 3 MP3 Sample Rate 8K 48KHz...

Page 73: ...menu is enabled the TV wakes up at 03 00 and searches broadcast channels for a new software upgrade If new software is found and downloaded successfully with next power up the TV opens with new softwa...

Page 74: ...t with ISO IEC 135818 6 and UK DTT profile UK only Frequency range 474 850 MHz for UK models II VIDEO H 264 MPEG 4 part 10 main and high profile level 4 1 MPEG 2 MP HL video decoder HD display multi f...

Page 75: ...er the following explanation about a possible sub pixel error This problem can be encountered during the production phase as well as during use Sub pixel errors are mainly 2 types Type 1 The sub pixel...

Page 76: ...ts mosaic images may occur sharpness and resolution of the image may be low some effects may arise on the screen This is not a failure If your appliance supports high definition it is recommended that...

Page 77: ...ar Pazarlama A Zorlu Plaza Avc lar 34310 stanbul T RK YE Tel 0212 456 22 00 Faks 0212 422 02 03 Cihaz n z n G mr k ve Ticaret Bakanl veya Bakanl k a tespit ve ilan edilen kullan m mr cihaz n fonksiyon...

Reviews: