background image

English

   - 18 -

If the selected network is protected with a password, 

please  enter  the  correct  key  by  using  the  virtual 

keyboard. You can use this keyboard via the directional 

buttons and the 

OK

 button on the remote control. 

Wait until the IP address is shown on the screen.
This means that the connection is now established. 

To  disconnect  from  a  wireless  network,  highlight 

Network Type 

and press Left or Right buttons to set 

as 

Disabled

.

If your router has WPS (Wi-Fi Protected Setup) button, 

you can directly connect your Display to the modem/

router without entering a password or adding the 

network first.


Highlight the 

Press WPS on your wifi 

router

 option and press the 

OK

 button. Then press 

the WPS button on your router/modem to connect.

Highlight 

Internet Speed Test

 and press the 

OK

 button 

to  check  your  internet  connection  speed.  Highlight 

Advanced


Settings 

and press the 

OK

 button to open 

the advanced setting menu. Use directional and numeric 

buttons to set. Press the 

OK

 button to save settings 

when complete. 

Other Information

The  status  of  the  connection  will  be  displayed  as 

Connected

 or 

Not


Connected

 and


the current IP 

address, if a connection is established.

Connecting to your mobile device via WiFi

• 

If your mobile device has WiFi feature, you can connect 

it to your Display via a router, in order to access the 

content in your device. For this, your mobile device 

must have an appropriate sharing software.

• 

Connect to your router following the steps stated above 

in the 

Wireless Connectivity

 section.

• 

Afterwards, engage your mobile device with the router 

and then activate the sharing software on your mobile 

device. Then, select files that you want to share with 

your Display.

• 

If the connection is established correctly, you will be 

able to access the shared files from your mobile device 

via the 

Media Browser

 of your Display.

• Enter the 

Media Browser

 menu and the playback 

device selection OSD will be displayed. Select your 

mobile device and press the 

OK 

button to continue.

• 

If  available,  you  can  download  a  virtual  remote 

controller application from the server of your mobile 

device application provider. 

Note: 

This feature may not be supported on all mobile devices.

Connecting Other Wireless Devices

Your Display supports another short range wireless 

connection technology too. A pairing is required before 

using these kind of wireless devices with the Display 

set. You should do the followings to pair your device 

with the Display:

• Set the device to pairing mode
• Start device disc

overy on the Display

Note:

 Refer to the user manual of the wireless device to learn 

how to set the device to pairing mode.

You can connect audio devices wirelessly to your 

Display. Unplug or switch off any other connected 

audio device in order for wireless connection feature 

to work correctly. For audio devices you should use 

the 

Audio Link

 option in the 

System>Sound

 menu. 

Select the menu option and press the 

OK

 button to 

open the related menu. Using this menu you can 

discover and connect the devices that use 

the same 

wireless technology and start to use them. Follow the 

on-screen instructions. Start the device discovery. A 

list of available wireless devices will be displayed. 

Select the device you want to connect from the 

list and press the 

OK

 button to connect. If “

Device 

connected

”  message  is  displayed,  the  connection 

is successfully established. If the connection fails 

try it again.

Note:

 Wireless devices may operate within the same radio 

frequency range and may interfere with one another. To 

improve the performance of your wireless device place it at 

least 1 meter away from any other wireless devices.

Connectivity Troubleshooting

Wireless Network Not Available

• 

Ensure that any firewalls of your network allow the 

Display wireless connection. 

• 

Try searching for wireless networks again, using the 

Network/Internet Settings

 menu screen.

If the wireless network does not function properly, try 

using the wired network in your home. Refer to the 

Wired Connectivity

 section for more information on 

the process.

If  the  Display  does  not  function  using  the  wired 

connection,  check  the  modem  (router).  If  the 

router does not have a problem, check the internet 

connection of your modem.

Connection is Slow

See the instruction book of your wireless modem to 

get information on the internal service area, connection 

speed, signal quality and other settings. You need to 

have a high speed connection for your modem.

Distruption during playback or slow 

reactions

You could try the following in such a case:
Keep at least three meters distance from microwave 

ovens, mobile telephones, bluetooth devices or any 

other Wi-Fi compatible devices. Try changing the active 

channel on the WLAN router.

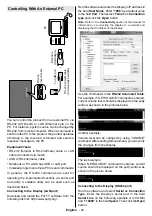
Summary of Contents for PDU86S30B/7

Page 1: ...86 218cm UHD BIG SIZE MONITOR 86 218cm UHD GRAND ECRAN DE TAILLE 86 218cm UHD GROßER GRÖßE MONITOR PDU86S30B 7 ENGLISH FRANCAIS DEUTSCH USER MANUAL MANUEL D UTILISATION BEDIENUNGSANLEITUNG ...

Page 2: ......

Page 3: ...assthrough 11 Usage of the Start URL 11 Display Menu Contents 12 Connectivity 17 Internet Browser 20 Internal USB Operations 20 OSD Rotation Support 21 DisplayPort 21 HDMI Out 21 Controlling With An External PC 21 RS232 LAN Command Tables 23 RS232 HEX Commands 32 Maximum Pixel Rates 33 System Features 33 Accessories Included 34 License Notification 34 Vesa Wall Mount Measurements 35 Installation O...

Page 4: ...ect the product from the mains Do not touch the controls other than those described in the operating instructions Improper adjustment of controls not described in the instructions can cause damage which often requires extensive adjustment work by a qualified technician Important Safety Information CAUTION RISK OF ELECTRIC SHOCK DO NOT OPEN CAUTION TO REDUCE THE RISK OF ELECTRIC SHOCK DO NOT REMOVE...

Page 5: ...istics and performance as the original parts Use of unauthorized parts can result in fire electric shock and or other danger Safety checks Upon completion of service or repair work request the service technician to perform safety checks to ensure that the product is in proper operating condition Wall mounting When mounting the product on a wall be sure to install the product according to the metho...

Page 6: ...way from metal objects which may cause a short circuit resulting in leakage or in extreme cases fire or even an explosion Remove dead batteries from equipment and all batteries from equipment you know you are not going monitor where it cannot be pushed pulled over or knocked down Care should be taken to route all cords and cables connected to the monitor so that they cannot be pulled or grabbed by...

Page 7: ...leaked battery fluid gets on your skin or clothing rinse immediately and thoroughly If it gets into your eye bathe your eye well rather than rubbing and seek medical treatment immediately Leaked battery fluid that gets into your eye or your clothing may cause a skin irritation or damage your eye CAUTION RISK OF EXPLOSION IF BATTERY IS REPLACED BY AN INCORRECT TYPE DISPOSE OF USED BATTERIES ACCORDI...

Page 8: ...ote Control Sensor Rear Side 1 1 VGA 2 RS232 3 HDMI 2 4 Display Port Input 5 Display Port Output 6 HDMI 1 7 Headphone 8 USB 2 0 9 USB 3 0 10 IR Input 11 HDMI Out 12 Internal USB Compartment 13 Connection Slot for PC OPS Module 1 2 3 4 6 8 7 9 10 11 12 13 5 ...

Page 9: ...Display off Press the centre of the joystick in and hold it down for a few seconds the Display will turn into standby mode To change source Press the centre of the joystick in the sources list will appear on the screen Scroll through the available sources by pushing the joystick up or down To change volume Increase the volume by pushing the joystick right Decrease the volume by pushing the joystic...

Page 10: ... side of the Display to switch it on from standby or to switch it into standby mode V V Joyst ck LED Status Status of the monitor Power LED not lit Power on Power LED lit Power off Standby mode Power LED flashing slow Scheduler active Power LED flashing fast Power up down and software update ...

Page 11: ...ed menus or returns to previous screen 9 Network Displays Network Internet Settings menu 10 Sound Displays Sound Settings menu 11 Coloured Buttons Follow the on screen instructions for coloured button functions 12 Picture Mode Cycles between picture modes 13 Rapid reverse Moves frames backwards in media such as movies 14 Pause Pauses the media being played 15 Media browser Opens the media browsing...

Page 12: ...supply external hard disk drives or USB memory stick to your Display by using the USB input s of the Display IMPORTANT Back up the files on your storage devices before connecting them to the Display Manufacturer will not be responsible for any file damage or data loss Certain types of USB devices e g MP3 Players or USB hard disk drives memory sticks may not be compatible with this Display The Disp...

Page 13: ...e 0 Zero button on the remote control for 3 seconds This feature CEC can also be enabled or disabled under the System Settings More menu The Display supports also ARC Audio Return Channel feature This feature is an audio link meant to replace other cables between the Display and the audio system A V receiver or speaker system When ARC is active Display does not mute its other audio outputs automat...

Page 14: ...desired value Noise Reduction If the signal is weak and the picture is noisy use the Noise Reduction setting to reduce the amount of noise Colour Temp Sets the desired colour temperature value Cool 1300K Normal 9300K and Warm 8500K options are available Picture Zoom Sets the desired image size format Movie Sense Press left right buttons to set Movie Sense to Low Medium High or Off While Movie Sens...

Page 15: ...es that this menu item is set to Headphone If it is set to Lineout the output from the headphone socket will be set to maximum which could damage your hearing Digital Out Sets digital out audio type PCM and Compressed options are available Surround Sound Surround sound mode can be changed as On or Off Bass Gain Controls the bass gain level Use Left or Right button to set Note This feature may not ...

Page 16: ...isplays serial number of the unit Cannot changed by user Model name Displays model name of the unit Cannot changed by user Save model information Copies the model information data of the unit to a connected USB device Temperature Settings Press OK to open the Temperature Settings menu screen Current system temperature will be displayed You can also change the maximum system shutdown temperature us...

Page 17: ...X There is no need to restart the Display after selection in order to work with the protocols correctly If the selection is changed the latest selected protocol will be preserved and started when the Display is booted up Note that ASCII HEX selection is always working as expected It does not matter if the debug logs are enabled or not Also note that HEX protocol will work with the baud rate value ...

Page 18: ...e This menu will not be available if OPS is not supported or not connected to the unit Scheduler Settings Press OK to open the Scheduler Settings menu screen You can set up to 4 different schedulers Highlight the Status column of the desired scheduler option and set as Enabled by using the Left Right directional buttons after pressing the OK button Using the scheduler options you can set the unit ...

Page 19: ... SSID settings via the modem s software Broadband ISP connection A Wireless N router IEEE 802 11a b g n with simultaneous 2 4 and 5 GHz bands is designed to increase bandwidth These are optimized for smoother and faster HD video streaming file transfers and wireless gaming The frequency and channel differ depending on the area The transmission speed differs depending on the distance and number of ...

Page 20: ... short range wireless connection technology too Apairing is required before using these kind of wireless devices with the Display set You should do the followings to pair your device with the Display Set the device to pairing mode Start device discovery on the Display Note Refer to the user manual of the wireless device to learn how to set the device to pairing mode You can connect audio devices w...

Page 21: ...dia Browser by using the directional buttons from the main menu and press OK The media browser will then be displayed Audio Video Sharing Select the desired media type on the main media browser menu and press OK If sharing configurations are set properly Device Selection screen will be displayed after selecting the desired media type If available networks are found they will be listed on this scre...

Page 22: ...cursor to the top of the page The browser bar will appear Highlight the Speed Dial button and press the OK button Then select Add to Speed Dial option and press the OK button Fill in the blanks for Name and Address highlight OK and press the OK button to add Whilst you are on the site you wish to add to the Speed Dial list highlight the Opera button and press the OK button Then highlight Add to Sp...

Page 23: ...to stream 4 different FHD images the source device should be capable of supporting this operation Note It is recommended to use a DisplayPort certified cable for connection In SST operation mode the total amount of the Displays is limited a maximum of 7 units due to HDCP encryption If the signal is stable and there is no cable loss there will be no limitation in case the source content is not HDCP...

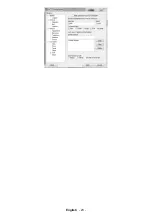
Page 24: ...ftware from the following link first http www putty org Run the software and enter the Display s IP address in the field Host Name Enter 1986 as a default value in the field Port Then select Telnet as Connection type and click the Open button Note Refer to the Connectivity section of this manual for information on connecting the Display to a network and displaying the IP address of the Display Use...

Page 25: ...English 23 ...

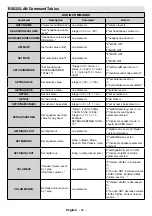
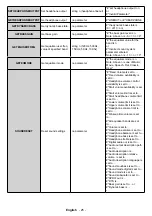
Page 26: ...L state no parameter avl state is SETDYNAMICBASS Set dynamic bass state integer n 0 off 1 on set dynamic bass state to n SETEQUSERFREQ Set equalizer user freq value for any band string n 120Hz 500Hz 1 5KHz 5KHz 10KHz integer n 13 n 13 Example SETEQUSERFREQ 120Hz 10 setEQUserFreq set to n or Incorrect sound system parameter entered or Incorrect equalizer mode It should be USER mode GETDIGITALOUT Ge...

Page 27: ...peech Flat Classic User SOUNDRESET Reset sound settings no parameter Fixed Volume is set to Fixed volume availability is set to Headphone volume control availability is set to Start volume availability is set to Start volume limit is set to Start headphone volume limit is set to Lower volume limit is set to Upper volume limit is set to Headphone volume limit is set to Wakeup time volume is set to ...

Page 28: ...s set GETSTARTURL Gets the start URL no parameter Start URL is GENERAL DISPLAY COMMANDS Command Description Parameter Return SETRC Enables disables remote control commands string integer n n ON n OFF set remote state On or set remote state OFF SETSOURCE Set source as enable disable string n integer b n SCART1 n SCART2 n FAV n SVHS n HDMI1 n HDMI2 n HDMI3 n HDMI4 n YPBPR n VGA n SCART1S n SCART2S b...

Page 29: ...off USBOPERATIONS Perform USB Operations no parameter You may observe prints Bank 0 Bank 1 etc Be sure or observe debug print outs MFC ISP done will be writen This may take over 10 minutes GETMENUTIMEOUT Get menu time out mode no parameter menu timeout mode is OFF menu timeout mode is n can not get menu timeout mode Note Above n is one of 15 30 60 GETTVLIFETIME Prints Monitor life time in minutes ...

Page 30: ...0 Slovenian 21 Slovak 22 Serbian 23 Finnish 24 Swedish 25 Turkish 26 Czech 27 Ukranian 28 Bulgarian 29 Arabic 30 Persian 31 Hebrew 32 Belarussian 33 Macedonian 34 Montenegrin 35 Kazakh 36 Thai Example CHANGELNG 0 25 To set system language to Turkish Active language was changed or Incorrect item parameter entered SETCOUNTRY Set country in no channels state string integer n TURKEY GERMANY setCountry...

Page 31: ... nnn nnn nnn nnn string nnn nnn nnn nnn set default gateway nnn nnn nnn nnn setting default gateway is failed GETDEFAULTGATEWAY get default gateway eg GETDEFAULTGATEWAY no parameter the default gateway is nnn nnn nnn nnn GETDNS1 get DNS server 1 eg GETDNS1 no parameter DNS server 1 is nnn nnn nnn nnn GETDNS2 get DNS server 2 eg GETDNS2 no parameter DNS server 1 is nnn nnn nnn nnn INTERNETSPEED sta...

Page 32: ...tness value is set to n Same value is set Do nothing Incorrect value must between defined ranges 0 100 GETSHARPNESS Get picture sharpness value no parameter THE SHARPNESS VALUE SETSHARPNESS Set picture sharpness value int n 0 n 100 Picture brightness value is set to n Same value is set Do nothing Incorrect value must between defined ranges 0 100 GETCOLOUR Get picture colour value no parameter THE ...

Page 33: ...ameter Colour temp is GETHUE Get picture hue value no parameter Hue level is GETSKINTONE Get picture skin tone value no parameter Picture skin tone is GETPATTERN Get selected pattern of the Monitor screen no parameter The pattern is VIDEO WALL COMMANDS Command Description Parameter Return SETROWCOUNT Set row count integer n 0 n 100 set row count to n GETROWCOUNT Get row count no parameter row coun...

Page 34: ...w style Flat or Folder string n Flat Folder The view style is set to Flat or Folder GETVIEWSTYLE get view style Flat or Folder no parameter The view style is Flat or Folder SETSLIDESHOWINTERVAL set slide show interval integer n 5 10 15 20 25 30 The slideshow interval is set to seconds GETSLIDESHOWINTERVAL get slide show interval no parameter The slideshow interval is seconds SETUSBAUTOPLAY set usb...

Page 35: ...e boards are explained below 1 RJ12 is connected to UART 0 DSUB9 is connected to UART 1 Therefore UART 0 and UART 1 could be tested separately in this type of the board 2 RJ12 and DSUB9 both are connected to UART 0 UART 1 is supported for OPS module but not reachable Therefore only UART 0 could be tested in this type of the board Activate HEX protocol on Display a Enter Signage Settings Menu b Cha...

Page 36: ...4 74 176 O O O 45 60 74 25 O O O 1920x1080i 28 13 50 74 25 O O O 33 716 59 94 74 175 O O O 33 75 60 74 25 O O O 1920x1080p 56 25 50 148 5 O O O 67 432 59 95 148 35 O O O 67 5 60 148 5 O O O UHD only for 4K models 3840x2160p 67 5 30 297 O O 3840x2160p 135 60 297 O Consult your local dealer to get information on the chasis version of your display System Features Panel Panel type 86 218cm 24 7 ELED R...

Page 37: ...nstruction Book Quick Start Guide IR Extender Wall Mount Kit Information for Users on Disposal of Old Equipment and Batteries European Union only Equipment bearing these symbols should not be disposed as general household waste You should look for appropriate recycling facilities and systems for the disposal of these products Notice The sign Pb below the symbol for batteries indicates that this ba...

Page 38: ...Minimum 50 mm E Ambient temperature range 0 35ºC When installing the product on an indented wall allow at least the space specified above between the product and wall for ventilation and ensure that the ambient temperature is kept between 0ºC 35ºC Do not expose the product to direct sunlight We will take no responsibility for any damages or failures in case our products are not being used subject ...

Page 39: ...llation Initiale 11 Lecture de média via entrée USB 11 Serveurs intermédiaires CEC et CEC RC 12 Utilisation de l URL de démarrage 12 Contenus du Menu du téléviseur 14 Connectivité 20 Navigateur Internet 23 Opérations de périphérique USB interne 24 Support de rotation OSD 24 Port d affichage 25 Sortie HDMI 25 Contrôle à partir d un PC externe 25 Panneau de commande RS232 LAN 27 ...

Page 40: ...eut donc se briser si l appareil tombe ou s il subit un choc Veillez à ne pas vous blesser avec les éclats de verre si le panneau LCD vient à se briser L utilisation du moniteur ne doit pas entraîner des risques mortels ou des dangers qui pourraient provoquer directement la mort des blessures sur le personnel des dommages physiques sévères Consignés de Sécurité Importantes ATTENTION RISQUE DE CHOC...

Page 41: ...ans les orifices de l appareil peut causer un choc électrique un court circuit des pièces internes et ou un incendie Pour la même raison ne renversez pas d eau ou de liquide sur le produit Réparation Sauf disposition expresse écrite par le département technique du fabricant sur une exécution de base de l appareil évitez de réparer vous même votre appareil Autrement votre garantie peut être suspend...

Page 42: ...ommages causés au cordon peuvent entraîner un incendie ou un choc électrique Lorsque vous débranchez l appareil tirez toujours directement sur la fiche Ne tirez pas sur le cordon pour débrancher l appareil N utilisez pas le cordon d alimentation avec une prise d alimentation L utilisation d une rallonge peut causer un incendie dû à la surchauffe Ne retirez n insérez pas la fiche d alimentation ave...

Page 43: ... cas extrêmes provoquer un incendie ou une explosion Conservez les piles inutilisées dans leur emballage d origine et loin des objets métalliques car ceux ci pourraient provoquer un court circuit qui pourrait provoquer une fuite ou dans des cas extrêmes un incendie ou une explosion Retirez toutes les piles y compris les usagées d un appareil que vous n allez pas utiliser pendant une longue période...

Page 44: ...onctionnelle Cet appareil de par sa conception ne nécessite pas de branchement sécurisé à un système électrique de mise à la terre Le système de mise à la terre est utilisé pour des besoins fonctionnels Raccordement à une terre de protection La borne marquée est destinée au branchement du conducteur de terre de protection associé au câblage d alimentation Borne dangereuse sous tension Les bornes m...

Page 45: ...télécommande Arrière 1 1 VGA 2 RS232 3 HDMI 2 4 Port écran d entrée 5 Port écran de sortie 6 HDMI 1 7 Casque 8 USB 2 0 9 USB 3 0 10 Entrée IR 11 Sortie HDMI 12 Compartiment de périphérique USB interne 13 Module de connexion pour PC OPS 1 2 3 4 6 8 7 9 10 11 12 13 5 ...

Page 46: ...maintenez enfoncé pendant quelques secondes l écran passe alors en mode veille Pour modifier la source Appuyez au centre du bouton joystick pour faire apparaître la liste de sources à l écran Faites défiler les sources disponibles en appuyant sur le bouton joystick Haut ou Bas Pour régler le volume Augmentez le volume en appuyant sur le bouton joystick vers la droite Diminuez le volume en appuyant...

Page 47: ...ier du mode Veille ou pour le mettre en mode Veille V V Joyst ck Voyant DEL de statut État du moniteur DEL d alimentation éteint Power on DEL d alimentation allumé Mise hors tension Mode Veille Clignotement du voyant DEL d alimentation lent Planificateur actif Clignotement du voyant DEL d alimentation rapide Mise sous hors tension et mise à jour du logiciel ...

Page 48: ...ourne à l écran précédent 9 Réseau Affiche le menu Paramètres réseau Internet 10 Audio affiche le menu Paramètres audio 11 Boutons de Couleur Suivez les instructions qui s affichent à l écran pour les fonctions des boutons de couleur 12 Mode Image permet de naviguer entre les modes Image 13 Retour rapide lecture rapide en arrière des médias comme les films 14 Pause suspend la lecture du média en c...

Page 49: ...ur OK pour confirmer Remarque Évitez d éteindre le téléviseur lors de la Première Installation Veuillez noter que certaines options ne seront pas disponibles selon le choix du pays Lecture de média via entrée USB Remarque En cas d insertion d un périphérique USB interne et externe le lecteur multimédia utilise uniquement le périphérique externe Vous pouvez connecter des disques durs externes de 2 ...

Page 50: ...nouveau périphérique d entrée CEC est connecté il s affiche dans le menu source avec son propre nom au lieu du nom des ports HDMI connectés lecteur DVD enregistreur 1 etc La télécommande du téléviseur peut automatiquement fonctionner après avoir sélectionné la source HDMI connectée Pour terminer cette opération et à nouveau commander le téléviseur à distance appuyez sur le bouton Quick Menu de la ...

Page 51: ...ctionnez Opérations du périphérique USB dans le menu Paramètres de signalisation et appuyez sur OK Éteignez puis rallumez l écran Remarque Vous pouvez vérifier si l URL de démarrage comporte le lien choisi à partir du menu Paramètres de signalisation Options de liaison ...

Page 52: ...éclairage La fonction de rétroéclairage sera inactive si le Mode Économie d énergie est réglé sur une option autre que Personnalisation Paramètres avancés Contraste dynamique Vous pouvez régler le rapport de contraste dynamique à votre guise Réduction du bruit Si le signal de diffusion est faible et l image est bruyante utilisez la fonction Réduction du bruit pour réduire l intensité du bruit Temp...

Page 53: ...sques veuillez également vous assurer que leur volume est réglé à un niveau faible afin d éviter que votre audition ne soit endommagée Uniquement disponible lorsque l option Casque Sortie de ligne est définie en tant que Casque Liaison audio Appuyez sur OK pour ouvrir l écran de menu Liaison audio Grâce à cet écran vous pouvez découvrir et connecter sans fil des périphériques audio AVL Limitation ...

Page 54: ...une tablette pc compatible en plus de l application requise installée vous pourrez partager lire les photos sur votre téléviseur Reportez vous aux instructions de votre logiciel de partage pour plus d informations Paramètres de mur vidéo Appuyez sur OK pour afficher le menu Paramètres du mur vidéo Les options Nombre de lignes Nombre de colonnes Cellule et Décalage sont disponibles CEC Avec cette f...

Page 55: ...nible ou si aucun périphérique USB n est connecté au téléviseur l image de l option Aucun signal s affiche Si l image de l option Aucun signal ne s affiche pas l OSD de l option Aucun signal s affiche à l écran Il est important de paramétrer l option AutoPlay dans le menu Navigateur multimédia Paramètres elle fonctionne néanmoins en mode Basculement Si vous sélectionnez la Recherche d entrée le té...

Page 56: ...2 et Lan pour rallumer votre téléviseur si elles ont servi à l éteindre Appuyez sur le bouton Gauche ou Droit pour activer ou désactiver cette fonction Délai de mise sous tension Permet de définir un délai lors de la mise sous tension Cette valeur peut être comprise entre 0 et 2 000 ms par paliers de 100 ms Le téléviseur s allume après expiration du délai défini Démarrage automatique Permet de con...

Page 57: ...est ni pris en charge ni connecté à l appareil Paramètres du planificateur Appuyez sur OK pour afficher le menu Paramètres du planificateur Vous pouvez régler jusqu à 4 planificateurs différents Sélectionnez la colonne Statut de l option du planificateur souhaitée et réglez sur Activé à l aide des boutons de direction Gauche Droit après avoir appuyé sur le bouton OK Grâce aux options du planificat...

Page 58: ...terminé Connexion sans fil Optionnel Connexion à un réseau sans fil L écran ne peut pas se connecter aux réseaux avec un SSID masqué nom du réseau sans fil Pour que votre modem SSID soit visible vous devez changer vos paramètres SSID via le logiciel du modem Connexion FSI à large bande Un routeur sans fil N IEEE 802 11a b g n avec des bandes simultanées de 2 4 et 5 GHz est conçu pour augmenter la ...

Page 59: ...ion de partage audio vidéo sur votre périphérique mobile Enfin sélectionnez les fichiers que vous voulez partager avec votre téléviseur Si la connexion est établie correctement vous pourrez maintenant accéder aux fichiers partagés de votre téléphone portable via le Navigateur multimédia de votre téléviseur Entrez dans le menu Navigateur multimédia et l OSD de sélection du périphérique playback s a...

Page 60: ...nisseur de service Internet Un pare feu pourrait expliquer le problème de connectivité et de découverte pendant l utilisation de l écran en mode Partage audio vidéo ou pendant la navigation via la fonction Partage audio vidéo Domaine non valide Assurez vous de vous être déjà connecté à votre PC avec un nom d utilisateur mot de passe autorisé et veillez également à ce que votre domaine soit actif a...

Page 61: ...tallées dans le PC Si des applications manquent celles ci s affichent et doivent être installées avant la suite du processus 5 Appuyez sur le bouton Installer L interface intégrée s affiche Ne modifiez pas l interface qui s affiche 6 Appuyez sur le bouton Suivant La fenêtre détaillant les conditions de la Licence EULA va s afficher Veuillez lire l accord de licence attentivement et cochez la case ...

Page 62: ...ie vers un périphérique USB suppression et formatage de disque FAT32 uniquement Retrouvez ces options dans le menu Paramètres de signalisation opérations de périphérique USB interne La mémoire interne de votre écran contient un dossier par défaut nommé int_usb dans le répertoire racine Toutes les opérations de copie à partir vers un périphérique USB s effectuent à l aide de ce dossier Si vous souh...

Page 63: ...e ce port C est une fonction par défaut et vous ne pouvez la désactiver l activer par aucune option de menu Le port de sortie HDMI fonctionne toujours si un périphérique source est connecté au port d entrée HDMI Horloge en Temps Réel RTC Votre téléviseur comporte un RTC Il est utilisé pour conserver les informations réelles relatives à la date et l heure pendant un certain temps si l alimentation ...

Page 64: ... cliquez sur le bouton Remarque Consultez la section Connectivité de ce manuel pour obtenir les informations relatives au branchement de du téléviseur au réseau et à l affichage de l adresse IP du téléviseur Utilisez les commandes de la table de commande RS232 Par exemple si vous entrez la commande GETVOLUME le niveau de volume s affiche sur la fenêtre mastic comme l illustre les images ci après A...

Page 65: ... balance incorrect défini DÉFINITION DE LA BALANCE Définissez la valeur de balance Aucun paramètre le niveau de balance est RÉGLAGE DE L AVL Réglez l état de l AVL n est un entier 0 arrêt 1 marche réglez l état de l AVL à n DÉFINITION DE l AVL Définissez l état de l AVL Aucun paramètre l état de l AVL est RÉGLAGE DE LA BASSE DYNAMIQUE Réglez l état de la basse dynamique n est un entier 0 arrêt 1 m...

Page 66: ... sortie Réglez la sortie de casque sur n ou Paramètres incorrects RÉGLAGE DE LA SORTIE DE CASQUE Réglez la sortie de casque Aucun paramètre LIGNE DE SORTIE ou CASQUE RÉGLAGE DE LA BASSE DYNAMIQUE Réglez l état de la basse dynamique Aucun paramètre l état de la basse dynamique est 0 arrêt 1 marche RÉGLAGE DU GAIN DE BASSE Réglez le gain de basse Aucun paramètre le niveau de gain de basse est n Rema...

Page 67: ... volume du réveil est de Toutes les bandes de l égaliseur sont réglées sur Le volume est réglé sur Le volume du casque est réglé sur L équilibre du casque est réglé sur La basse du casque est réglée sur L aigu du casque est réglé sur La sortie audio numérique est réglée sur Le chemin de description de la sortie audio est réglé sur La description audio est Le niveau relatif de volume de la descript...

Page 68: ...ne L URL de démarrage est définie DÉFINITION DE L URL DE DÉMARRAGE Définit l URL de démarrage Aucun paramètre L URL de démarrage est COMMANDES GÉNÉRALES D ÉCRAN Commande Description Paramètre Retour RÉGLAGE DE LA TÉLÉCOMMANDE Active désactive les commandes de la télécommande n est une chaîne de caractères ou un entier n MARCHE n ARRÊT Active ou désactive la télécommande RÉGLAGE DE LA SOURCE active...

Page 69: ...cun paramètre N de modèle DÉFINITION DU N DE SÉRIE Définit le n de série Aucun paramètre Numéro de série RÉGLAGE DU VOYANT LED Activez ou désactivez le voyant LED Aucun paramètre Voyant LED activé voyant LED désactivé RÉGLAGE DE LA TÉLÉCOMMANDE Activez la télécommande Aucun paramètre Télécommande activée Télécommande désactivée OPÉRATIONS USB Exécuter des opérations USB Aucun paramètre Vous pouvez...

Page 70: ...age définis aux valeurs par défaut SÉLECTIONNER LA SOURCE Sélectionnez la source 0 TV autres index de source certains d entre eux ne sont pas activés entier n 5 FAV 7 HDMI1 8 HDMI2 11 YPbPr 12 Vga 18 DVI 19 DP 20 OPS sélectionnez la source du téléviseur ou sélectionnez une source externe TOUCHE Veille Faites passer le boîtier en mode Veille Pour un mode Veille rapide Aucun paramètre la clé de seco...

Page 71: ...r la langue du système en turc La langue active a été modifiée ou Paramètres d élément incorrects définis RÉGLAGE DU PAYS Ne réglez pas le pays dans un état de canaux n est une chaîne de caractères ou un entier TURQUIE ALLEMAGNE Définissez le pays sur n ou Le pays doit être défini uniquement en mode FTI aucun état de canaux RÉGLAGE DU MODE VEILLE RAPIDE RÉGLEZ LE MODE VEILLE RAPIDE n lorsque n est...

Page 72: ...nnn nnn Chaîne de caractères nnn nnn nnn nnn définir masque sous réseau nnn nnn nnn nnn échec de définition de masque sous réseau OBTENIR UN MASQUE SOUS RÉSEAU Obtenez un masque sous réseau ex OBTENIR UN MASQUE SOUS RÉSEAU Aucun paramètre Le masque sous réseau est nnn nnn nnn nnn DÉFINIR UNE PASSERELLE PAR DÉFAUT Définissez une passerelle par défaut la valeur de passerelle doit être au format nnn ...

Page 73: ...t L OPS n est pas activé L OPS n est pas branché valeur entrée non valide COMMANDES D IMAGE Commande Description Paramètre Retour TEMPÉRATURE DE COULEUR Réglez la température de couleur n est une chaîne de caractères ou un entier réglez la température de couleur à n DÉFINITION DU MODE IMAGE Définissez le mode Image Aucun paramètre Le mode Image est pour la source actuelle MODE IMAGE Sélectionnez l...

Page 74: ...înes de caractères ou des entiers type gain de rouge gain de vert gain de bleu décalage de rouge décalage de vert décalage de bleu 0 valeur 250 La balance des blancs est réglée Valeur de balance des blancs incorrecte 0 255 Type de balance des blancs incorrect DÉFINITION DE LA BALANCE DES BLANCS Définissez la valeur de balance des blancs Le type est une chaîne de caractères ou un entier type gain d...

Page 75: ...nombre de colonnes Aucun paramètre Le nombre de colonnes est SETCOLUMNCOUNT Régler le nombre de colonnes n est un entier 0 n 100 Régler le nombre de colonnes à n GETCOLUMNCOUNT Obtenir le nombre de colonnes Aucun paramètre Le nombre de colonnes est SETCELL Régler le nombre de cellules n est un entier 0 n 100 Régler le nombre de cellules à n GETCELL Obtenir le nombre de cellules Aucun paramètre Le ...

Page 76: ... de signalisation Aucun paramètre l identifiant de signalisation est si la valeur renvoyée est 0 cela signifie qu aucune signalisation n est attribuée 0 est la valeur par défaut COMMANDES DU NAVIGATEUR MULTIMÉDIA Commande Description Paramètre Retour SETVIEWSTYLE Régler le style d affichage plat ou Dossier Caractère n Plat Dossier Le style d affichage est réglé à Plat ou Dossier GETVIEWSTYLE Obten...

Page 77: ...sir la langue du moniteur Chaîne de caractères entier veuillez consulter les abréviations des différentes langues La langue a été modifiée à STWA Arrêter alarme de réveil Aucun paramètre Alarme de réveil arrêtée STEA Arrêter alarme d urgence aucun Alarme d urgence arrêtée UNP Envoyer un message chaîne de caractères entier texte du message 0 le contenu du texte du message doit être mot 1 mot 2 mot ...

Page 78: ...ste deux types de tableau Les connexions UART 0 et UART 1 de ces tableaux sont présentées ci après 1 RJ12 est connecté à UART 0 et DSUB9 à UART 1 Alors UART 0 et UART 1 peuvent être testés séparément dans ce type de tableau 2 RJ12 et DSUB9 sont tous connectés à UART 0 UART 1 est compatible avec le module OPS mais ne lui est pas accessible Alors seul UART 0 peut être testé dans ce type de tableau A...

Page 79: ... 28 13 50 74 25 O O O 33 716 59 94 74 175 O O O 33 75 60 74 25 O O O 1920x1080p 56 25 50 148 5 O O O 67 432 59 95 148 35 O O O 67 5 60 148 5 O O O UHD seulement pour les modèles 4K 3840x2160p 67 5 30 297 O O 3840x2160p 135 60 297 O Contactez votre revendeur local pour avoir des informations relatives à la version du châssis de votre écran Fonctionnalités du système Panneau Type de panneau 86 218cm...

Page 80: ...Manuel d instructions Guide de mise en marche rapide Extendeur IR Kit de Montage Mur Informations applicables aux utilisateurs concernant la mise au rebut de l ancien appareil et des piles Union européenne uniquement L équipement portant ces symboles ne doit pas être mis au rebut comme les ordures ménagères Vous devriez chercher des méthodes et des systèmes de recyclage appropriés pour l éliminati...

Page 81: ...ature ambiante 0 35 ºC Pendant l installation de l appareil sur une paroi dentelée laissez un espace minimum prévu au dessus entre l appareil et la paroi pour assurer la ventilation et veiller à ce que la température ambiante soit maintenue entre 0 ºC 35 ºC N exposez pas l appareil à la lumière directe du soleil Nous ne prendrons aucune responsabilité pour tout dommage ou dysfonctionnement survenu...

Page 82: ... Erstinstallation 11 Medien Abspielen über USB Eingang 11 CEC und CEC RC Passthrough 12 Nutzung der Start URL 13 Inhalte des Bildschirmmenüs 14 Konnektivität 21 Internet Browser 24 Interne USB Operationen 25 OSD Rotation Unterstützung 25 DisplayPort 26 HDMI Ausgang 26 Echtzeituhr RTC 26 Steuerung über einen externen PC 27 RS232 LAN Befehlstabelle 29 RS232 HEX Befehle 41 ...

Page 83: ...ie Steckdose sollte in der Nähe des Geräts installiert und leicht zugänglich sein Berühren Sie nicht über längere Zeit Geräteteile die sich erhitzen können Dies kann auch bei relativ niedrigen Temperaturen zu Verbrennungen führen Das in diesem Gerät verwendete LCD Panel ist aus Glas gefertigt Es kann daher brechen wenn das Gerät fallen gelassen oder Schlägen und Stößen Wichtige Sicherheits informa...

Page 84: ...on Säuglingen Kindern und Hautieren halten Lüftungslöcher des Geräts Die Öffnungen dienen dazu einen konstanten Betrieb des Systems zu ermöglichen und das Gerät vor einer Überhitzung zu schützen Blockieren Sie keinesfalls diese Öffnungen Aus demselben Grund darf das Gerät nicht auf Unterlagen wie Betten Sofa Teppiche usw gestellt werden Niemals Gegenstände durch die Lüftungsschlitze oder Öffnungen...

Page 85: ...ht Lassen Sie das Gerät beim Transport nicht fallen und schützen Sie es gegen Erschütterungen und Stöße Wandmontage Wenn das Gerät an einer Wand montiert werden soll achten Sie darauf dass die Montage gemäß den Vorgaben des Herstellers erfolgt Lesen Sie die Bedienungsanleitung bevor Sie das Gerät an der Wand befestigen Das Set für Wandbefestigung ist optional Sie können es bei Ihrem Händler vor Or...

Page 86: ...auftreten wenn eine nicht sachgemäße oder missbräuchliche Verwendung erfolgt die zum Auslaufen sowie in Extremfällen zu Feuer oder Explosionen führen kann Hier finden sich einige einfache Verhaltenshinweise für die sichere Nutzung von Batterien die dazu dienen sollen derartige Probleme zu vermeiden Achten Sie auf den korrekten Sitz der Batterien sowie auf die richtige Polung Plus und Minussymbole ...

Page 87: ...RAUCHTEN AKKUS DEN ANWEISUNGEN ENTSPRECHEND Kennzeichnungen auf dem Gerät Die folgenden Symbole werden auf dem Gerät als Kennzeichnungen für Einschränkungen und Vorsichtsmaßnahmen sowie Sicherheitshinweise verwendet Jede Kennzeichnung ist dann zu beachten wenn diese auf dem Gerät angebracht worden ist Beachten Sie diese Informationen aus Sicherheitsgründen Gerät der Schutzklasse II Dieses Gerät is...

Page 88: ...enungssensor Rückseite 1 1 VGA 2 RS232 3 HDMI 2 4 Eingangsport anzeigen 5 Bildschirmausgangsport anzeigen 6 HDMI 1 7 Kopfhörer 8 USB 2 0 9 USB 3 0 10 IR Eingang 11 HDMI Aus 12 Internes USB Fach 13 Anschlusssteckplatz für PC OPS Modul 1 2 3 4 6 8 7 9 10 11 12 13 5 ...

Page 89: ...Joysticks für ein paar Sekunden nach unten gedrückt bis der Bildschirm sich in den Standby Modus schaltet Um die Signalquelle zu ändern Drücken Sie zweimal auf die Mitte des Joysticks um die Quellenliste wird auf den Bildschirm aufzurufen Sie können durch die verfügbaren Quellen scrollen indem Sie den Joystick nach oben bzw nach unten drücken Um die Lautstärke zu ändern Erhöhen Sie die Lautstärke ...

Page 90: ...s Bildschirms um diesen aus dem Standby einzuschalten bzw in den Standby Modus zu stellen V V Joyst ck LED Status Status des Monitors Power LED leuchtet nicht Power Ein Power LED leuchtet Strom aus Standby Modus Power LED blinkt langsam Zeitplaner aktiv Power LED blinkt schnell Einschalten Ausschalten und Software Aktualisierung ...

Page 91: ...nüs oder kehrt zum vorherigen Bildschirm zurück 9 N e t z w e r k Z e i g t d a s M e n ü N e t z w e r k Interneteinstellungen an 10 KLANG Zeigt das Menü Ton Einstellungen an 11 Farbtasten Folgen Sie derAnleitung zu den Farbtasten auf dem Bildschirm 12 Bildmodus Durchläuft alle Bild Modi zyklisch 13 Schneller Rücklauf Bewegt Einzelbilder rückwärts in Medien wie Filme 14 Pause Hält die abspielende...

Page 92: ...r Erstinstallation definiert haben Wenn die korrekte PIN eingegeben wird erscheint eine Bestätigungsmeldung mit der Sie gefragt werden on Sie alle Einstellungen löschen und den Bildschirm zurücksetzen möchten Wählen Sie Ja und drücken Sie OK zum Bestätigen Hinweis Schalten Sie den Bildschirm nicht ab während die Erstinstallation durchgeführt wird Bitte beachten Sie dass einige Funktionen unter Ums...

Page 93: ...on aktiviert ist CEC und CEC RC Passthrough Diese Funktion erlaubt die Steuerung der CEC fähigen Geräte die über HDMI Eingänge angeschlossen sind mit Hilfe der Fernbedienung auf dem Bildschirm D i e C E C O p t i o n i m M e n ü System Einstellungen Weitere Einstellungen muss vorher aktiviert werden Drücken Sie die Taste Quelle und wählen Sie den HDMI Eingang des angeschlossenen CEC Geräts im Menü...

Page 94: ...ass diese Dateierweiterung txt ist Öffnen Sie diese Datei mit einer Texteditor Software wie beispielswiese Notepad Schreiben Sie gewünschte URL beispielsweise www starturl com in die Datei und speichern Sie die Änderungen Schließen Sie das USB Speichergerät an den Bildschirm an Markieren Sie die Option USB Betrieb im Menü Signage Einstellungen USB und drücken Sie OK Schalten Sie den Bildschirm aus...

Page 95: ...eser Einstellung wird die Hintergrundbeleuchtung geregelt Die Backlight Funktion ist deaktiviert wenn die Energiespar Option nicht auf Benutzerdefiniert eingestellt ist Erweiterte Einstellungen Dynamischer Kontrast Sie können das dynamische Kontrastverhältnis auf den gewünschten Wert ändern Rauschunterdrückung Wenn das Sendersignal schwach oder verrauscht ist können Sie mit der Option Rauschredukt...

Page 96: ...ern Sie sich bitte ob die Kopfhörerlautstärke auf ein niedriges Niveau gesetzt ist um Gehörschäden zu vermeiden Nur verfügbar wenn die Option Kopfhörer Lineout auf Kopfhörer eingestellt ist Audio Link Drücken Sie OK um den Bildschirm des Audio Link Menüs zu öffnen Bei der Nutzung des Bildschirms können Sie drahtlose Tongeräte ermitteln und mit dem Bildschirm verbinden AVL Automatische Lautstärkebe...

Page 97: ...tion gestattet Ihnen das Teilen von auf Ihrem Smartphone oder Tablet PC gespeicherten Dateien Sofern Sie ein kompatibles Smartphone bzw einen Tablet PC besitzen und die geeignete Software installiert ist können Sie dort gespeicherte Bilder auf dem Bildschirm teilen anzeigen Für weitere Informationen beachten Sie die Anweisungen Ihrer Sharing Software Videowandeinstellungen Drücken Sie OK um den Bi...

Page 98: ...Kein Signal Stellt das bevorzugte Verhalten des Bildschirms ein wenn kein Signal für die augenblicklich eingestellte Eingangsquelle entdeckt wird Failover und Eingangssuche Optionen sind verfügbar Wenn Failover eingestellt ist prüft der Bildschirm das angeschlossene USB Gerät auf für Wiedergabe verfügbare Dateien Wenn keine zur Wiedergabe geeignete Dateien verfügbar sind oder kein USB Gerät mit de...

Page 99: ...r Standardwert beträgt HEX Es besteht keine Notwendigkeit den Bildschirm nach der Auswahl neu zu starten damit das Protokoll korrekt funktioniert Wenn die Auswahl geändert wurde wird das letzte ausgewählte Protokoll behalten und beim Neustart des Bildschirms gestartet Beachten Sie dass dieASCII HEX Auswahl immer wie erwartet warten wird Es spielt keine Rolle wenn die Debug Logs aktiviert sind Beac...

Page 100: ... AUS gestellt ist werden die USB Anschlüsse des Bildschirms deaktiviert Weiterhin ist es möglich diese Option auf 5V zu setzen um Strom mit einer Spannung von 5 Volt über den USB Anschluss zu beziehen Bei dieser Einstellung ist es jedoch nicht möglich auf den Inhalt des USB Browsers über den Medienbrowser des Bildschirms zuzugreifen Videowandeinstellungen Drücken Sie OK um den Bildschirm des Menüs...

Page 101: ...konfiguriert werden Lautstärke Einstellungen Drücken Sie OK um die verfügbaren Menüoptionen anzuzeigen Auf Standardwerte zurücksetzen Markieren Sie diese Option und drücken Sie auf der Fernbedienung die OK Taste um den Bildschirm auf die Standardwerte zurückzusetzen Erstinstallation Markieren Sie und drücken Sie OK um die Erstinstallation auszuführen und alle Einstellungen auf die Werkeinstellunge...

Page 102: ...e neuen Werte mit Hilfe der nume rischen Tasten der Fernbedienung ein Klicken Sie auf die OK Taste um zumAbschluss die Änderungen zu speichern Drahtlose Verbindung Fakultativ Anschluss an ein kabelgebundenes Netzwerk Der Bildschirm kann nicht an Netzwerke mit einer versteckten SSID Name des drahtlosen Netzwerks angeschlossen werden Um die SSID Ihres Modems sichtbar zu machen müssen Sie die SSID Ei...

Page 103: ...ber eine geeignete Sharing Software verfügen Um die Verbindung zu Ihrem Router herzustellen folgen Sie den Schritten im Abschnitt Drahtlose Verbindung oben Anschließend verbinden Sie Ihr Mobilgerät mit dem Router und aktivieren dann die Sharing Software auf dem Mobilgerät Wählen Sie die Dateien die Sie teilen möchten auf Ihrem Bildschirm aus Wenn die Verbindung korrekt etabliert wurde sind Sie in ...

Page 104: ... Informationen darüber wie sich ein weiteres Gerät also Ihr Displaymit dem Internet verbinden lässt Es ist auch möglich dass die Verbindung nicht zugänglich ist wegen eines Firewall Problems Wenn Sie denken dass dies zu Ihrem Problem führt kontaktieren Sie Ihren Internetdienstanbieter Eine Firewall kann ebenfalls der Grund für Konnektivitäts oder Entdeckungsprobleme bei der Verwendung des Bildschi...

Page 105: ... com mediahome tv 2 Klicken Sie auf die Schaltfläche Download auf der sich öffnenden Seite Die Installationsdatei wird nun auf Ihren Computer heruntergeladen 3 Nachdem der Download abgeschlossen wurde doppelklicken Sie auf die Installationsdatei um die Installation zu starten Der Installations Assistent wird Sie durch den Installationsprozess führen 4 D i e f o l g e n d e M e l d u n g z u d e n ...

Page 106: ...der entsprechenden Seite zu starten Markieren Sie ein Vorschaubild und drücken Sie zum die OK Taste die damit verknüpfte Website aufzurufen Ihr Bildschirm ist kompatibel mit USB Tastaturen Mäusen Stecken Sie Ihr Gerät in den USB Eingang Ihres Bildschirms um leichter und schneller Navigieren zu können Einige Internetseiten enthalten Flash Inhalte Diese werden vom Browser nicht unterstützt Ihr Bilds...

Page 107: ...uellgerät MST fähig ist Wenn Ihr Quellgerät ein Computer sein sollte kontrollieren Sie bitte die Spezifikationen der Grafikkarte um die MST Kompatibilität zu gewährleisten HDMI Ausgang Der HDMI2 Anschluss an der linken Rückseite des Bildschirms funktioniert als ein Ausgangsanschluss oberer HDMI Anschluss Dieser Anschluss funk tioniert nicht als ein Eingang daher sollten keine Quellengeräte mit die...

Page 108: ...ann genutzt werden Anschluss an den Bildschirm LAN Port Laden Sie zuerst die Software PuTTY über den folgenden Link herunter http www putty org und installieren Sie diese Starten Sie die Software und geben Sie die IP Adresse im Feld Host Name ein Geben Sie als einen Standardwert 1986 in das Feld Anschluss ein Wählen Sie Telnet als Verbindungsart klicken Sie auf die Schaltfläche Öffnen Hinweis Lese...

Page 109: ...uss Starten Sie die Software und wählen Sie Serial als Verbindungstyp aus Geben Sie den seriellen Port des Bildschirms in das Feld Serial Line ein im folgenden Beispiel ist es COM4 und 115200 in das Feld Speed Dann klicken Sie auf die Schaltfläche Open ...

Page 110: ...eine Kenngröße der Balancewert beträgt SETAVL Den AVL Status einstellen integer n 0 aus 1 ein den avl Status stellen auf n GETAVL Den AVL Status angeben keine Kenngröße avl Status ist SETDYNAMICBASS Dynamischen Bass Status einstellen integer n 0 aus 1 ein dynamischen Bass einstellen auf n SETEQUSERFREQ Stellt den benutzerdefinierten Frequenzwert des Equalizers für alle Frequenzbereiche ein Zeichen...

Page 111: ...ige Kenngröße GETHEADPHONEOUTPUT Kopfhörer Ausgabe angeben keine Kenngröße AUSGANG oder KOPFHÖRER GETDYNAMICBASS Status des dynamischen Basses angeben keine Kenngröße der Status des dynamischen Basses ist 0 aus 1 ein GETBASSGAIN Bassverstärkung angeben keine Kenngröße der Wert der Bassverstärkung ist n Achtung Oben angegebenes n ist 6 n 6 GETEQUSERFREQ Gibt benutzerdef Frequenzwert des Equalizerfr...

Page 112: ...r Lautstärke eingestellt auf Aufwachzeit Lautstärke eingestellt auf Alle Equalizer Frequenzbereiche eingestellt auf Lautstärke eingestellt auf Kopfhörer Lautstärke eingestellt auf Kopfhörer Balance eingestellt auf Kopfhörer Bass eingestellt auf Kopfhörer Höhen eingestellt auf Digitale Audioausgabe eingestellt auf Audioausgabe Beschreibungspfad eingestellt auf Audiobeschreibung ist Relative Lautstä...

Page 113: ...URL Gibt die Start URL an keine Kenngröße Start URL ist ALLGEMEINE BILDSCHIRMBEFEHLE Befehl Beschreibung Parameter Zurück SETRC Aktiviert deaktiviert Fernbedienungsbefehle Zeichenfolge integer n n EIN n AUS setzt Fernbedienung Status auf EIN oder setzt Fernbedienung Status auf AUS SETSOURCE Quelle auf aktivieren deaktivieren einstellen Zeichenfolge n Integer b n SCART1 n SCART2 n FAV n SVHS n HDMI...

Page 114: ...ED Angabe des LED Status an aus keine Kenngröße LED ist an LED ist aus GETRC Angabe des Status der Fernbedienungsbefehle keine Kenngröße Fernbedienungsbefehle sind an Fernbedienungsbefehle sind aus USBOPERATIONS Ausführen von USB Vorgängen keine Kenngröße Sie können die Drucke Bank 0 Bank 1 usw beachten Seien Sie sicher oder beachten Sie die Fehlerbeseitigung Ausdrucke MFC ISP erledigt wird geschr...

Page 115: ...initialisiert CHANGELNG Aktive Sprache ändern integer integer x y x Sprachtyp 0 Systemsprache 1 Ereignissprache 2 Primäre Audiosprache 3 Sekundäre Audiosprache 4 Primäre Untertitelsprache 5 Sekundäre Untertitelsprache 6 Primäre Teletextsprache 7 Sekundäre Teletextsprache y Sprache 0 Dänisch 1 Deutsch 2 Estnisch 3 Englisch 4 Spanisch 5 Griechisch 6 Französisch 7 Gaelisch 8 Kroatisch 9 Italienisch 1...

Page 116: ...hl Beschreibung Parameter Zurück set_IP_address Stellt eine statische IP Adresse der eth0 Netzwerkschnittstelle ein Zchfl int n Beispiel set_ IP_address 192 168 0 15 Einstellung der IP Adresse erfolgreich Einstellung der IP Adresse NOK get_IP_address Eine statische IP Adresse der eth0 Netzwerkschnittstelle angeben Verwendung get_IP_address keine Kenngröße IP Adr SETNETWORKTYPE einstellen des Netzw...

Page 117: ...ngröße Geschwindigkeitstest gestartet Gibt die Nachricht Keine Internetverbindung gefunden aus wenn fehlgeschlagen VGA PC BEFEHLE Befehl Beschreibung Parameter Zurück HPOS Stellt horizontale Position ein int n 25 n 25 stellt horizontale Position zu ein Prozentsatz im Bereich ungültiger Wert eingegeben VPOS Stellt vertikale Position ein int n 25 n 25 sstellt vertikal Position ein zu Prozentsatz im ...

Page 118: ...nstellen int n 0 n 100 Bildkontrastwert ist eingestellt auf n Derselbe Wert ist eingestellt Unternehmen Sie nichts Unzulässiger Wert muss zwischen 0 100 liegen GETBRIGHTNESS Bildhelligkeitswert angeben keine Kenngröße DER HELLIGKEITSWERT SETBRIGHTNESS Bildhelligkeitswert einstellen int n 0 n 100 Bildhelligkeitswert ist eingestellt auf n Derselbe Wert ist eingestellt Unternehmen Sie nichts Unzuläss...

Page 119: ...ig 2 mittel 3 hoch seMonitorirtual3D eingestellt auf n Unzulässige Kenngröße für 3D Modus eingegeben CONTRASTUP Kontrast um jeweils 1 Stufe erhöhen keine Kenngröße Bildkontrastwert ist eingestellt auf CONTRASTDOWN Kontrast um jeweils 1 Stufe verringern keine Kenngröße Bildkontrastwert ist eingestellt auf GETENERGYSAVING Energieeinspar Modus angeben wenn im Profil keine Kenngröße Der Energieeinspar...

Page 120: ...ode colortemp zoom_mode hdmi_ trueblack picture_hue volume headphone_volume SETPIXELSHIFT Pixelshift auf aktiviert oder nicht einstellen Zeichenfolge integer n n ein n aus ACK NACK GETPIXELSHIFT Pixelshift erhalten keine Kenngröße Pixelshift ist SETSIGNAGEID Signage ID einstellen Ganze Zahl n 1 n 100 n ist die Signage ID ACK NACK GETSIGNAGEID Signage ID erhalten keine Kenngröße Die Signage ID ist ...

Page 121: ...rd für die Lautstärke eingestellt integer Lautstärkewert Eingestellte Lautstärke STL Monitor Sprache einstellen Zeichenfolge int bitte Abkürzungen der Sprachen ansehen Sprache geändert zu STWA Weck Alarm stoppen keine Kenngröße Weck Alarm gestoppt STEA Notruf Alarm stoppen keine Notruf Alarm ist gestoppt UNP Nachricht senden Zeichenfolge int Nachrichttext 0 Inhalt der Nachricht sollte sein Wort1 W...

Page 122: ...läutert 1 RJ12 ist mit UART 0 verbunden DSUB9 ist mit UART 1 verbunden Somit könnten UART 0 und UART 1 mit diesem Boardtyp getrennt getestet werden 2 RJ12 und DSUB9 sind beide mit UART 0 verbunden UART 1 wird für das OPS Modul unterstützt ist aber nicht verfügbar Somit kann nur UART 0 mit diesem Boardtyp getestet werden Das HEX Protokoll im Bildschirm aktivieren a Gehen Sie zum Menü Signage Einste...

Page 123: ...45 60 74 25 O O O 1920x1080i 28 13 50 74 25 O O O 33 716 59 94 74 175 O O O 33 75 60 74 25 O O O 1920x1080p 56 25 50 148 5 O O O 67 432 59 95 148 35 O O O 67 5 60 148 5 O O O UHD nur für 4K Modelle 3840x2160p 67 5 30 297 O O 3840x2160p 135 60 297 O Wenden Sie sich an Ihren Händler vor Ort um Informationen über die Chassisversion Ihres Displays zu erhaltenSystemfunktionen Bildschirm Bildschirmtyp 8...

Page 124: ...g Batterien 2 x AAA Handbuch Schnellstart Anleitung IR Extender Set für Wandbefestigung Verwenderinformationen zur Entsorgung von Altgeräten und Batterien Nur Europäische Gemeinschaft Geräte die diese Symbole tragen dürfen nicht als Haushaltsmüll entsorgt werden Für die Entsorgung dieser Produkte müssen Sie sich nach geeigneten Recycling Einrichtungen oder Systeme umsehen Hinweis Das unten abgebil...

Page 125: ...gstemperaturbereich 0 35ºC Bei der Befestigung des Geräts an der vorgesehenen Wand muss zu Belüftungszwecken mindestens der oben angegebene Abstand zwischen dem Gerät und der Wand eingehalten und sichergestellt werden dass die Umgebungstemperatur zwischen 0ºC 35ºC liegt Setzen Sie das Gerät nicht direktem Sonnenlicht aus Wir haften nicht für Schäden oder Defekte sofern unsere Produkte nicht unter ...

Page 126: ...tain frequency range galvanic isolator see EN 60728 11 Utstyr som er koplet til beskyttelsesjord via nettplugg og eller via annet jordtilkoplet utstyr og er tilkoplet et kabel TV nett kan forårsake brannfare For å unngå dette skal det ved tilkopling av utstyret til kabel TV nettet installeres en galvanisk isolator mellom utstyret og kabel TV nette Utrustning som är kopplad till skyddsjord via jord...

Page 127: ......

Page 128: ... P A Società Unipersonale Via Polidoro da Caravaggio 6 20156 Milano MI Phone 39 02 842 48577 Fax 39 02 842 48617 info givesit it www givesit it Vestel UK Ltd Vestel House Waterside Drive Langley Berkshire SL3 6EZ Phone 44 3330 146 400 info vestel uk com www vestel co uk Vestel Benelux B V P O Box 29179 3001 GD Rotterdam Netherlands Phone 31 10 235 1000 Fax 31 10 235 1003 info vestelbenelux nl www ...

Reviews: