background image

English   

- 36 -

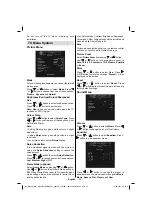
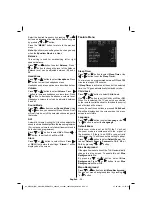
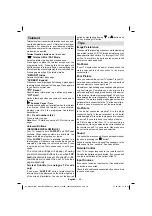
Power Save Mode

Use “ ” or “ ” button to select Power Save Mode.
Press “ ” or “ ” button to set Power Save Mode as 
On or Off.
See the section, “Environmental Information” in 
this manual for further information on Power Save 
Mode.

Note : Backlight function will be invisible if Power Save 
Mode is set to on.


 Backlight 

This setting controls the backlight level. Select 
 

Backlight 

 by pressing “ ” or “ ” button. Press“

” or “ ” button to set  

Backlight 

 to  

Auto, Medium 


Maximum 

 or  

Minimum 

.


   Menu Timeout 

 To set a speci

fi

 c display timeout for menu screens, 

set a value for this option.
Press “ ” or “ ” button to select  

Menu Timeout 

. Use 

“ ” or “ ” button to change menu timeout to  

15 sec

 , 


30 sec

  or  

60 sec

 . 

 Teletext Language 

 Press “ ” or “ ” button to select  

Teletext Language

 . 

Use “ ” or “ ” button to change  

Teletext Language

  to 


West, East

 ,  

Turk/Gre 

,  

Cyrillic, Arabic

 or 

Persian


  .  


HDMI PC Full Mode (optional)

If you want to view PC screen in HDMI mode by using 
external connection, HDMI PC FULL MODE option 
should be On to adjust the screen ratio correctly. This 
item might be inactive in some resolutions.

Note

: If you connect an HDMI device and switch the 

TV to HDMI mode, this feature will be visible (except 
for 1080i/1080P resolution).

Full Mode (optional)

If you connect a device via HDMI or YPbPr connectors 
and set 1080i/1080P resolutions, Full Mode item will 
be visible.You can set Full Mode as 1:1 or Normal 
by using “ ” or “ ”.If you select 1:1, screen ratio will 
be adjusted correctly. If you set Normal, screen ratio 
may expand.

 Ext Out 

 Press “ ” or “ ” button to select Ext Out. Use “ ” or 
“ ” button to set the Ext Out as On or Off. 

  Note 

:

For copying from a DVD or VCR device, you should 
choose desired source from source menu and turn 
“On” to EXT Out from feature menu.

   Install Menu 


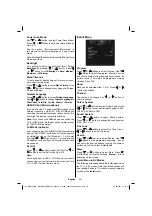
 Program 

 Press “ ” or “ ” button to select Program. Use  “ ” 
or “ ” button to select the program number. You can 
also enter a number using the numeric buttons on the 
remote control. There are 200 programme storage 
between 0 and 199. 

 Band 

 Band can be selected either C or S. Press “ ” or “
” button to set Band.  

 Channel 

 Channel can be changed by “ ” or “ ” button or 
numeric buttons. 

 Colour System 

 Press “ ” or “ ”  button to select Colour System. Use 
“ ” or “ ” button to change the colour system to PAL, 
PAL 60, SECAM or AUTO. 

 Sound System 

 Press “ ” or “ ” button to select  Sound System.  
Press “ ” or “ ” button to change the sound system 
to BG,DK, I, L or L’. 

 Fine Tune 

 Press “ ” or “ ” button to select Fine Tune. Press “

” or “ ” button to adjust the tuning. 

 Search 

 Press “ ” or “ ” button to select Search. Use  “ ” 
or “ ” button to start programme searching. You can 
also enter the desired frequency using the numeric 
buttons while Search item is highlighted. 

 Store 

 Press “ ” or “ ” button to select Store. Press “ ” 
or  

OK

  button to store the settings. “ 

Stored... 

” will be 

displayed on the screen. 

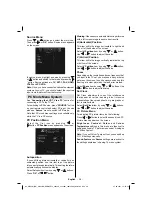
 Install Menu in AV Modes 

 The following screen appears in the install menu when 
the TV is in AV modes. Note that limited options will 
be available. Switch to TV mode for viewing complete 
version of the  

Install 

 menu. 

02_MB45M_[GB]_ANALOG_BRONZE14_3902UK_32930W_10075966_50201734.indd   36

02_MB45M_[GB]_ANALOG_BRONZE14_3902UK_32930W_10075966_50201734.indd   36

27.09.2011   15:16:41

27.09.2011   15:16:41

Summary of Contents for PERFORMANCE 32VH3010

Page 1: ...2 2 KULLANIM KILAVUZU OPERATING INSTRUCTIONS PERFORMANCE 32VH3010 32 LCD TV...

Page 2: ...Bilgileri 4 Uzaktan Kumandaya Genel Bak 5 LCD TV ve al ma Tu lar 6 Ba lant lar Arka Konekt rler 6 Ba lant lar Yan Konekt rler 7 G Ba lant s 7 Anten Ba lant s 7 LCD TV yi PC ye Ba lama 8 DVD alara Ba...

Page 3: ...o alan b rak n z Bir hata olu umunu nlemek ve g venli olmayan bir durumdan korunmak i in cihaz n zerine l tfen herhangi bir nesne koymay n z Bu cihaz l man hava ko ullar nda kullan n z 10 cm 10 cm 10...

Page 4: ...ya s v d k lecek olursa TV nin fi ini ekiniz ve tekrar al t rmadan nce vas fl eleman taraf ndan kontrol ettiriniz Temizlik Temizlemeden nce TV nin fi ini prizden ekiniz S v veya sprey t e m i z l e y...

Page 5: ...ji t ketimini azaltacakt r Uzun s re boyunca televizyondan uzak olacaksan z televizyonun elektrik ba lant s n kesin Televizyonu Enerji Tasarruf Modu ile kullanmak bekleme modunda b rakmak yerine telev...

Page 6: ...Tutma DTV modunda 21 mle A a 22 Geri d n Dizin Sayfalar TXT modunda 23 mle Sa a Alt sayfa TXT modunda 24 mle Yukar 25 nceki Program 26 Sar zellik Men s 27 Mavi Y kleme men s 28 lev Yok 29 TXT Altyaz...

Page 7: ...i in kullan l r RF Giri i bir antene veya kabloya ba lan r 4 E er bir ifre z c veya medya kaydedicisi kullan yorsan z cihaz yoluyla anten kablosunu uygun bir anten kablosu ile a a daki sayfalarda bulu...

Page 8: ...yuvas na ve cihaz n z zerinde bulunan SES IKI AUDIO OUTPUT yuvas na ba lay n z Ayr ca PC YPbPr ses ba lant s n bu gibi bir durumda sa layabilmek i in ba lant l cihaz n ses k lar ve TV nin ses giri ler...

Page 9: ...i in DVD alar n z n talimat kitab na bak n z Herhangi bir ba lant yapmadan nce hem TV hem de cihaz n z kapat n z Not Resimde g sterilen kablolar tedarik edilmemi tir E er DVD alar n z n HDMI yuvas var...

Page 10: ...iller yerle tiriniz Pilleri takarken kutuplar n do ru olmas na dikkat edin ve pil kapa n kapat n Not Uzaktan kumanda aleti uzun s re kullan lmayaca zaman pilleri aletten kar n z Aksi takdirde pilleri...

Page 11: ...as n Uzaktan Kumandayla letim TV nizin uzaktan kumandas se ti iniz modelin b t n i levlerini kontrol etmek zere tasarlanm t r Fonksiyonlar TV nin men sistemine uyumlu olarak a klanacakt r Men sistemin...

Page 12: ...yun Konumu opsiyonel veya tu una basarak Oyun Konumunu se iniz Oyun Konumunu A k veya Kapal olarak ayarlamak i in veya tu lar n kullan n z Oyun Konumu a k olarak se ildi inde daha iyi g r nt kalitesi...

Page 13: ...ektir veya tu una basarak AVL yi se iniz Bu zelli i a mak ve kapamak i in veya tu una bas n z Kaydet veya tu una basarak Haf za se iniz Ayarlar kaydetmek i in veya OK tu una bas n z Ekranda Kaydedildi...

Page 14: ...ran n do ru ayarlamak i in HDMI PC FUL MODU se ene i a k olmal d r Bu e baz z n rl klerde aktif olmayabilir Not Bir HDMI cihaz ba lad n zda ve TV yi HDMI moduna getirdi inizde bu zellik g r necektir 1...

Page 15: ...ayfada 20 programa ula abilirsiniz TV Konumunda AV Konumlar d nda t m programlar g rmek i in y n tu lar na basarak sayfalar a a ve yukar kayd rabilirsiniz mle hareketiyle program se imi kendili inden...

Page 16: ...kendili inden do ru konumuna getirmek i in bu zelli i kullan n z Sonu olarak bu men otomatik olarak g r nt y d zeltir veya tu lar n kullanarak Oto Konumland rma maddesini se iniz OK veya tu una bas n...

Page 17: ...zellik PC konumu veya DVI kayna ndan film izlendi inde uygun olmayacakt r Zoom Modlar Farkl zoom modlar nda resim g r nt lemek i in TV nin g r n m oran n Resim Boyutunu de i tirebilirsiniz Yak nla t r...

Page 18: ...sayfan n alt yar s n b y tmek i in yeniden bas n z Normal boyuta geri d nmek i in yeniden bas n z G ster Gizli bilgileri g sterir r oyun z mleri OK Tut Uygun oldu unda bir tekst sayfas n tutar Geri al...

Page 19: ...kontrol ediniz Kanallar tekrar ayarlay n z ki evresel donan m televizyona ayn anda ba lad n zda g r nt kalitesi d ebilir B yle bir durumda evresel donan mlardan birinin ba lant s n kesiniz G r nt Yok...

Page 20: ...A 4 800 600 56 35 2 VESA 5 800 600 60 37 9 VESA 6 800 600 70 43 8 7 800 600 72 48 1 VESA 8 800 600 75 46 9 VESA 9 832 624 75 49 7 MAC 10 1024 768 60 48 4 VESA 11 1024 768 70 56 5 VESA 12 1024 768 72 5...

Page 21: ...Hz O 720P 50Hz O 720P 60Hz O 1080I 50Hz O 1080I 60Hz O 1080P 24Hz O 1080P 25Hz O 1080P 30HZ O 1080P 50HZ O 1080P 60HZ O X Mevcut de il O Mevcut Not Baz durumlarda LCD TV sinyali d zg n g r nt lenemeye...

Page 22: ...220 240V AC 50 Hz SES German Nicam Stereo SES IKI G C WRMS 10 THD 2 x 6 G T KET M W 150 W maks PANEL 32 Geni g r nt BOYUTLAR mm BxUxY Ayakl 187 x 783 x 556 A rl k Kg 12 30 BxUxY Ayaks z 94 5 x 783 x...

Page 23: ...sel k rm z ye il veya mavi olabilir Tip 2 S rekli s n k alt piksel siyah bir ekilde g r n r ISO 13406 2 standard na g re a a daki zet tablo alt piksel hatalar i in belirlenmi tir Tipi A klama Adet Not...

Page 24: ...lir ve bu yay nlarda resimde mozaiklenme veya resim netlik ve keskinli i az g r nt de ekranda baz efektler olu abilir Bu bir ar za de ildir E er r n n z y ksek z n rl destekleyen bir r n ise iyi bir g...

Page 25: ...ion Distribution System Cable TV etc from Tuner 26 Environmental Information 27 Repair Information 27 Overview of the Remote Control 28 LCD TV and Operating Buttons 29 Viewing the Connections Back Con...

Page 26: ...ll around the set To prevent any fault and unsafe situations please do not place any objects on top of the set Use this device in moderate climates 10 cm 10 cm 10 cm Safety Precautions Please read the...

Page 27: ...aning Before cleaning unplug the TV set from the wall outlet Do not use liquid or aerosol cleaners Use soft and dry cloth Ventilation The slots and openings on the TV set are intended for ventilation...

Page 28: ...This will also reduce energy consumption Disconnect power when going away for longer time Note that annually using the TV set in Power Save Mode has more power efficiency than disconnecting the TV fr...

Page 29: ...sor Down 22 Return Index page in TXT mode 23 Cursor Right Subpage in TXT mode 24 Cursor Up 25 Previous programme 26 Yellow Feature Menu 27 Blue Install Menu 28 No function 29 TXT subtitle 30 V V SCREE...

Page 30: ...ut connects to an antenna or a cable 4 Note that if you use a decoder or a media recorder you should connect the aerial cable through the device to the television with an appropriate antenna cable as...

Page 31: ...our device Also to enable PC YPbPr sound connection in such a case use an appropriate audio cable between the connected device s audio outputs and the TV s audio inputs Note If you connect a device to...

Page 32: ...s instruction book for additional information Power off both the TV and the device before making any connections Note Cables shown in the illustration are not supplied If your DVD player has an HDMI s...

Page 33: ...wards from the indicated part Insert two AAA R3 or equivalent type batteries inside Observe the correct polarity when inserting batteries and replace the battery cover Note Remove the battery from rem...

Page 34: ...selected The functions will be described in accordance with the menu system of your TV Functions of the menu system are described in the following sections Volume Setting Press V button to increase t...

Page 35: ...button to set Game Mode as On or Off When Game Mode is set to On specific game mode settings which are optimized for better video quality will be loaded Also Picture Mode Contrast Brightness Sharpness...

Page 36: ...eep Timer Press or button to select Sleep Timer Use or button to set the Sleep Timer The timer can be programmed between Off and 120 minutes in steps of 10 minutes If Sleep Timer is activated at the e...

Page 37: ...screen ratio may expand Ext Out Press or button to select Ext Out Use or button to set the Ext Out as On or Off Note For copying from a DVD or VCR device you should choose desired source from source m...

Page 38: ...by navigation buttons Press the GREEN button By navigation buttons move the selected programme to the decided programme space and press the GREEN button again Delete To delete a programme press the YE...

Page 39: ...side or left hand side of the screen Select H Position item by using or button Use or button to adjust the value V Vertical Position This item shifts the image vertically towards the top or bottom of...

Page 40: ...ratio of the screen is adjusted by the information provided by the selected source if available The format being displayed in AUTO mode is completely independent of WSS information which could be inc...

Page 41: ...he desired option by highlighting it using or button and then by pressing OK button Tips Image Persistence Please note that ghosting may occur while displaying a persistent image LCD TVs image persist...

Page 42: ...37 5 VESA 4 800 600 56 35 2 VESA 5 800 600 60 37 9 VESA 6 800 600 70 43 8 7 800 600 72 48 1 VESA 8 800 600 75 46 9 VESA 9 832 624 75 49 7 MAC 10 1024 768 60 48 4 VESA 11 1024 768 70 56 5 VESA 12 1024...

Page 43: ...60Hz O 1080I 50Hz O 1080I 60Hz O 1080P 24Hz O 1080P 25Hz O 1080P 30HZ O 1080P 50HZ O 1080P 60HZ O X Not Available O Available Note In some cases a signal on the LCD TV may not be displayed properly Th...

Page 44: ...OLTAGE 220 240V AC 50 Hz AUDIO German Nicam Stereo AUDIO OUTPUT POWER WRMS 10 THD 2 x 6 POWER CONSUMPTION W 150 W max PANEL 32 wide display DIMENSIONS mm DxLxH With foot 187 x 783 x 556 Weight Kg 12 3...

Page 45: ...ly Please consider the following explanation about a possible sub pixel error This problem can be encountered during the production phase as well as during use Sub pixel errors are mainly 2 types Type...

Page 46: ...n these broadcasts mosaic images may occur sharpness and resolution of the image may be low some effects may arise on the screen This is not a failure If your appliance supports high definition it is...

Page 47: ...retici firma Vestel Elektronik Sanayi ve Ticaret A Adres Organize Sanayi B lgesi 45030 Manisa Tel 0236 233 01 31 Fax 0236 233 25 85...

Page 48: ...ar Pazarlama A Ambarl Petrol Ofisi Dolum Tesisleri Yolu 34310 Avc lar stanbulTel 0212 456 22 00 Faks 0212 422 02 03 Cihaz n z n G mr k ve Ticaret Bakanl veya Bakanl k a tespit ve ilan edilen kullan m...

Reviews: