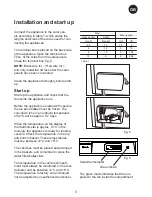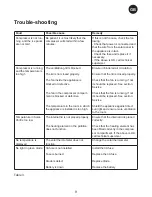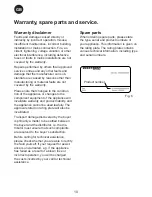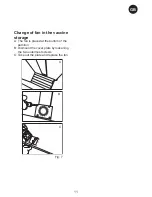
Cleaning
Disconnect the power supply before
cleaning.
The best way to clean the appliance is by
using warm water (max. 85°C) with a small
amount of unscented detergent. Never use
cleaning agents that scour. Use a soft cloth.
Rinse with clean water and dry thoroughly.
It is important to prevent water from running
into the control panel.
The sealing strip around the lid must be
cleaned regularly to prevent discolouration
and prolong service life. Use clean water.
After cleaning the sealing strip, check that it
continues to provide a tight seal.
If the appliance is not being used for any
period of time, switch the appliance off,
disconnect the power supply, empty the
appliance, clean the inside, and leave the
lid open to allow air circulation and prevent
smells.
Maintenance of the SolarChill
appliance
Daily maintenance:
The temperature in the vaccine
compartment must always be monitored
on the thermometer every morning and
evening. Please note that the vaccine in the
appliance may not freeze. The temperature
is factory set, and should not be adjusted by
unauthorized personnel.
Please check each day that the internal lid
is placed correctly and that the lid fits tightly
to the appliance.
Monthly maintenance:
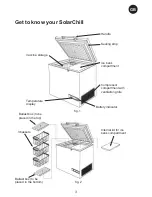
Clean the grill on the right side of the
refrigerator once each month.
Yearly maintenance:
Electric connections and components are
to be checked and cleaned once a year or
more if necessary.
Maintenance of the solar panels
Weekly maintenance:
The solar panels are to be cleaned for dust
once each week – or as required. Cleaning
must be carried out with water.
Yearly maintenance:
Electric connections and components are
to be checked and cleaned at least once a
year or more often if required. Because of
risk of fire, it is necessary to remove dust
and dirt.
All bolts and nuts are to be re-tightened 2
weeks after installation, and then once a
year.
Maintenance and cleaning
8
GB
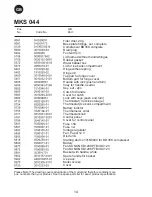
Summary of Contents for MKS 044 SolarChill
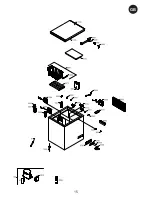
Page 15: ...15 GB...
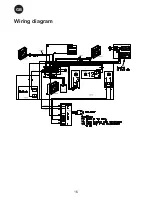
Page 16: ...Wiring diagram 16 GB...
Page 31: ...15 FR...
Page 32: ...Sch ma de principe 16 FR...
Page 47: ...15 ES...
Page 48: ...Diagrama de cableado 16 ES...
Page 51: ...SolarChill 1 2 3 v 3 RUS...
Page 54: ...SolarChill 6 RUS...
Page 55: ...2 12 150 180 1 3 2 20 80 UL T V 61215 2 7 RUS...
Page 56: ...2 85 C SolarChill 8 RUS...
Page 57: ...SolarChill 3A 3A 3A 3 9 RUS...
Page 58: ...6 10 RUS...
Page 59: ...A B C 7 A B C 11 RUS...
Page 60: ...6 A B C D 8 A A B C D 9 12 RUS...
Page 61: ...3 A 15 A 10 9Ah 12V 7 2 Ah 12V 6 3 94 65 94 11 13 RUS...
Page 63: ...15 RUS...
Page 64: ...16 RUS...
Page 65: ...3 2002 96 EC 2006 66 EC 17 RUS...
Page 66: ...3 2 C 8 C 2 22V 2 3 4 5 6 7 8 9 10 16 17 Vestfrost Solutions 2 CHI...
Page 67: ...1 2 3 3 CHI...
Page 70: ...6 CHI...
Page 71: ...2 12V 150 180W 1 3 2 20 80 UL T V IEC 61215 2 7 CHI...
Page 72: ...85 C 2 8 CHI...
Page 73: ...3A 3A 3A 3 9 CHI...
Page 74: ...6 10 CHI...
Page 75: ...A B C A B C 7 11 CHI...
Page 76: ...6 A B C D 8 9 A A B C D 12 CHI...
Page 77: ...3A 15A 10 9Ah 12V 7 2 Ah 12V 6 3 94 65 11 13 CHI...
Page 79: ...15 CHI...
Page 80: ...16 CHI...
Page 81: ...2002 96 EC 2006 66 EC 17 CHI...
Page 82: ......
Page 83: ......
Page 84: ...EC 2006 66 EC 2002 96 ARA...
Page 85: ...ARA...
Page 86: ...ARA...
Page 88: ...7 A B C ARA...
Page 89: ...15A 3A 8 9Ah 12V 7 2 6 3 Ah 12V 94 65 94 11 ARA...
Page 90: ...6 10 9 A A B C D ARA...
Page 91: ...6 ARA...
Page 92: ...3A 3A 3A ARA...
Page 93: ...85 ARA...
Page 94: ...2 12 180 150 3 1 80 20 T V UL IEC 61215 2 ARA...
Page 95: ...ARA...
Page 96: ...1 4 3A 7 5 27 4 8 2 8 2 AWG 2 2 5 12 1 5 5 4 12 3 10 6 10 5 16 5 10 8 9 29 5 4 1 5 ARA...
Page 97: ...EN378 8 3 1 R600a 20 32 20 WHO PQS 2 8 20 12 2 12 3 30 3 800 mm 20 mm 100 m m 100 mm ARA...
Page 98: ...1 2 3 ARA...
Page 99: ...8 2 22 22 2 3 4 5 6 7 8 9 10 16 17 Vestfrost Solutions ARA...

