background image

EN -

7

-

Installing and operating your fridge

Before starting to use your fridge, you should pay attention to the following points:

• Operating voltage for your fridge is 220-240 V at 50Hz.
• We do not take the responsibility of the damages that occur due to ungrounded usage.
• Place your fridge in a place that it would not be exposed to direct sunlight.
• Your appliance should be at least 50 cm away from stoves, Gas ovens and heater cores, 

and should be at least 5 cm away from electrical ovens.

• Your fridge should never be used outdoors or left under the rain.
• When your fridge is placed next to a deep freezer, there should be at least 

2 cm between them to prevent humidity on the outer surface.

• Do not place anything on your fridge, and install your fridge in a suitable 

place so that at least 15 cm is available on the upper side.

• The adjustable front legs should be adjusted to make sure your appliance is level and 

stable. You can adjust the legs by turning them clockwise (or in the opposite direction). 

This should be done before placing food in the fridge.

• Before using your fridge, wipe all parts back with warm water added with a tea spoonful of 

sodium bicarbonate, and then rinse with clean water and dry. Place all parts after cleaning.

• Do  not  place  glass  bottles  or  beverage  cans  in  the  ice-making 

compartment as they can burst as the contents freeze.

• Do not place explosive or flammable material in your fridge. Place drinks 

with high alcohol content vertically in the fridge compartment and make 

sure that their tops are tightly closed.

• When removing ice from the ice-making compartment, do not touch it. Ice may 

cause frost burns and/or cuts.

• Do not touch frozen goods with wet hands. Do not eat ice-cream or ice cubes immediately 

after you have taken them out of the ice-making compartment.

• Do not re-freeze frozen goods after they have melted. This may cause health issues 

such as food poisoning.

• Do not cover the body or top of fridge with lace. This affects the performance of your fridge.
• Secure any accessories in the fridge during transportation to prevent damage to the 

accessories.

• Do not use plug adapter.

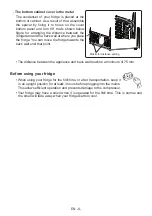
If your refrigerator includes a fan condenser


-

The bottom cabinet cover is the plastic

The  condenser  of  your  fridge  is  located  at 

the  bottom  of  the  cabinet.  As  a  result,  the 

fittings  which  control  the  distance  between 

the refrigerator and the wall behind your fridge 

are located on the cover of the bottom of the 

cabinet. You can move your fridge toward the 

back wall until this point.

Plastic for distance setting

Summary of Contents for VRT71700FFEX

Page 1: ...FROST FREE REFRIGERATOR Freezer Fridge Instruction booklet NO FROST NO FROST VWT717FFE00B VRT71700FFEX...

Page 2: ...ink cool mode 11 Function of Child lock 12 Freezer temperature settings 13 Cooler temperature settings 13 Warnings about temperature adjustments 14 Accessories 14 Icematic 14 Chiller Shelf 15 Fresh di...

Page 3: ...le socket outlets or portable power supplies at the rear of the appliance WARNING In order to avoid any hazards resulting from the instability of the appliance it must be fixed in accordance with the...

Page 4: ...efrigerator This plug should be used with a specially grounded socket of 16 amperes If there is no such socket in your house please have one installed by an authorised electrician Children aged from 3...

Page 5: ...g 2000 m To avoid contamination of food please respect the following instructions Opening the door for long periods can cause a significant increase of the temperature in the compartments of the appli...

Page 6: ...rise due to wrong waste procedure for the product by ensuring that this product is annihilated properly Recycling materials will help natural resources be preserved For more detailed information regar...

Page 7: ...and then rinse with clean water and dry Place all parts after cleaning Do not place glass bottles or beverage cans in the ice making compartment as they can burst as the contents freeze Do not place e...

Page 8: ...l will fade away when your fridge starts to cool The bottom cabinet cover is the metal The condenser of your fridge is placed at the bottom of cabinet As a result of that assemble the spacer by fixing...

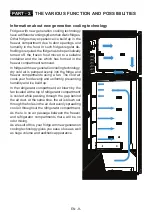
Page 9: ...neration cooling technology dry cold air is pumped evenly into the fridge and freezer compartments using a fan The cold air cools your food evenly and uniformly preventing humidity and ice build up In...

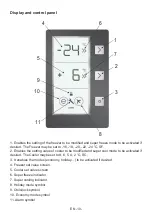
Page 10: ...4 C SF 2 Enables the setting value of cooler to be modified and super cool mode to be activated if desired The Cooler maybe set to 8 6 5 4 2 C SC 3 It enables the modes economy holiday to be activated...

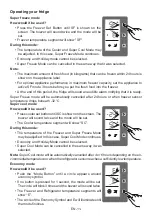
Page 11: ...ically cancelled after 24 hours or when freezer sensor temperature drops beneath 32 C Super cool mode How would it be used Press cooler set button until SC is shown on the screen The buzzer will sound...

Page 12: ...hen the cooler will not be used for a long period of time By doing this you will be using your fridge in a more economic manner The cooler must be completely emptied before Holiday mode is activated D...

Page 13: ...ce Bottles may explode if left in the appliance for too long with Drink mode selected Purpose This mode saves energy by switching all control panel lights off for as long as the control panel remains...

Page 14: ...screen Whenever you press on this button lower temperatures will be set 16 C 18 C 20 C 22 C 24 C superfreeze If you press the freezer set button until the superfreeze symbol appears on the Freezer Set...

Page 15: ...tervals stated in the standards accord ing to the climate class displayed on the information label We do not recommend operating your fridge out of the stated temperature limits in terms of cool ing e...

Page 16: ...If the crisper is completely full open the fresh dial located in front of the crisper This allows the air in the crisper and humidity rate to be controlled and the storage life of the food in the cris...

Page 17: ...airy products The warmest area is the top shelf of the door We recommend you store but ter or cheese here Important Note Cover any finished dishes when you put them in the fridge Place them in the fri...

Page 18: ...e Always follow the instructions printed on the package and never exceed the maximum storage life indicated That If you decide to open the freezer door again immediately after closing it may be dif fi...

Page 19: ...clean it Do not wash your fridge by pouring water into it Wipe the inner and outer sides with a soft cloth or a sponge using warm and soapy water Remove the parts individually and clean with soapy wat...

Page 20: ...on the model 1 LED strip in the freezer compartment and 2 LED strips in the cooler compartment are used to illuminate the interior of your appliance To replace any of the LEDS please contact the neare...

Page 21: ...ion of your fridge door if the door handles on your fridge are installed from the front surface of the door It is possible to change the opening direction of the door on models without any handles If...

Page 22: ...oaded to the appliance 1 Set the refrigerator temperature to colder values or set the super cooling mode until the compartment gets to normal temperature 2 Do not open the door much until this failure...

Page 23: ...for a short time when it is activated Bubbling noise and splash This noise is caused by the flow of the refrigerant in the tubes of the system Water flow noise Normal flow noise of water flowing to th...

Page 24: ...stated and declared by the Department of the Industry is 10 years the period for retaining parts required for the proper functioning of the appliance Tips for saving energy 1 Install the appliance in...

Page 25: ...e shelf Wine rack 6 Fridge compartment shelves 7 Chiller shelf 8 Crisper cover 9 Crispers 10 Levelling feet 11 Door bottom shelf 12 Door bottle shelf 13 Door shelves 14 Fridge compartment led lamp 15...

Page 26: ...RU 26 27 31 31 32 33 34 43 Icematic 43 43 44 44 44 Maxi fresh 45 46 46 47 48 50 50 50 51 54 55...

Page 27: ...RU 27 1 R600a R600a...

Page 28: ...RU 28 16 8...

Page 29: ...RU 29 3 8 0 3 3 8 8 14 2000...

Page 30: ...RU 30...

Page 31: ...RU 31...

Page 32: ...RU 32 220 240 50 50 5 2 15...

Page 33: ...RU 33 3 90 75...

Page 34: ...RU 34 2...

Page 35: ...RU 35 1 2 3 4 5 6 7 8 9 10 11 1 16 18 20 22 24 C SF 2 8 6 5 4 2 C SC 3 4 5 6 7 8 9 10 11...

Page 36: ...RU 36 SF SF 24 SF 3 24 32 C...

Page 37: ...RU 37 SC SC SuperCool 4 6 1 3 E E...

Page 38: ...RU 38 1 3 H H 3 dc 05 05 10 15 20 25 30 3 2...

Page 39: ...RU 39 3 5 5 10 5 5 30 30 3 3...

Page 40: ...RU 40 18 C 16 C 18 C 20 C 22 C 24 C 1 16 C 4 C R 8 C 6 C 5 C 4 C 2 C 1 8 C...

Page 41: ...RU 41 18 C 4 C 20 C 22 C 24 C 4 C 30 C SF 4 C 18 C 20 C 22 C 24 C 2 C 18 C 20 C 22 C 24 C SC...

Page 42: ...RU 42 10 C 24 5 5 C T 16 43 C ST 16 38 C N 16 32 C SN 10 32 C...

Page 43: ...RU 43 Icematic...

Page 44: ...RU 44 0 C 20 1 2 2 1...

Page 45: ...RU 45 Maxi fresh Maxi fresh Maxi Fresh Maxi Fresh Maxi fresh...

Page 46: ...RU 46 2 3 1 2 3...

Page 47: ...RU 47 24 24 24 24...

Page 48: ...RU 48 4...

Page 49: ...RU 49 1...

Page 50: ...RU 50 5...

Page 51: ...RU 51 6 E01 E02 E03 E06 E07 E08 170 E09 1 2 3...

Page 52: ...RU 52 E10 1 2 E11 1 2 3 Iigiaeuiue caoe gaaiou aaioeeyoiga...

Page 53: ...RU 53 No Frost IMPORTANT NOTES 5 10 4...

Page 54: ...RU 54 VESTFROST 10 1 2 3 4 5 6 7 7...

Page 55: ...RU 55 A B 1 2 3 4 Icematic 5 6 7 8 9 10 11 12 13 14 15 7 A B 1 2 3 4 5 6 7 8 9 10 11 12 13 14 15 13...

Page 56: ...6 91 68 www vestfrost ru 45030 90 236 226 30 00 90 236 226 32 15 www vestfrost ru Made in Turkey Vestel Beyaz E ya San ve Tic A Address Organize Sanayi B lgesi 45030 Manisa TURK YE Tel 90 236 226 30 0...

Page 57: ...6 91 68 www vestfrost ru 45030 90 236 226 30 00 90 236 226 32 15 www vestfrost ru Made in Turkey Vestel Beyaz E ya San ve Tic A Address Organize Sanayi B lgesi 45030 Manisa TURK YE Tel 90 236 226 30 0...

Reviews: