Table of Contents
Rev. 3.19.2020
LAD-TRS MANUAL
Table of Contents
Copyright 2020 Vestil Manufacturing Co.
Page 11 of 13
RECORD OF SATISFACTORY CONDITION (THE “RECORD”)
After assembling the ladder and before putting it into service, visually inspect the ladder. Record the condition and
appearance of each of the frame members (step weldment, back leg weldment, base support frame members), the
handrails, outriggers, wheels and/or casters, (leg) caps, back platform frame and chain, and all fasteners (bolts, nuts,
etc.). Thoroughly photograph the ladder from multiple angles. Include close range photographs of the rubber leg caps,
casters and wheels, all labeling, and all handrail connections. Add the photographs to the record. Collate all
photographs and writings into a single file. This file is a record of the ladder in satisfactory condition. Compare the
results of all inspections to this Record to determine whether the ladder is in satisfactory condition. Do not use the
ladder unless it is in satisfactory condition. Purely cosmetic changes, like damaged paint or powdercoat, are not
changes from satisfactory condition. However, touchup paint should be applied as soon as damage occurs.
NATIONAL STANDARDS
This product is a “mobile ladder stand” (MLS).
(the “Standard”) applies to MLS’s. You
should
acquire a copy of the latest version of the standard. Follow all use and maintenance/care instructions provided
in the Standard as well as all other provisions for MLS owners and users. If any content in this manual conflicts with
any mandatory provision(s) in the Standard, apply the provision(s) from the Standard. Vestil encourages you to
immediately contact
TECHNICAL SERVICE
if you discover any inconsistencies.
USING THE LADDER
Review the
SAFETY INSTRUCTIONS
on p. 3 before using the ladder.
Inspect the ladder before each use for damage, such as unusual wear, deterioration, or corrosion. Tighten loose
nuts. If a lock nut has been partially or completely unfastened, it must be replaced with a new lock nut.
Make sure there are no children in the area where the ladder is used
or stored
.
Climbing the ladder:
ONLY use the ladder on even, level, improved surfaces (concrete or asphalt).
Never use the ladder on angled
surfaces. The ladder must not wobble or lean while in use. Only climb the ladder when the steps and handrails are
clean and dry.
Stand on the bottom step and confirm that the caps solidly contact the ground. The rubber caps on the bottoms of
the legs should prevent movement. Face the ladder and grasp the handrails while ascending and descending the
steps. Do not lean against the handrails or the platform chain.
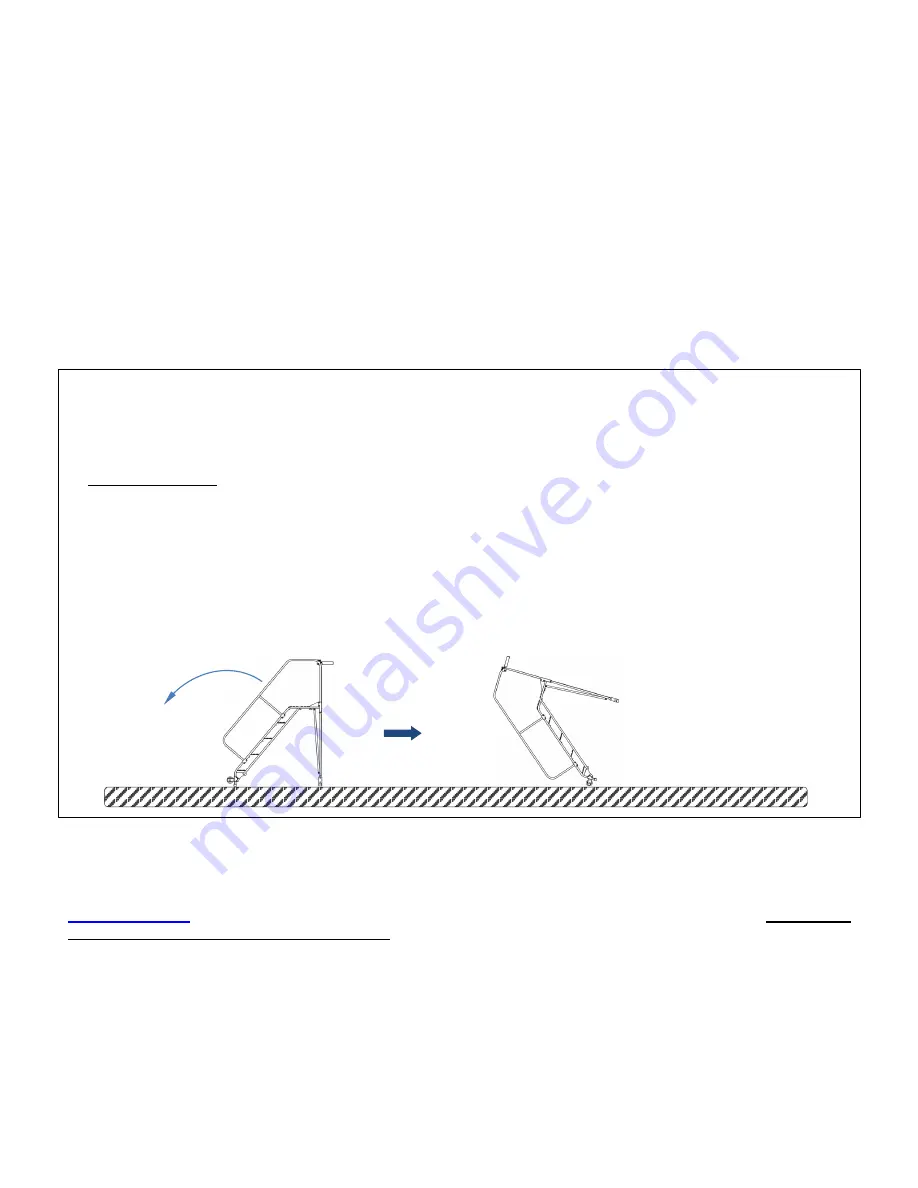
Before moving the ladder, completely empty the tool tray. Move the ladder by standing in front of it, grasping the
handrails, and rotating the ladder towards you until both wheels contact the ground and are able to roll. Push the
ladder to the desired location. Ladders with more steps are heavier and therefore require more effort to manipulate.
INSPECTIONS & MAINTENANCE
Inspect the unit as instructed. Inspections and all necessary repairs should be performed by qualified persons.
Compare the results of each inspection to the
RECORD
OF SATISFACTORY CONDITION
. Do not use the ladder
unless every part is in satisfactory condition. If you have any questions about the condition of your ladder, contact the
Technical Service
department. The phone number is provided on the cover page of this manual.
Never make
temporary repairs of damaged or missing parts
. Only use manufacturer-approved replacement parts to restore the
ladder to satisfactory condition.
Before each use,
inspect the ladder for any sustained damage, such as unusual wear, deterioration, or corrosion.
Look for loose connections. Tighten all loose connections. Whenever a lock nut is partially or completely unfastened,
it must be replaced with a new lock nut. Check cotter pins at each end of the wheel axle, the wheels, and the square
caps (99-024-027) for damage.
Regular inspections:
At least once per month inspect
the following items. Replace all parts that are damaged
before using the ladder again. DO NOT continue to use the ladder if damage cannot be repaired.
•
Handrails and platform bar: Inspect both handrails. Confirm that they are solidly fastened to the steps. Each
handrail should be rigid and undamaged. Examine the platform and platform bar. Confirm that the bar is securely
fastened to the handrails. Tighten nuts and bolts, if necessary.


