background image


12 

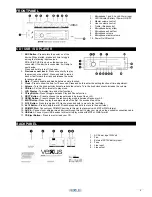
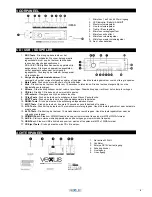
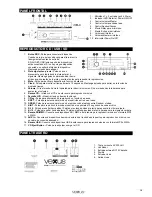
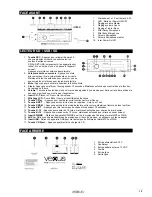
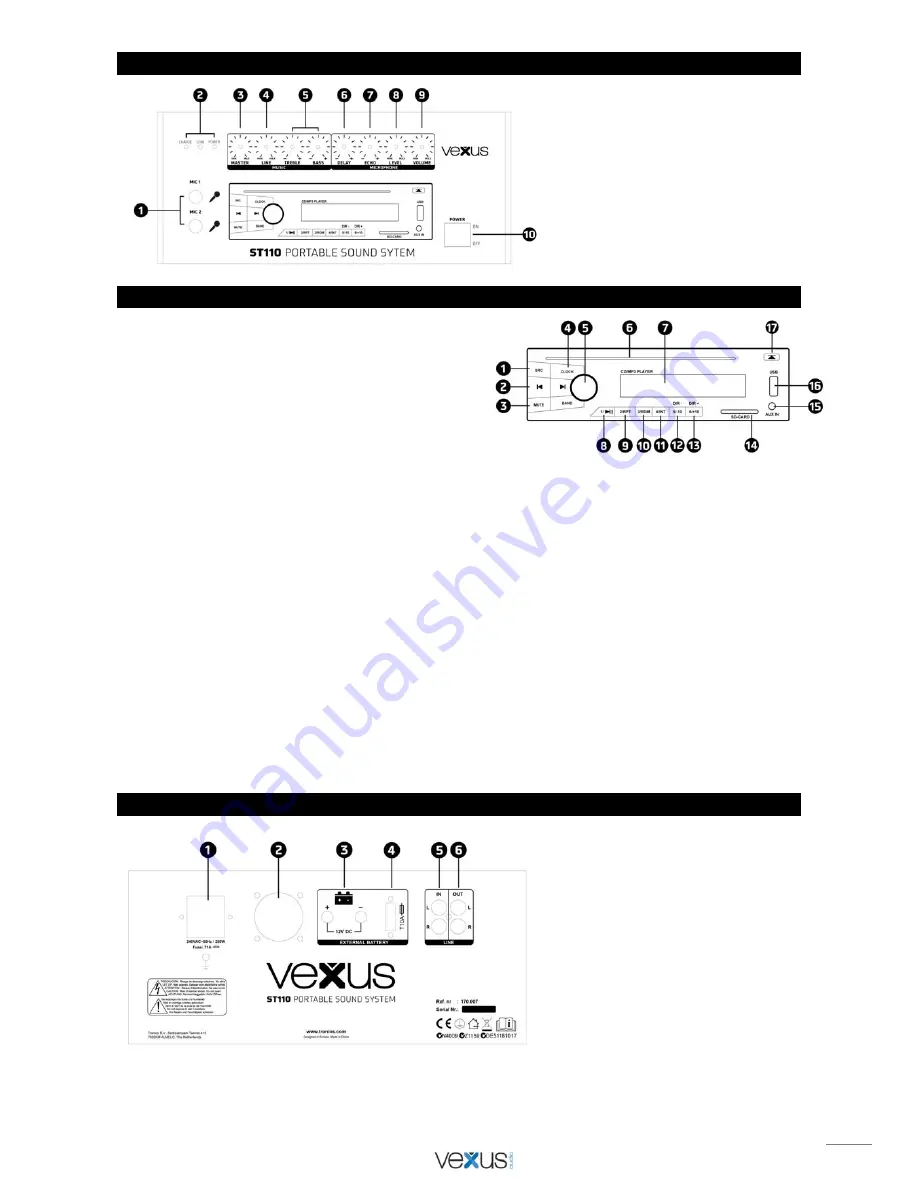
PANEL FRONTAL 


1.  Micrófono 1 y 2, entrada Jack 6.33mm 
2.  Indicador LED; Batería / Power ON/OFF 
3.  Control volúmen Master 
4.  Control volúmen entrada linea 
5. Control 

Agudos/Graves 

6.  Efecto Delay para micrófono 
7.  Efecto Echo para micrófono 
8. Volúmen 

micrófono 

9.  Volúmen Master micrófono 
10.  Interruptor Power On/Off 


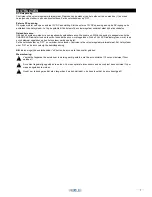
REPRODUCTOR CD / USB / SD  


1. 

Botón SRC


-

 Pulse para conectar el dispositivo. 

Cuando se inicia, pulse cada vez para alternar entre 
las siguientes fuentes de entrada: 
SD-AUX-BT-USB (sólo cuando los dispositivos 
están conectados). Si no hay ningún dispositivo 
conectado, se saltará al siguiente dispositivo. 
Mantenga pulsado para apagar. 

2. 

Pista siguiente o previa


-

 Pulse una vez 

brevemente para reproducir la pista anterior o 
siguiente. Mantenga pulsado para rebobinar hacia 
atrás o avance rápido de la pista y suelte el botón para reanudar la reproducción. 

3. 

Mute - 

Pulse para activar y desactivar la función de silencio. 

4. 

Clock


-

 Pulse para mostrar el tiempo durante 10 segundos. Mantenga pulsado para entrar en la función de 

ajuste de tiempo. 

5. 

Volume - 

Gire el mando hacia la izquierda para reducir el volumen. Gire el mando hacia la derecha para 

aumentar el volumen. 

6. 

Ranura CD – 

Introducir el CD en esta ranura para reproducir música. 

7. 

Pantalla LCD – 

Muestra tiempo y demás funciones. 

8. 

1/Play -

 Pulse para alternar entre reproducción y función de pausa. 

9. 

2/RPT


-

  Pulse para seleccionar el modo de repetición entre una o todas. 

10. 

3/RDM


-

 Pulse para seleccionar el modo de reproducción aleatorio entre Random o todas. 

11. 

4/INT


-

 Pulse para reproducir la música muestra de los primeros 10 segundos de cada archivo 

12. 

5/-10


-

 Pulse para saltar hacia atrás 10 pistas; mantenga pulsada la tecla para pasar a la última carpeta. 

13. 

6/+10


-

 Pulse para saltar hacia adelante 10 pistas; mantenga pulsada la tecla para pasar a la siguiente carpeta. 

14. 

Ranura SD/MMC


-

 Conecte sus dispositivos SD / MMC a esta ranura para reproducir música con formato MP3 

o WMA. 

15. 

AUX In


-

 Conecte sus dispositivos de música externos a través de este puerto para reproducir su música, con 

un cable de conexión adecuado. 

16. 

Ranura USB


-

 Conecte sus dispositivos USB a esta ranura para reproducir música con formato MP3 o WMA. 

17. 

CD Eject Button


 Pulse para expulsar o cargar el CD. 


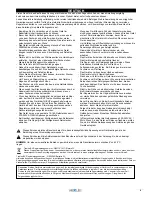
PANEL TRASERO 


1.  Toma corriente AC 230Volt 
2. Ventilador 
3.  Entrada externa DC12V batería 
4. Fusible 
5. Entrada 

Linea 

6. Salida 

Linea 


Summary of Contents for ST110

Page 1: ...ST110 Mobile System 8 CD USB MP3 Ref nr 170 007 INSTRUCTION MANUAL GEBRUIKSAANWIJZING GEBRAUCHSANLEITUNG MANUAL DE INSTRUCCIONES MANUEL D INSTRUCTIONS V1 0 ...

Page 2: ...ays seek advice from a specialist Do not force the controls This unit is with speaker inside which can cause magnetic field Keep this unit at least 60cm away from computer or TV This unit is with built in lead acid rechargeable battery Please recharge the battery every 3 months if you are not going to use the unit for a long period of time Or the battery may be damaged If the battery is damaged pl...

Page 3: ... Turn the knob anti clockwise to reduce the volume Turn the knob clockwise to increase the volume 6 CD Slot Put the CD to this slot to play music 7 LCD Display To display time and other functions 8 1 Play Button Press to toggle between Play and Pause function 9 2 RPT Button Press to choose the repeat mode in between One or All 10 3 RDM Button Press to choose the random play mode in between Random ...

Page 4: ... is connected CHARGE LED indicator will light red The rechargeable battery is being charged If FULL LED indicator light green the battery is fully charged and ready to power the unit alone Shut off the power switch and disconnect the AC power Turn the unit back ON and the rechargeable battery will power the unit alone Note Turning off the unit power switch will allow the battery to be charged more...

Page 5: ...ichtlijnen en moeten de aanwijzingen waarschuwingen worden gevolgd Het apparaat buiten bereik van kinderen houden Bovendien mag het apparaat nooit onbeheerd gelaten worden Gebruik geen schoonmaakspray om de schakelaars te reinigen Restanten van deze spray zorgen ervoor dat smeer en stof ophopen Raadpleeg bij storing te allen tijde een deskundige Gebruik geen overmatige kracht bij het bedienen van ...

Page 6: ...gen 5 Volume Draai de knop linksom om het volume te verlagen Draai de knop naar rechts om het volume te verhogen 6 CD Slot Druk de CD in deze poort om muziek te spelen 7 LCD scherm Weergeven van tijd en andere functies 8 1 Play Toets Druk op de toets om te schakelen tussen Play en Pauze functie 9 2 RPT Toets Druk op de toets om één of alle muzieknummers te herhalen 10 3 RDM Toets Druk op de toets ...

Page 7: ... de CHARGE LED indicator rood worden ten teken dat de accu wordt opgeladen Als de FULL LED indicator groen wordt is de accu helemaal opgeladen en kan het systeem worden gebruikt Zet de netschakelaar op OFF en verwijder het netsnoer Controleer of de volumeregelaar minimaal staat Zet het systeem weer ON en de accu verzorgt de bedrijfsspanning NB Indien mogelijk de netschakelaar uit zetten de accu wo...

Page 8: ...hintereinander ein und ausschalten Dadurch verkürzt sich die Lebensdauer erheblich Das Gerät außerhalb der Reichweite von Kindern halten Das Gerät niemals unbeaufsichtigt lassen Die Regler nicht mit Reinigungssprays reinigen Diese hinterlassen Rückstände die zu Staub und Fettansammlungen führen Bei Störungen immer einen Fachmann um Rat fragen Das Gerät nur mit sauberen Händen bedienen Das Gerät ni...

Page 9: ...gen den Uhrzeigersinn um die Lautstärke zu verringern Drehen Sie den Knopf im Uhrzeigersinn um die Lautstärke zu erhöhen 6 CD Slot Drücken Sie die CD in diesen Anschluss um Musik zu spielen 7 LCD Display Anzeige von Uhrzeit und andere Funktionen 8 1 Play Taste Drücken Sie die Taste um zwischen Wiedergabe und Pause umschalten Modus 9 2 RPT Taste Drücken Sie die Taste um eine oder alle Songs zu wied...

Page 10: ...Anzeige rot als Zeichen daß die Batterie aufgeladen wird Wenn die FULL LED grün leuchtet ist die Batterie vollständig geladen und das System kann verwendet werden Schalten Sie die Stromversorgung OFF und ziehen Sie das Netzkabel Stellen Sie die Position des Lautstärke Reglers auf Minimum ein Schalten Sie das System wieder ON und die Batterie liefert die Betriebsspannung Hinweis Die Batterie lädt s...

Page 11: ...rectrices aplicables y seguir las instrucciones No lo apague y encienda repetidamente Esto acorta su tiempo de vida Mantenga el aparato fuera del alcance de los niños No deje el aparato sin vigilancia No utilice sprays limpiadores para limpiar los interruptores Los residuos de estos sprays producen depósitos de polvo y grasa En caso de mal funcionamiento siempre consulte a un profesional No fuerce...

Page 12: ...ierda para reducir el volumen Gire el mando hacia la derecha para aumentar el volumen 6 Ranura CD Introducir el CD en esta ranura para reproducir música 7 Pantalla LCD Muestra tiempo y demás funciones 8 1 Play Pulse para alternar entre reproducción y función de pausa 9 2 RPT Pulse para seleccionar el modo de repetición entre una o todas 10 3 RDM Pulse para seleccionar el modo de reproducción aleat...

Page 13: ...rgable incorporada Cuando se conecta la alimentación de CA el indicador LED de carga se ilumina en rojo La batería recargable se está cargando Si la luz indicadora se ilumina verde la batería está completamente cargada y lista para alimentar la unidad sola Apague el interruptor de alimentación y desconecte la alimentación de CA Gire la unidad de nuevo en ON y la batería recargable encenderá la uni...

Page 14: ...oujours les mains propres pour utiliser l appareil Ne forcez pas les réglages Cet appareil utilise un haut parleur qui peut engendrer un champ magnétique Placez toujours l appareil à 60 cm au moins d un ordinateur ou téléviseur L appareil contient un accumulateur au plomb rechargeable Rechargez l accumulateur tous les trois mois en cas de non utilisation prolongée de l appareil sinon l accumulateu...

Page 15: ...montre pour diminuer le volume et dans le sens des aiguilles d une montre pour l augmenter 6 Insert CD Placez le CD pour lire la musique 7 Affichage LCD Pour afficher l heure et les différentes fonctions 8 Touche 1 Play Appuyez pour commuter entre fonction Lecture et Pause 9 Touche 2 RPT Appuyez pour choisir le mode de répétition Unique ou Tous 10 Touche 3 RDM Appuyez pour choisir le mode de lectu...

Page 16: ...cumulateur intégré rechargeable Si le cordon AC est branché la LED CHARGE témoin de charge brille en rouge L accumulateur est alors en charge Si le témoin FULL LED brille en vert l accumulateur est chargé prêt à faire fonctionner l appareil Eteignez l appareil débranchez le cordon secteur Rallumez l appareil l accumulateur alimente seul l appareil Note Si vous éteignez l appareil l accumulateur se...

Page 17: ...umber 170 007 Product Description ST110 Mobile System 8 CD USB MP3 Regulatory Requirement EN 60065 2002 A11 2008 EN 55013 2001 A2 2006 EN 55020 2007 EN 61000 3 2 2006 EN 61000 3 3 2008 The product meets the requirements stated in Directives 2006 95 and 2004 108 EC and conforms to the above mentioned Declarations Almelo 07 05 2015 Signature B Kosters ...

Page 18: ...Specifications and design are subject to change without prior notice www tronios com Copyright 2015 by TRONIOS the Netherlands ...

Reviews: