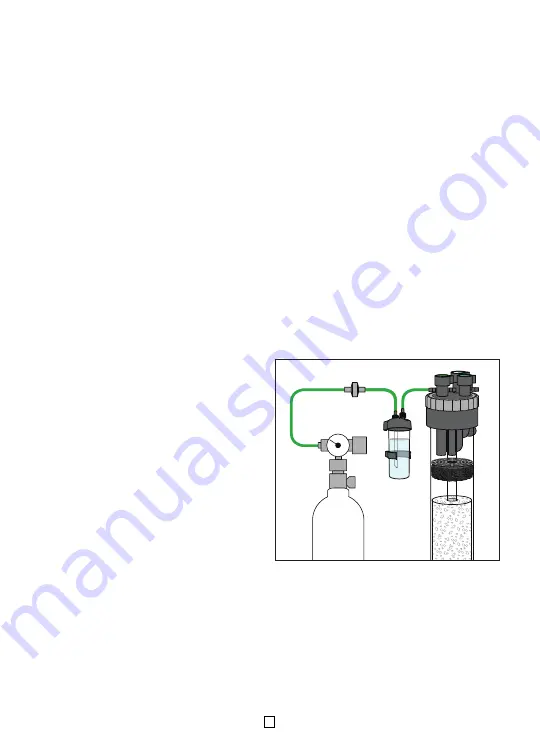
INSTALLATION:
1. Remove the top of the calcium reactor. Rinse calcium reactor media. Place a sponge over
the bottom support grid. Add approximately 6” of media to the reactor. When adding media
verify that media does not go down the stand pipe. Place another sponge over the top
support grip above the media. Screw lid back onto the calcium reactor and verify that the
output is connected to the stand pipe.
2. Choose one of the following water source (in):
a) Gravity (unit installed below aquarium): Connect a piece of silicone tubing to the green
water intake valve, insert the line inside the aquarium 2” below the water surface.
The tube can be secured directly to the overflow box using a zip tie.
b) Pressure: Choose an existing pressure line. Cut the line and plumb in a tee. The bleed line
will supply water to the calcium reactor. The bleed line must have a valve and reduced to
3/16” barb. With the valve closed connects the silicone tubing from the bleed line directly
to the green water intake valve.
c) Supply pump: Use a separate low flow pump. Reduce the output of the pump to 3/16”
barb. Connect silicone tubing directly to the green water intake valve. Depending on the
size of the pump, a bleed line is needed to keep water flowing through the pump at all
times.
3. Effluent water (out): Connect silicone tubing to the blue effluent water valve. Secure the line
to the back of the aquarium or sump. The silicone tubing must be positioned above water
level so that you can see droplets of water
flowing from the tube.
4. Fill bubble counter three quarters full with
fresh water.
5. CO
2
/Water intake (in): Attach the silicone
tubing from the CO
2
regulator to a check
valve to the bubble counter and to the CO
2
green water intake valve. See diagram below.
6. Air-vent-bleed: Attach silicone tubing to the
white air-vent-bleed valve. Secure silicone
tubing to the aquarium or sump. This help
prevents air and CO
2
from building up at the
top of the calcium reactor.
7. Priming Calcium Reactor:
a) Gravity: Open the green water intake
valve. Disconnect the tubing from the green water intake valve, apply suction to start a
siphon and reattach it back to the green water intake valve. Keep the white air-vent-bleed
valve open until the calcium reactor is full of water.
b) Pressure: Open the green water intake valve, then the white air-vent-bleed valve (this
valve may not have to be opened all the way). When a strong pump is used, the white
air-vent-bleed valve only needs to be open a quarter turn. Close the white air-vent-bleed
valve completely when the calcium reactor is full of water.
c) Supply pump: Open the green water intake valve. Plug the pump into a GFCI outlet.
Open the white air-vent-bleed valve until the calcium reactor is full of water.
max
min
min
max
min
Bubble
Counter
Check Valve
CO2 (in)
CO2
Tank
CO2 Regulator
3


