background image

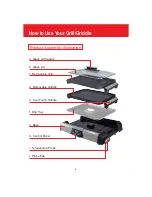
How to Use Your Grill/Griddle

6

a.Preheat Light
b.Ready Light
c.Fahrenheit/Centigrade Switch Button
d.Decrease Preheat Temperature Button
e.ON/OFF Button
f.Increase Preheat Temperature Button
g.Probe Function Button
h.Probe Plug Insert
i.Temperature Display
j.Probe Setting Icon
k.Probe Mode Mark
l.Release Button

a. Preheat Light (Red LED) – When 
    the unit is preheating, the Red LED 
    will light up. The Red LED will turn 
    OFF and the Green LED will turn 
    ON when the temperature is ready 
    to cook.

b. Ready Light (Green LED) – When 
    the temperature is ready to cook, 
    the Green LED will light up. If the 
    temperature is not ready to cook, 
    the Green LED will turn OFF and 
    the Red LED will turn ON.

c. Fahrenheit/Centigrade Switch 
    Button – Press to change mode.

d. Decrease Preheat Temperature 
    Button – Select desired temperature 
    by pressing the button. Temperature 
    will reduce in 25° intervals. 
    The lowest temperature is 150° F.

e. ON/OFF Button – Press the button 
    to start the unit. 
    Press again to turn off.

f.  Increase Preheat Temperature 
    Button – Select desired temperature 
    by pressing the button. Temperature 
    will increase in 25° intervals. 
    The highest temperature is 475° F.

g. Probe Function Button – Insert the 
    probe into food and press the mode 
    button (g) to display temperature.

h. Probe Plug Insert – for connecting 
    probe.

i.  Temperature Display – (White LCD) 
    for displaying temperature.

j.  Probe Setting Icon – For 
    temperature setting.

k. Probe Mode Mark – When using the 
    Probe, press the Mode button and 
    the Probe mark will show on the 
    LCD.

l.  Release Button – Raise the control 
    panel for easy-viewing. 
    Press the button to set the control 
    panel back to the holder.

Summary of Contents for CUC-01G

Page 1: ...MODEL CUC 01G Instruction Manual ...

Page 2: ......

Page 3: ......

Page 4: ... RQ D VLQN GUDLQ ERDUG Ɣ R QRW OHDYH WKH QGRRU OHFWURQLF ULOO ULGGOH unattended when in use Ɣ R QRW DWWHPSW WR RSHUDWH WKH QGRRU OHFWURQLF ULOO ULGGOH E DQ PHWKRG RWKHU WKDQ WKRVH GHVFULEHG LQ WKLV ERRNOHW Ɣ OZD V HQVXUH WKH QGRRU OHFWURQLF ULOO ULGGOH LV FRPSOHWHO DVVHPEOHG EHIRUH RSHUDWLQJ 7KH QGRRU OHFWURQLF ULOO ULGGOH ZLOO QRW RSHUDWH XQOHVV SURSHUO DVVHPEOHG Ɣ R QRW XVH DWWDFKPHQWV RWKHU WKD...

Page 5: ... 6HUYLFH HQWHU IRU VHUYLFH RU UHSDLU Ɣ 7KLV DSSOLDQFH LV IRU KRXVHKROG XVH RQO R QRW XVH WKLV DSSOLDQFH IRU DQ WKLQJ RWKHU WKDQ LWV LQWHQGHG XVH R QRW XVH LQ PRYLQJ YHKLFOHV RU ERDWV R QRW XVH RXWGRRUV 0LVXVH PD FDXVH LQMXU 2 CAUTION TO REDUCE THE RISK OF FIRE OR ELECTRIC SHOCK DO NOT REMOVE THE BOTTOM COVER CAUTION SWITCH OFF THE INDOOR ELECTRONIC GRILL GRIDDLE AND DISCONNECT FROM POWER SUPPLY BE...

Page 6: ...Parts And Features 3 Glass Lid Handle Glass Lid Removable Grill Griddle Cool Touch Handle Drip Tray Base Control Panel Temperature Probe Probe Site GRILL 120V 1800W GRIDDLE 120V 1500W ...

Page 7: ...se Your Grill Griddle 4 Product Assembly Illustration a Glass Lid Handle b Glass Lid c Removable Grill d Removable Griddle e Cool Touch Handle f Drip Tray g Base h Control Panel i Temperature Probe j Probe Site ...

Page 8: ...other liquid flowing into the appliance 3 Choose the Grill or Griddle d for cooking and make sure contact is firm 4 If the Grill or Griddle d are placed in the wrong direction rotate 180 degrees to place in the correct position 5 To avoid damage never disassemble any screwed parts How to Use Your Grill Griddle 5 Important Points For Product Assembly ...

Page 9: ...Switch Button Press to change mode d Decrease Preheat Temperature Button Select desired temperature by pressing the button Temperature will reduce in 25 intervals The lowest temperature is 150 F e ON OFF Button Press the button to start the unit Press again to turn off f Increase Preheat Temperature Button Select desired temperature by pressing the button Temperature will increase in 25 intervals ...

Page 10: ...nd turn OFF when it is ready to cook d When the temperature reaches the desired setting the Green LED will light up and will not go off e Eight total temperature settings 155F 175F 350F 375F 400F 425F 450F 475F 4 Preheating and Ready to Cook a During Preheating i LCD Display will show the Grill Griddle preheat setting temperature or default setting 475 F ii The Red LED will turn OFF when the tempe...

Page 11: ...red temperature by pressing the Minus or Plus buttons The Probe default Maximum temperature will display at 184 F Press the Minus or Plus button again to adjust 2 When the setting temperature is reached the beeper will sound 2 short each half second and 1 long 1 and a half seconds for 3 cycles When the MODE button is pressed and goes back to Normal mode the temperature setting is maintained a LCD ...

Page 12: ... temperature using the chart below 3 A beep will sound when the unit is preheated or when the food reaches the desired temperature at Probe Mode II 4 Two angles on the Control Panel provide a clear view 5 Use Grill Handles to easily remove the Grill or Griddle 6 Drip Tray catches grease and other liquid 7 A Glass Lid prevents spattering during cooking 8 Cooking suggestions for the Grill Griddle Tu...

Page 13: ...afe 2 The Grill and Griddle plates are removable for easy cleaning and can be washed but not submerged DO NOT PUT IN DISHWASHER 3 Clean the Drip Tray by washing and drying thoroughly Drip tray is dishwasher safe 4 Wash and dry the Probe DO NOT PUT IN DISHWASHER 5 Clean the Base by wiping and drying thoroughly DO NOT PUT IN DISHWASHER And DO NOT get the electrical parts wet Clean Maintenance If usi...

Page 14: ... in transit In the event of a product replacement or return all freight charges must be prepaid The repaired or replacement model will be returned at Vianté expense This warranty is conditional upon proper use and care in accordance with instruction manual directions which accompany the unit and only the use by the original purchaser For Service Please call Turnpike Appliance at 516 486 5700 for t...

Page 15: ...NOTES 12 ...

Page 16: ......

Reviews: