background image

SETUP SECTION

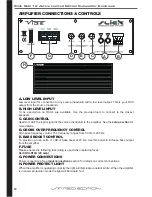
To correctly set the gain control of the amplifi er to match that of the source (headunit) use the 
following setup routine:

• Turn the gain control to minimum on the amplifi er.
• Ensure the bass boost is set to 0 dB.
• On the headunit set all crossovers to fl at and both bass and treble to zero.
• Turn up the source (headunit) to approx 3/4 volume.
• Very slowly turn up the gain on the amplifi er until distortion can be heard in any of the speak-

ers or until the volume reaches an uncomfortable listening level when this is reached turn 
down the gain control slightly.

• The gain control is now set.

The setting of the crossover will directly effect the sound you will hear from the subwoofer. At its 
lowest setting (50 Hz) the subwoofer will only react to frequencies from around 35 Hz to 50 Hz. At its 
highest setting (250 Hz) the subwoofer will react to a larger range of frequencies from around 35 Hz 
to 250 Hz. Experiment with this setting to achieve a sound you are happy with that feels comfortable 
with the music that you listen to.

7

Slick SLR 12 Active Limited Edition Subwoofer Enclosure

Summary of Contents for Slick SLR 12 Active Limited Edition

Page 1: ...Slick SLR 12 Active Subwoofer Enclosure Model SLR12A LIMITED EDITION To ensure maximum performance and safety please follow this manual Please retain the manual for future reference after installation www vibeaudio co uk ...

Page 2: ... cause a loss of bass response Ensure that no moving parts catch on the speaker or grill e g window or door handles or window glass inside the door INSTALLATION The quality of the installation will affect the system performance and reliability Contact your nearest authorised VIBE dealer if you are unsure about the installation of this product Please mount this unit away from any potential hazards ...

Page 3: ...ns up A new subwoofer is like a new car engine it needs a few thousand miles before you can drive it to its full potential driving it into the red line from the first day will mean engine damage is certain and will not be covered by warranty and the same applies to the subwoofer Failure to follow this simple procedure is the most common reason for a subwoofer to fail after a very short period of t...

Page 4: ...ther than eighteen inches away from the battery Please ensure that the fuse is not fitted until the entire installation procedure is complete The two tables below are to help you decide on what cable is correct for you The first ena bles you to select the size of cable depending on the length required The second will help you convert the cable size from American Wire Gauge to Metric if you need to...

Page 5: ...le provided If the source headunit does not have a remote turn on cable then a 12v supply should be used This will require a switch to be fitted inline to enable the amplifier to be turned on and off Remember that if this switch is left on you will flatten the car battery RCA CABLES Please take extra care when running these cables from the source to the amplifier Ensure that they are placed away f...

Page 6: ...pass frequency control The frequency ranges from 50 Hz to 250 Hz E BASS BOOST CONTROL To provide up to an extra 12 dB of bass boost at 45 Hz Use this boost to increase bass output from the amplifier F FUSE Please ensure the following fuse rating is used when replacing fuses SLICK SLR12A 20 amp G POWER CONNECTIONS Power connections See input connections section for details on correct connections H ...

Page 7: ...k ers or until the volume reaches an uncomfortable listening level when this is reached turn down the gain control slightly The gain control is now set The setting of the crossover will directly effect the sound you will hear from the subwoofer At its lowest setting 50 Hz the subwoofer will only react to frequencies from around 35 Hz to 50 Hz At its highest setting 250 Hz the subwoofer will react ...

Page 8: ...ically when the units temperature goes above 80 degrees If the amplifier feels very hot then this may be the reason for the amplifier not starting Check that there is good airflow around the amplifier In some applications an external fan may be required BLOWN FUSE S Check both positive supply and ground for shorts Check that the positive wire is connected to the positive terminal on the amplifier ...

Page 9: ...abbreviations of product names as logos are all trademarks of VIBE Graphics and logos are trademarks or trade dress of VIBE Technologies Ltd or its subsidiaries VIBE s trademarks and trade dress may not be used in connection with any product or service that is not VIBE s in any manner that is likely to cause confusion among customers or in any manner that disparages or discredits VIBE All other tr...

Page 10: ...chase and aid your warranty please fill in the following form and keep it safe for your future reference For more information and to register your warranty online visit www vibeaudio co uk warranty 10 SPECIFICATIONS RMS Power Peak Power SLICK SLR12A 400 Watts 1200 Watts Slick SLR 12 Active Limited Edition Subwoofer Enclosure ...

Page 11: ......

Page 12: ...twitter com vibeaudio youtube com vibeaudio PJO 7 PO MJOF ...

Reviews: