10 Date and Time Setup
10.1 Time
Setup
The time is displayed with a dot [
]. Set the time in Hour-Minute-Second format on a 24-hour basis.
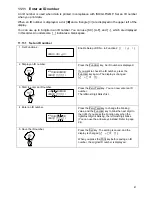
1 Display the time.
Press the Function key for a few seconds.
When the display is changed from [
] to [
],
release the key.
Press the Function key once.
The display automatically indicates the time after indicating
[
].
2 Set the time.
Press the Set key. You can change a blinking digit.
Use the Zero/Tare key to change the blinking digit.
Use the Function key to blink the next digit to the right. If you press
the Function key when the rightmost digit is blinking, the leftmost
digit blinks.
3 Save the time.
Press the Set key to save the settings.
The changes are saved, and a date is displayed.
When you press the Print key before saving a time, the original time is displayed.
30-sec adjustment function
Press the Zero/Tare key when the time is being displayed.
29 or fewer seconds are rounded down to the nearest minute, and 30 or more seconds are
rounded up to the nearest minute.
10.2 Date
Setup
A date is displayed with a dot [
]. The last two digits of the year are displayed. You can change the
date format in Function 1.
1 Display the date.
Follow step 1 in 9.1 to change the display to [
]
(Go straight to step 2 if you set a date after completing steps in 9.1).
Press the Function key twice.
The display automatically indicates a date after indicating
[
].
2 Set a date.
Press the Set key. You can change a blinking digit.
Use the Zero/Tare key to change the blinking digit.
Use the Function key to blink the next digit to the right.
If you press the Function key when the rightmost digit is blinking,
the leftmost digit blinks.
3 Save the date.
Press the Set key to save the settings.
The changes are saved, and the balance goes back into
measurement mode.
When you press the Print key before saving a date, the original date is displayed.
Press twice
:
:
Key released
Continuous press
37

