background image

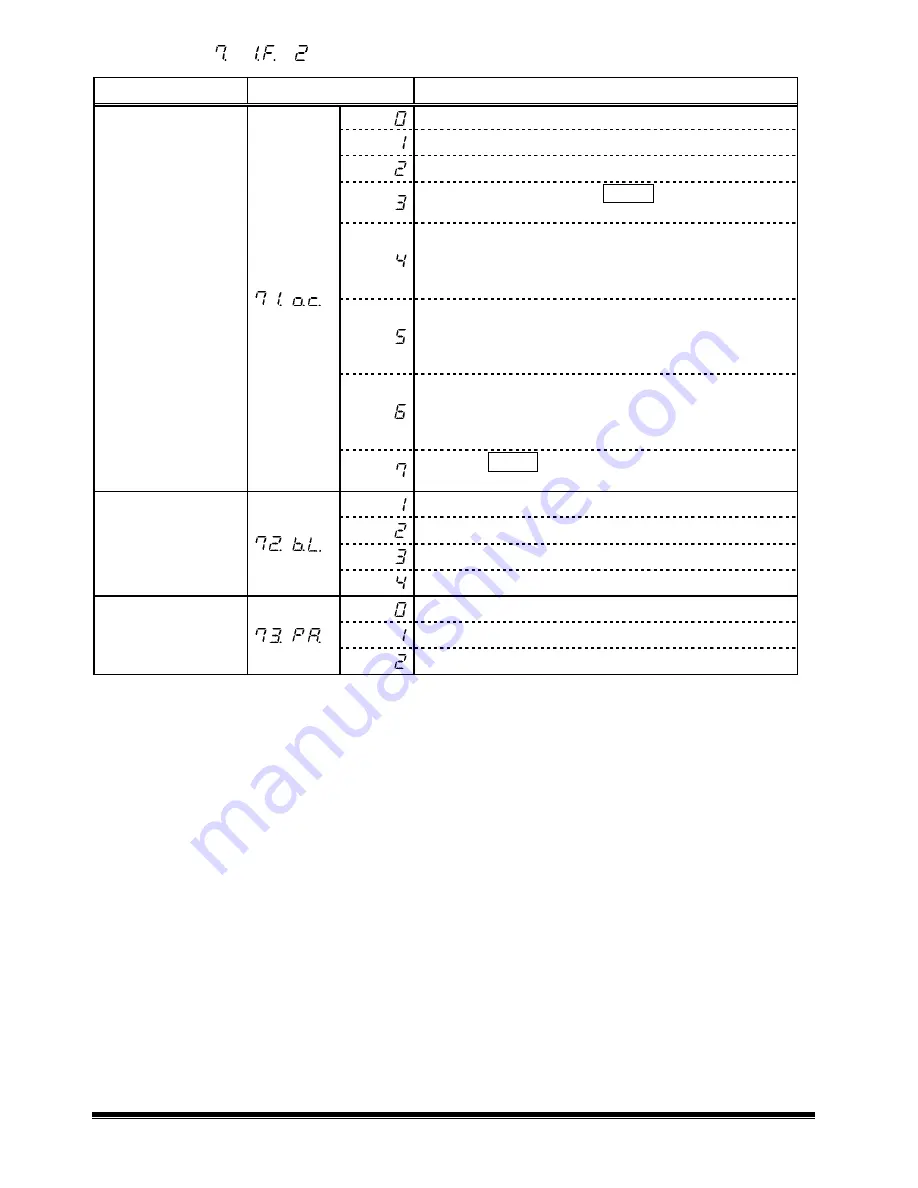
Displayed when [


].

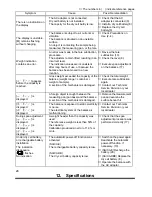
Item

Set Value

Description

Stop output

Output continuous at all times

Output continuous if stable (stop output if unstable)

Outputs once by pressing    Print    key (irrespective of
whether stable).

Outputs once if stable.    Outputs if the balance is
stable when a sample is loaded after the preceding
sample has been removed and the balance indicated
zero, or less.

Outputs once if stable, and stops output when
unstable.    Even if the sample is not replaced, the
balance is output once when it stabilizes next time
(including the zero indication).

Outputs once if stable, and outputs continuously when
unstable.    Even if the sample is not replaced, output
of the balance stops when it stabilizes after being
output once.

Output Control


Pressing  Print   key causes the balance to output
once when stable.

1200 bps

2400 bps

4800 bps

Baud Rate


9600 bps

None

Odd

Parity


Even

  denotes a factory-setting


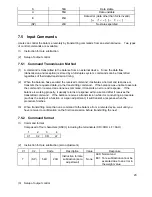
  The data interval in continuous output mode is 0.1 to 1 second.    (The interval varies depending

      on weighting conditions and other factors.)

14

5.    Switching Function for Units of Measurement

Summary of Contents for SA/CA Series

Page 1: ...e SA CA Series Operation Manual SHINKO DENSHI CO LTD To ensure safe and proper use of the balance please read this manual carefully After reading this manual store it in a safe place near the balance so you can review it as needed IMPORTANT ...

Page 2: ...body The balance is easy to operate and features user friendly keys Furthermore the large liquid crystal display provides excellent visibility and the instrument s high speed and stability intrinsic to a tuning fork design help boost operational efficiency Before using the balance please check that the following items have been included in the package Should you find any missing parts please conta...

Page 3: ...hing Function for Units of Measurement 5 1 Switching Units of Measurement 15 5 2 Setup of Units of Measurement 15 6 Calibrating the Balance 17 7 Input output functions 7 1 Terminal Numbers and Functions 19 7 2 Connection between Balances and Personal Computers 20 7 3 Interface Specifications 21 7 4 Output Data 21 7 5 Input Commands 23 8 Operating the Balance with the Dry Cell Battery 25 9 Operatin...
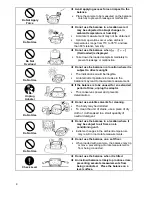
Page 4: ... steps that the user should take to ensure the quality and reliability of the balance Meanings of Symbols Each symbol is accompanied by an instruction 強 制 記 号 Mandatory Symbol Indicates a mandatory action that should be executed without fail 水 平 確 認 Check Level 禁止記号 Prohibitive Symbol Indicates a prohibited action that must not be executed 使 用禁 止 Do not Use 注 意 CAUTION 分解禁止 Do Not Disassemble Do n...

Page 5: ...c shock 定 格外 禁止 Keep Dry Do not use the balance in a location were it may be subjected to excess moisture Electric shock or short circuiting could occur The balance may be corroded with resultant malfunction 定 格 外禁 止 Do Not Leave Afloat Do not use the balance with its adjusters lifted The balance will become unstable preventing accurate measurement 定 格外 禁止 Avoid Dust Do not use the balance in a lo...

Page 6: ...ure increase in the balance may lead to inaccurate measurement Unplug Adapter If the balance is to be unused for an extended period of time unplug the adaptor This conserves power and prevents deterioration 定 格外 禁止 Do Not Use Do not use volatile solvents for cleaning The body may be distorted To clean the unit of stains use a piece of dry cloth or cloth soaked in a small quantity of neutral deterg...

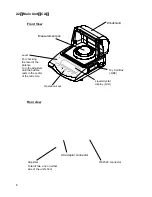
Page 7: ...vel For checking the level of the balance Turn the adjusters until the bubble rests in the center of the red circle Adjusters Total of two one on either side of the unit s front AC adaptor connector Measurement pan Liquid crystal display LCD RS232C connector Windshield Dry Cell Box DBE ...

Page 8: ...ng the level of the balance Turn the adjusters until the bubble rests in the center of the red circle Measurement pan Liquid crystal display LCD Windshield Dry Cell Box DBE Adjusters Total of two one on either side of the unit s front AC adaptor connector RS232C connector ...
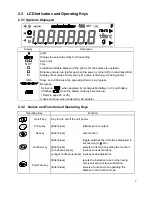
Page 9: ...y becomes low Refer to page 25 or 26 It does not show when powered by AC adaptor 2 3 2 Names and Functions of Operating Keys Operating Key Function On off key Key to turn on off the unit power Printy key Brief press initiates print or output Set key Brief press sets function Function key Brief press toggle switches the units to be displayed in succession ct g g g g etc Brief press selects an item ...

Page 10: ...curing the exact level of the balance Turn the adjusters until the bubble rests in the center of the red circle on the level The adjuster is located on either side at front 3 When powered by AC adaptor Connect as the following drawings 3 When dry cell Battery operated Connect as the following drawings Can be operated with AC adopter too 8 3 2 Operation Check Position of air bubble in the level ...

Page 11: ... Switching the measurement mode Press the Function key Each time the key is pressed the unit of measurement changes as indicated The balance is shipped from the factory with the following switching sequence g g g g ct g g g g 4 Verifying changes in the read out indicator Press the measurement pan lightly and make sure that the read out indicator changes Also ensure that the read out indicator is r...
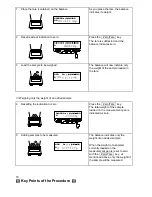
Page 12: ...dication to zero Press the Zero Tare key The total weight of the sample loaded on the measurement pan is indicated as zero 5 Adding samples to be measured The balance indicates only the weight of an added sample When the weight of a sample currently loaded on the measurement pan is reset to zero with the Zero Tare key as mentioned above only the weight of the sample will be measured 10 Key Points ...

Page 13: ...f it is likely that the balance is being affected by wind or other vibrations Use the windshield or vibration dampers to protect against such adverse effects Unstable Stable 4 When the read out indicator is reset to zero or the tare is subtracted the balance indicates zero this way 0 If the indication deviates from the true zero point by 1 4 of a graduation or less 0 disappears If zero is set or t...

Page 14: ...em Press the Function key The indication changes to the next item Auto zero 3 Selecting an item Pressing the Function key advances the function items at the rate of one item per press 4 Changing the content of an item Select the item to be changed with the Function key Each press of the Zero Tare key changes the digit on the right end Select the desired one 5 Terminating the function selection Pre...

Page 15: ...perated Measurement by consecutive weighings Response speed Fast Slow Stability parameters Wide mild Narrow strict 1 Disable input output Interface 2 Seven digit numeric format 4 3 1 g g g g 2 ct oz lb ozt dwt Lower right grain tl_Hong Kong Upper right tl_Singapore Malaysia Lower right tl_Taiwan mom to Setup of units of measurement to be displayed Register selected measuring units with Function ke...

Page 16: ...sample is not replaced the balance is output once when it stabilizes next time including the zero indication Outputs once if stable and outputs continuously when unstable Even if the sample is not replaced output of the balance stops when it stabilizes after being output once Output Control Pressing Print key causes the balance to output once when stable 1200 bps 2400 bps 4800 bps Baud Rate 9600 b...

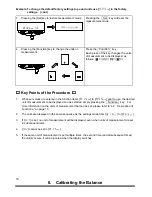
Page 17: ...n values to are entered prior to use the desired unit of measurement to be displayed can be chosen simply by pressing the Function key For more information on the units of measurement that can be set here please refer to 4 2 Description of Functions on page 13 Example To change the default factory settings to pound units use in the factory settings 1 Display the function item Press and hold down t...

Page 18: ... function items to prior to use the desired unit of measurement to be displayed can be selected simply pressing the Function key For more information on the units of measurement that can be set please refer to 4 2 Description of Functions on page 13 2 The units are displayed in the same sequence as the settings made from to 3 If is set no unit of measurement will be displayed even when units of me...

Page 19: ...surement pan 1 Activating the span adjustment function Pressed continuously Key released Press and hold down the Function key Release the key when the display changes from to 2 Starting the span adjustment Release simultaneously Press the Function key while holding down the Zero Tare key Press the Function key while holding down the Zero Tare key then release both keys simultaneously The display f...

Page 20: ... a weight close to the capacity of the balance Calibration weights can be ordered from Shinko For ordering information please contact Shinko 3 If problems arise during span adjustments one or more of the following error messages will appear 1 The calibration weight exceeds the capacity of the balance 2 The calibration weight is less than half the capacity of the balance 3 The difference between be...

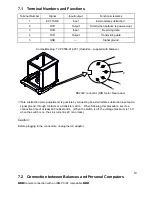
Page 21: ...5 pin Rear panel Tare subtraction zero adjustment is possible by connecting an external tare subtraction input and a signal ground through contacts or a transistor switch When following this procedure secure a connection time of at least 400 milliseconds When the switch is off the voltage maximum is 15 V when the switch is on the sink current is 20 mA or less Caution Before plugging in the connect...

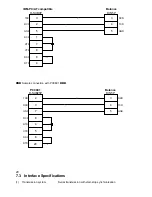
Page 22: ...mission system Serial transmission with start stop synchronization Balance DIN5P IBM PC AT compatible D SUB9P TXD RXD GND DCD RTS CTS DSR DTR RXD TXD GND 3 2 5 1 7 8 6 4 3 4 5 PC9801 D SUB25P TXD RXD GND DCD RTS CTS DSR DTR RXD TXD GND Balance DIN5P 3 4 5 3 2 5 20 7 8 6 4 ...

Page 23: ... bit 0 1 bits Stop bit 2 bits 6 Parity bit none odd even 7 4 Output Data By changing the function settings on the main unit of the balance users can select either of the following formats See 4 2 Description of Functions on page 13 7 4 1 Data Format Seven digit numeric format Composed of 15 characters including the terminators CR 0DH LF 0AH A parity bit can also be appended 1 2 3 4 5 6 7 8 9 10 11...

Page 24: ...ero of leading portion of value leading zero suppress 7 4 4 Units U1 U2 two characters All the codes are ASCII codes U1 U2 Code Meaning Balance indicators SP G 20H 47H gram g g g g C T 43H 54H carat O Z 4FH 5AH ounce L B 4CH 42H pound O T 4FH 54H troy ounce D W 44H 57H pennyweight G R 47H 52H grain lower right T L 54H 4CH tael Hong Kong T L 54H 4CH tael Singapore Malaysia upper right T L 54H 4CH t...

Page 25: ...e command or received an erroneous command it transmits an error end response If the balance is working properly it usually returns a response within a second after it receives the transmitted command If the balance receives a transmission while it is conducting a procedure such as the setup of a function or a span adjustment it will transmit a response when the procedure finishes 3 When transmitt...

Page 26: ...utput once O 7 4FH 37H Pressing Print key causes the balance to output once when stable O 8 4FH 38H Output once immediately O 9 4FH 39H Output once after stabilization The output controls executed with commands O0 O7 work the same as the output controls executed through function setup on the main unit of the balance The commands O8 and O9 are data request commands issued to the balance Once any co...

Page 27: ...The balance can be operated with AC adaptor while the dry cell battery is installed does not show in this case 3 Operable hour will be shorten when is selected because some power is consumed for interface even with no output Cautions To operate the balance safely observe the following failure to do so could result in malfunctions breakage burst batteries or fire 1 Do not disassemble or modify the ...

Page 28: ...o decrease battery life 2 When the balance is used for the first time after purchase the operating time may be shorter than when using a fully charged battery This is due to natural discharge of the battery Although the balance can be used while is flashing it should be recharged as soon as possible 3 When the battery displays no indication or an indication disappears quickly after the balance is ...

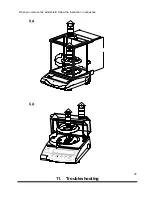
Page 29: ...When you remove the windshield follow the instruction in sequence SA CA 27 11 Troubleshooting 3 ...

Page 30: ... A section of the mechanism is damaged Check the total weight Execute tare subtraction again Contact our Technical Service Division or your local dealer is displayed A foreign object is caught between the measuring pan pan base and the balance A section of the mechanism is damaged Remove the measurement pan and examine the surface beneath it is displayed is displayed The balance is exposed to stat...

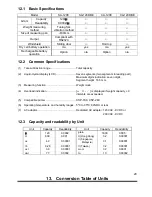
Page 31: ...ng part Maximum digits indication seven digits Segment height 16 5 mm 3 Measuring function Weight mode 4 Overload indication is displayed if weight capacity 9 intervals are exceeded 5 Compatible printer CSP 160 CSP 240 6 Operating temperature and humidity ranges 5 C to 35 C 80 RH or less 7 AC adaptor Dedicated AC adaptor 120 VAC 9 VDC or 230 VAC 9 VDC 12 3 Capacity and readability by Unit Unit Cap...

Page 32: ... 75 18 75 0 13228 0 00827 0 12057 2 41131 1to 11 66380 58 31902 0 41143 0 02571 0 37500 7 5 unit grain tael Hong Kong tael Singapore Malaysia tael Taiwan momme tola 1g g g g 15 43236 0 02672 0 02646 0 02667 0 26667 0 08574 1ct 3 08647 0 00534 0 00529 0 00533 0 05333 0 01715 1oz 437 5 0 75742 0 75 0 75599 7 55987 2 43056 1lb 7000 12 11874 12 12 09580 120 95797 38 88889 1ozt 480 0 83100 0 82286 0 82...

Reviews: