background image

U.S. Patent No. 8,714,275 and other patents pending                                                                                                                  SNT3, Rev 7/5/2019 

Copyright © 2019 Vibrant Yard Company LLC, Wichita, Kansas, USA.  All rights reserved.                            Page 

7

 of 

8


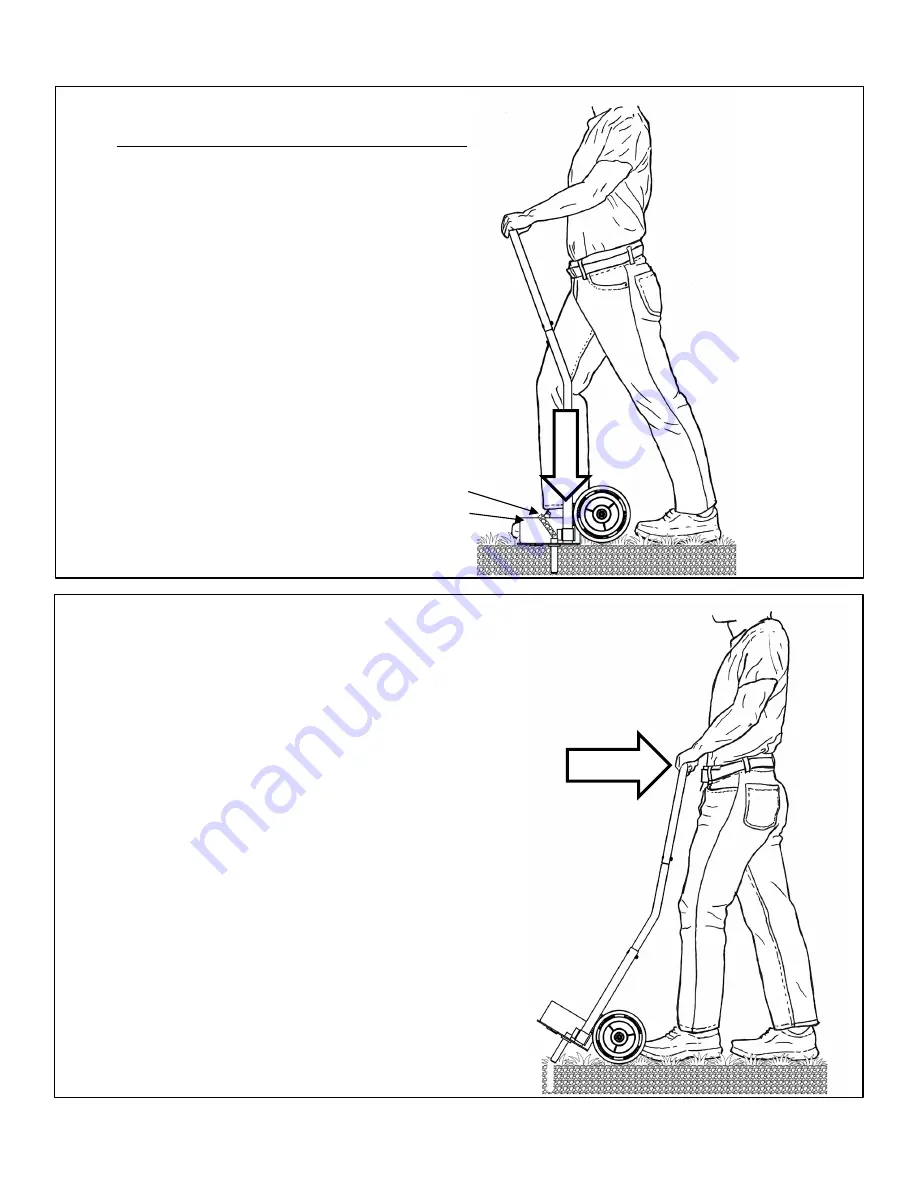
STEP: Step on the baseplate directly above the aerator 

tines (do not push down on the handle with your hands).  


Soil cores will stay inside the aerator tines the first time 

you perform this task.  The second time you perform this 

task, the second soil cores will push the first soil cores out 

of the aerator tines through the top opening, as shown in 

the figure on the right.  Note that the soil cores are usually 

shorter than the depth of the holes because the soil is 

compressed during the core removal process.  The 

deflectors will prevent soil cores from dropping onto the 

baseplate so your shoes will stay clean.  If the optional 

soil core container is used, step on the top plate of the 

container.  The soil cores will be deposited directly into 

the container. 

TILT: Remove your foot from the baseplate and take a small step back. Tilt the 

handle back to remove the tines from the ground. Repeat the steps POSITION-

STEP-TILT to create holes that are between 2 to 6 inches apart.  Alternate your left 

and right feet occasionally to reduce fatigue. 

Tips: If the aerator tines clog, remove the clog in accordance with the procedures in 

the next page.  If the tines continually clog, the soil may be too wet or muddy.  Wait 

1-2 days before aerating again.  If the tines cannot penetrate the ground, the soil may 

be too dry.  To avoid excessive tine wear, do not use the Step ’N Tilt


lawn aerator 

when the ground is too dry.


TILT 

soil core 
deflector 

Summary of Contents for Step ’N Tilt Lawn Aerator 3

Page 1: ...Washington Ave Wichita KS 67214 USA Please email cs corelawnaerator com for customer support U S Patent No 8 714 275 and other patents pending With optional soil core container IMPORTANT READ THIS MA...

Page 2: ...raction slip or fall Important Helpful Hints 1 Although the tines are designed to prevent clogging in clay soil the tines may still clog if the soil is too wet Please aerate two or three days after at...

Page 3: ...you will tighten them in step 3 Step 3 Install the upper handle bar onto the baseplate Take note of the orientation of the handle bar it should be tilted forward as shown in the picture Secure the hex...

Page 4: ...tines is intended for general purpose use and recommended for troubled areas and bare spots Two pairs of tines will require significantly more force to push the tines into the ground It is intended fo...

Page 5: ...the clay soil during rain or irrigation Highly compacted clay soil may seem moist at the surface after rain or irrigation but remains dry and compacted underneath the surface A compacted soil plug may...

Page 6: ...djusting the height of the latch bodies see step 5b 1 PUSH 2 LIFT latch handle latch arm latch arm latch handle baseplate baseplate latch body OPERATING PROCEDURES Tips The aerator tines will penetrat...

Page 7: ...soil cores from dropping onto the baseplate so your shoes will stay clean If the optional soil core container is used step on the top plate of the container The soil cores will be deposited directly i...

Page 8: ...tyard com 5 LIMITED WARRANTY Vibrant Yard Company LLC will repair or replace without cost to the owner any part or parts of the Step N Tilt found to have manufacturing defect for a period of one year...

Reviews: