background image


17

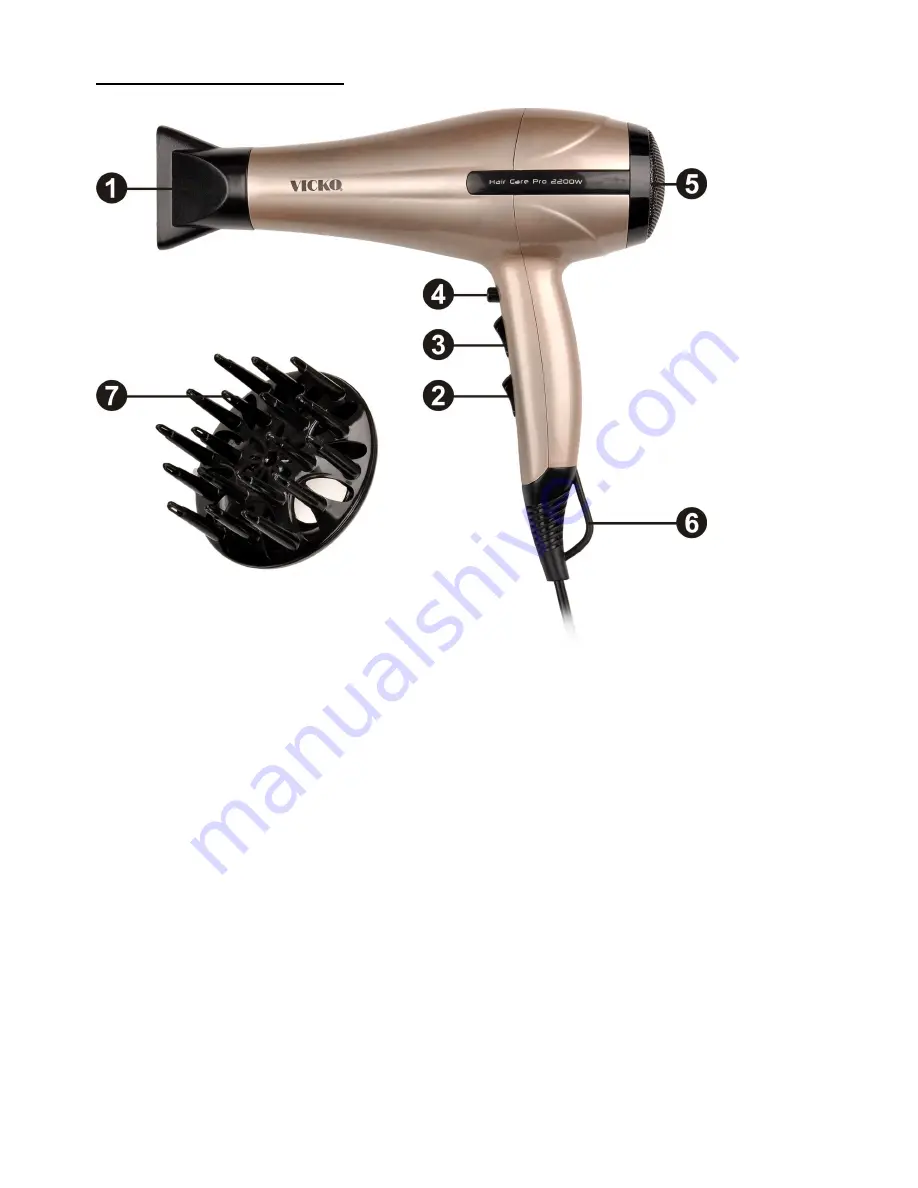
APPLIANCE DETAILS 


1.  Concentrator nozzle 
2.  ON/OFF switch / Speed control  
3.  Temperature control switch 
4.  Cool shot button  
5.  Air intake cap and filter 
6.  Hanger 
7.  Diffuser 


Summary of Contents for 871-7054

Page 1: ...12 Hair Dryer 1800 2200W With Diffuser INSTRUCTIONS MANUAL Model No 871 7054 Ref No DW 1109...

Page 2: ...se injury and device destruction 12 Do not use with a voltage converter 13 Keep the appliance away from flammable objects or other heat source 14 Do not use outdoors or where aerosol spray products ar...

Page 3: ...n when they are near the device 33 The device is not a toy Children should be supervised to ensure that they do not play with the appliance 34 The appliance should only be stored indoors in a dry plac...

Page 4: ...of sink WARNING The appliances are not intended to be operated by means of an external timer or separate remote control system WARNING This appliance is not intended for use by persons including chil...

Page 5: ...running water in order to clean it 5 Before using the device unfold the cord completely and make sure that it does not show any signs of damage 6 Ensure that the main voltage rating of your power supp...

Page 6: ...17 APPLIANCE DETAILS 1 Concentrator nozzle 2 ON OFF switch Speed control 3 Temperature control switch 4 Cool shot button 5 Air intake cap and filter 6 Hanger 7 Diffuser...

Page 7: ...ed with cool shot function which allows rapid cooling of hair and longer lasting curl Temperature control switch 3 There are 3 settings Hot Warm Halfwarm ON OFF switch Speed control 2 Use this switch...

Page 8: ...d on the appliance 2 Connect the appliance to the power supply 3 Use the ON OFF switch Speed control 2 to turn ON the appliance and also set the speed level to your desired level 4 Use Temperature con...

Page 9: ...ter carefully by turning it counterclockwise Image 1 Remove from the filter any residues of hair dust etc or any objects that prevent the airflow using your hands or a slightly damp cloth After cleani...

Page 10: ...ed as follows 1 Switch off the appliance and remove the plug from the power supply 2 Allow the appliance to cool down for a few minutes 3 Before you switch the appliance on again check the air inlet f...

Page 11: ...dicates that this product should not be disposed with other household wastes throughout EU To prevent possible harm to the environment or human health from uncontrolled waste disposal recycle it respo...

Reviews: