background image

POWER REQUIREMENTS

 DANGER

•  To reduce the risk of 

electric shock, check 
the electrical source for 
proper grounding.

•  Before performing any 

maintenance on the 
tool, disconnect the 
power cord from the 
electrical source.

Failure to follow these instructions could 
result in death or serious personal injury.

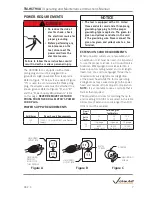
The HCT908 tool is equipped with a three-
prong plug and must be plugged into a 
grounded, single-phase electrical receptacle . 
Refer to Figure “A” below . If an adapter (Figure 
“C”) is used to accommodate the three-prong 
plug, the adapter’s wire must be attached to a 
known ground . Refer to Figures “A” and “B” 
and the “Power Supply Requirements” table 
on this page . 

NEVER REMOVE THE THIRD 

PRONG FROM THE DRILL MOTOR’S POWER 
CORD PLUG

 .

POWER SUPPLY REQUIREMENTS

Volts/Amps

Power Supply Requirements

120

120 VAC, 15-amp, 50/60 Cycle Power 

Supply

7

NOTICE

•  The tool is equipped with a UL Listed 

three-conductor cord and a three-prong, 
grounding-type plug to fit the proper 
grounding-type receptacle. The green (or 
green and yellow) conductor in the cord 
is the grounding wire. Never connect the 
green (or green and yellow) wire to a live 
terminal.

EXTENSION CORD REQUIREMENTS

When pre-wired outlets are not available and 
an extension cord must be used, it is important 
to use the proper cord size (i .e . Conductor Size 
American Wire Gauge) . Cord size selection is 
based upon tool rating (amps) and cord length 
(feet) . Use of a cord size (gauge) thinner than 
required will cause significant voltage drop 
at the power head while the tool is operating . 
Voltage drops may cause damage to the power 
head and can result in improper tool operation . 

NOTE: 

It is acceptable to use a cord size that is 

thicker than required .
The required cord sizes for cord lengths up to 
and including 100 ft/31 m are listed in the table 
below . Use of extension cords longer than 100 
ft/31 m must be avoided .

Circuit 

Rating

Cord Lengths 

feet/meters

Volts/

Amps

25 

8

50 

15

100 

31

120

15

12 gauge

12 gauge

10 gauge

6 530

circular mils

6 530

circular mills

10 380 

circular mils

ADAPTER

GROUNDING

MEANS

GROUNDED

OUTLET BOX

METAL

SCREW

GROUNDED

OUTLET BOX

GROUNDING

PRONG IS

LONGEST OF

THE 3 PRONGS

Figure A

Figure C

Figure B

7

REV_C

TM-HCT908 

/ Operating and Maintenance Instructions Manual

Summary of Contents for TM-HCT908

Page 1: ...instructions in this manual and all warning labels on the tool Wear safety glasses hardhat foot protection and hearing protection while working around this tool Save this operating and maintenance manual in a place accessible to all operators of the tool If you need additional copies of any literature or if you have questions concerning the safe and proper operation of this tool contact Victaulic ...

Page 2: ......

Page 3: ...er Requirements 7 Power Supply Requirements 7 Extension Cord Requirements 7 Tool Nomenclature 8 Installing the Hole Saw 9 Tool Setup 9 Tool Operation 11 Removing the Hole Saw 13 Maintenance 14 Lubrication 14 Adjusting the Gib 14 Parts Ordering Information 14 Accessories 15 Troubleshooting 15 3 REV_C TM HCT908 Operating and Maintenance Instructions Manual ...

Page 4: ...ncluding set up and maintenance Each operator must become familiar with the tool s operations applications and limitations Particular care should be given to reading and understanding the dangers warnings and cautions described throughout these operating instructions Use of this tool requires dexterity and mechani cal skills as well as sound safety habits Although this tool is designed and manufac...

Page 5: ...he cord away from heat oil and sharp objects CAUTION 1 The HCT908 tool is designed ONLY for grooving pipe tubing sizes materials and wall thicknesses as designated 2 Inspect the equipment Before using the tool check moveable parts for obstructions Ensure that tool components are installed and adjusted in accordance with setup instructions 3 Stay alert Do not operate the tool if you are drowsy from...

Page 6: ...ed ONLY for grooving pipe tubing with specifications that fall within the designated parameters Failure to follow this instruction could overload the tool resulting in reduced tool life tool damage or personal injury RECEIVING THE TOOL HCT908 Hole Cutting Tools are packed individually in sturdy containers Upon receipt of the tool ensure that all necessary parts are included If any parts are missin...

Page 7: ...onductor in the cord is the grounding wire Never connect the green or green and yellow wire to a live terminal EXTENSION CORD REQUIREMENTS When pre wired outlets are not available and an extension cord must be used it is important to use the proper cord size i e Conductor Size American Wire Gauge Cord size selection is based upon tool rating amps and cord length feet Use of a cord size gauge thinn...

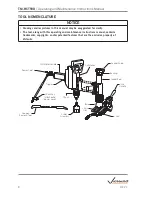
Page 8: ... manual contains trademarks copyrights and or patented features that are the exclusive property of Victaulic Power Cord Trigger Drill Motor Handle Drill Motor Feeder Knob Bearing Feeder Rod Vise Handle Chain Base Chain Slot Arbor Assembly Coupon Removal Tool Chuck Key attached to power cord Chuck 8 REV_C TM HCT908 Operating and Maintenance Instructions Manual ...

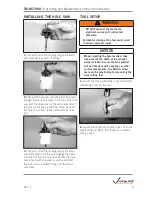
Page 9: ...hat the hole saw is installed firmly onto the arbor assembly TOOL SETUP WARNING DO NOT connect the tool to the electrical source until instructed otherwise Accidental startup of the tool could result in serious personal injury NOTICE When selecting the hole location take into account the width of the product being installed Ensure that the product will not interfere with couplings or other system ...

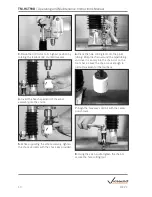
Page 10: ... chuck key provided 6 Place the hole cutting tool onto the pipe tubing Wrap the chain around the pipe tubing and insert is loosely into the chain slot on the tool s base Leave the chain loose enough to permit movement of the tool base 7 Align the hole saw s drill bit with the center punch mark 8 Using the vice handle tighten the chain to secure the hole cutting tool 10 REV_C TM HCT908 Operating an...

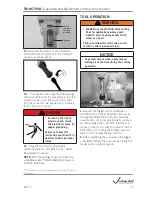
Page 11: ...le Saws TOOL OPERATION WARNING NEVER use the HCT908 Hole Cutting Tool for applications where spark hazards exist or where contact with water can occur Failure to follow this instruction could result in serious personal injury NOTICE To extend hole saw life apply thread cutting oil to the hole during the cutting operation 1 Depress the trigger on the underside of the drill motor s handle Feed the h...

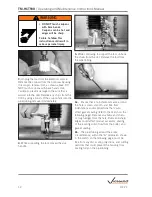
Page 12: ...uing to support the tool unhook the chain from the slot Remove the tool from the pipe tubing 6a Ensure that a 5 8 inch 16 mm area around the hole is clean smooth and free from indentations and or projections that could affect gasket sealing refer to the sketch on the following page Remove any burrs and sharp or rough edges from the hole Burrs and sharp edges could affect product assembly seating o...

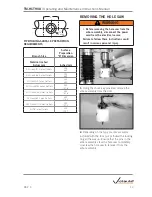
Page 13: ...6 1 mm Outlets 5 50 139 7 REMOVING THE HOLE SAW WARNING Before removing the hole saw from the arbor assembly disconnect the power cord from the electrical source Failure to follow these instructions could result in serious personal injury 1 Using the chuck key provided remove the arbor assembly from the drill 2 Depending on the type of arbor assembly included with the tool pull or thread the locki...

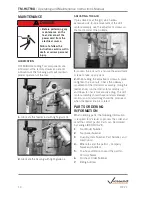
Page 14: ...djustment screws to take up any slack 2 While holding the adjustment screws in place re tighten the lock nuts Check the sideways movement of the drill motor assembly Using the feeder knob run the drill motor assembly up and down to check for excessive drag The drill motor assembly should have minimal sideways motion and minimal drag should be produced when the feeder knob is rotated PARTS ORDERING...

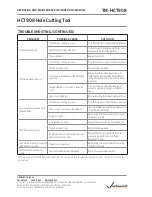
Page 15: ...6 13 4 inch 45 mm Hole Saw 18 N M18 000 031 2 inch 51 mm Hole Saw 19 N M18 000 037 21 2 inch 64 mm Hole Saw 20 N M18 000 040 23 4 inch 70 mm Hole Saw The arbor assembly is supplied with the tool Hole saws must be ordered separately TROUBLESHOOTING PROBLEM POSSIBLE CAUSE SOLUTION The base will not tighten onto the pipe The vise handle has run out of threads Loosen the vise handle and position one l...

Page 16: ...h in the forward position There is a lack of lubrication on the feeder rod Lubricate the feeder rod by following the instructions in the Maintenance section The gib is too tight Adjust the gib by following the instructions in the Maintenance section The drill motor gets very hot Holes are being cut too fast Feed the hole saw into the cut at a moderate rate The hole saw blade is dull Replace the ho...

Reviews: