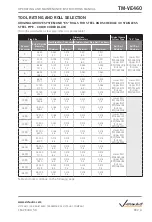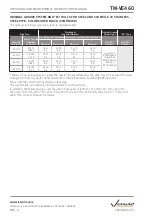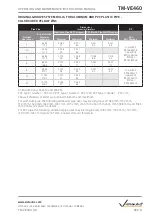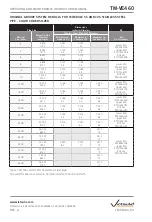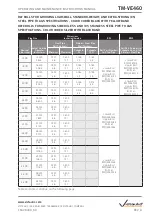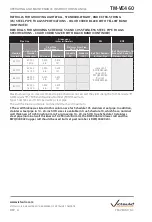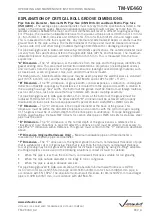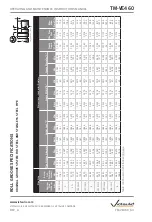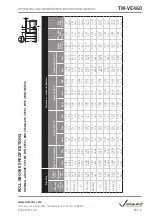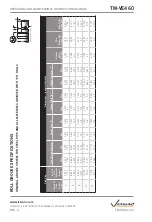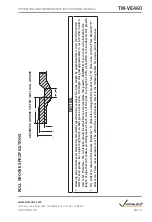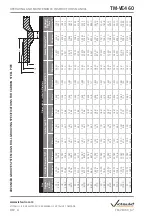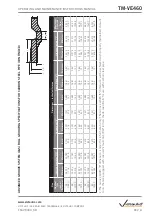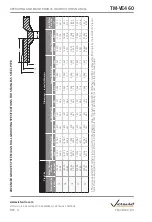
EXPLANATION OF CRITICAL ROLL GROOVE DIMENSIONS
Pipe Outside Diameter - Nominal NPS Pipe Size (ANSI B36.10) and Basic Metric Pipe Size
(ISO 4200) –
The average pipe outside diameter must not vary from the specifications listed in the
tables on the following pages. Maximum allowable pipe ovality should not vary by more than 1%.
Greater variations between the major and minor diameters will result in difficult coupling assembly.
For IPS pipe, the maximum allowable tolerance from square-cut pipe ends is 0.045 inch/1.1 mm for
4 - 6-inch/114.3 - 168.3-mm sizes and 0.060 inch/1.5 mm for 8-inch/219.1-mm and larger sizes.
This is measured from the true square line. Any internal and external weld beads or seams must be
ground flush to the pipe surface. The inside diameter of the pipe end must be cleaned to remove
coarse scale, dirt, and other foreign material that might interfere with or damage grooving rolls.
For pipe being grooved to Advanced Groove System (AGS) specifications, the outside diameter must
not vary from the specifications listed in the applicable table (API 5L end tolerance). The maximum
allowable tolerance from square-cut ends is 0.063 inch/1.5 mm. This is measured from the true
square line.
“A” Dimension –
The “A” dimension, or the distance from the pipe end to the groove, identifies the
gasket seating area. This area must be free from indentations, projections (including weld seams),
and roll marks from the pipe end to the groove to ensure a leak-tight seal. All foreign material, such
as loose paint, scale, oil, grease, chips, rust, and dirt must be removed.
For AGS products, beveled carbon steel pipe may be used, provided the wall thickness is standard
wall (0.375 inch/9.5 mm) and the bevel meets ASTM A53 and/or API 5L (30° +5°/-0°).
“B” Dimension –
The “B” dimension, or groove width, controls expansion, contraction, and angular
deflection of flexible couplings by the distance it is located from the pipe and its width in relation to
the coupling housings’ “key” width. The bottom of the groove must be free from all foreign material,
such as dirt, chips, rust, and scale that may interfere with proper coupling assembly.
For pipe being grooved to AGS specifications, the corners at the bottom of the groove must be
radiused R .09 inch/R 2.3 mm. The Groove Width “B” dimension will be achieved with properly
maintained Victaulic tools that are equipped with special Victaulic AGS (RW or RWX) roll sets.
“C” Dimension –
The “C” dimension is the proper diameter at the base of the groove. This
dimension must be within the diameter’s tolerance and concentric with the OD for proper coupling
fit. The groove must be of uniform depth for the entire pipe circumference. For pipe being grooved
to AGS specifications, Victaulic RW roll sets for carbon steel pipe or RWX roll sets for stainless steel
pipe must be used.
“D” Dimension –
The “D” dimension is the normal depth of the groove and is a reference for a
“trial groove” only. Variations in pipe OD affect this dimension and must be altered, if necessary, to
keep the “C” dimension within tolerance. This groove must conform to the “C” dimension described
above.
“F” Dimension (Original Roll Groove Only) –
Maximum allowable pipe-end flare diameter is
measured at the extreme pipe-end diameter.
“T” Dimension –
The “T” dimension is the lightest grade (minimum, nominal wall thickness) of pipe
that is suitable for cut or roll grooving. Pipe that is less than the minimum, nominal wall thickness
for cut grooving may be roll grooved or adapted for Victaulic couplings by using Vic-Ring
®
adapters.
Vic-Ring adapters can be used in the following situations (contact Victaulic for details):
•
When the pipe is less than the minimum, nominal wall thickness suitable for roll grooving
•
When the pipe outside diameter is too large to roll or cut groove
•
When the pipe is used in abrasive services
For pipe being grooved to AGS specifications, the absolute minimum wall thickness is 0.290
inch/7.4 mm for 14-inch/355.6-mm pipe and 0.318 inch/8.1 mm for 16-inch/406.4-mm pipe, in
accordance with EN 10217. The absolute minimum wall thickness for 18-inch/457.0-mm and larger
pipe is 0.328 inch/8.3 mm, in accordance with ASTM A-53.
TM-VE460_62
TM-VE460
OPERATING AND MAINTENANCE INSTRUCTIONS MANUAL
www.victaulic.com
VICTAULIC IS A REGISTERED TRADEMARK OF VICTAULIC COMPANY.
REV_A

