background image

INSTALLERS NOTES

9

8

Summary of Contents for V8+

Page 1: ...ASSEMBLY INSTRUCTIONS 8mm Wet Room Walk In V02 09 2015...

Page 2: ...dising processes in order to create your finished shower enclosure Some light surface marks are normal and is a result of the manufacturing processes Quality control has ensured that this item is of a...

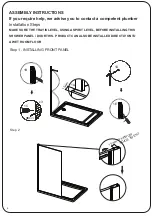
Page 3: ...tent plumber Installation Steps Step 1 INSTALLING FRONT PANEL 1 5 m m x3 1A 1B 1C 1E Step 2 MAKE SURE THE TRAY IS LEVEL USING A SPIRIT LEVEL BEFORE INSTALLING THIS SHOWER PANEL DOORTHIS PRODUCT CAN AL...

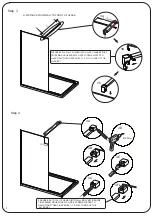
Page 4: ...BAR IS FULLY PUSHED INTO GLASS CLAMP BEFORE ALLEN KEY TIGHTENING GRUB SCREWS ONCE SCREWS NIPPED TO HAND TIGHT THEN TIGHTEN BY 1 1 5 FULL TURNS OF THE ENSURE BAR IS FULLY PUSHED INTO WALL BRACKET BEFOR...

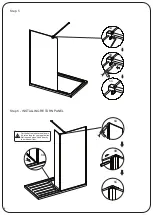
Page 5: ...Step 5 Step 6 INSTALLING RETURN PANEL 5 5A 5B 5C 6A 6B 6C 6D Cut the bottom spacer seal down if it is too long for your application Not required when fitted directly to a wetroom floor 4...

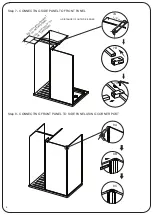
Page 6: ...NEL TO FRONT PANEL Step 8 CONNECTING FRONT PANEL TO SIDE PANEL USING CORNER POST 6 L L 32mm 7A 7B 7C L DISTANCE OF OUTSIDE EDGES 200 300m m FR O M FRO NT IF N O RE TUR N PANEL 100m m IF FIXED W ITH RE...

Page 7: ...Step 9 7 Silicone outside edge only where the vertical profiles meet the wall and the glass panels sit on the tray 6...

Page 8: ...is our intention that the quality and functions of this product are of the highest standard If you require help we advise you firstly contact a competent plumber However we understand that this may n...

Page 9: ...INSTALLERS NOTES 9 8...

Page 10: ...INSTALLERS NOTES 10 9...

Page 11: ...entally friendly way We suggest you take it to the local landfill site and discard in the designated bins Shower enclosures with aluminium profiles and safety glass Victoria Plum Limited Bridgehead Bu...

Reviews: