background image

•  Duct system must terminate to the outside (roof or side wall).

•  DO NOT

 terminate the duct system in an attic or other enclosed area.

•  DO NOT

 use 4” (10.2 cm) laundry-type wall caps.

•  Use metal/aluminum duct only. Rigid metal/aluminum vent is recommended.

•  DO NOT

 use plastic duct.

• 

Always keep the duct clean to ensure proper airflow.

• 

Calculate the following figures before installation:

1.  Distance from the floor to the ceiling.

2. 

Distance from countertop/stove to range hood (recommend* 28” to 36”).

3.  Height of hood and duct cover.

For the most efficient & quiet operation:

• 

A distance of 28” to 36” is recommended* between stove top and the bottom of range hood.

• 

It is recommended that the range hood be vented vertically through the roof through 8” or bigger 

round metal/aluminum duct work.

•  The size of the duct should be uniform.

• 

Use no more than three 90° elbows.

• 

Make sure there is a minimum of 24” (61 cm) of straight duct between the elbows if more than one 

elbow is used.

•  DO NOT

 install two elbows together.

• 

The length of duct system and number of elbows should be kept to a minimum to provide efficient 

performance.

• 

The duct system must have a damper. If roof or wall cap has a damper, 

DO NOT

 use damper (if 

supplied) on top of the range hood.

• 

Use aluminum foil tape to seal all joints in the duct system.

• 

Use caulking to seal exterior wall or roof opening around the cap. 

USE 8” ROOF OR WALL VENT 

CAP MINIMUM

.

IMPORTANT:

•  A minimum of a 8” round duct (standard for this range hood) must be used to maintain maximum 

airflow efficiency. There is also an option to use a 10” round duct size for this unit.

• 

Always use rigid type metal/aluminum ducts if available to maximize airflow when connecting to 

provided duct.

•  Please use Duct Run Calculation below to compute total available duct run when using elbows, 

transitions and caps.

• 

ALWAYS, when possible, reduce the number or transitions and turns in the duct run. If a long duct 

run is required, increase the duct size from 8” to 10”. If a reducer is used, install a long reducer 

instead of a pancake reducer. Reducing the duct size will restrict airflow and decrease efficiency.

• 

If turns or transitions are required: Install as far away from opening and as far apart, between 2, as 

possible.

• 

Minimum mount height between stove top to hood bottom should be no less than 28-inch*.

• 

Maximum mount height between stove top to hood bottom  should be no higher than 36-inch*.

• 

It is important to install the hood at the proper mounting height. Hoods mounted too low could 

result in heat damage and fire hazard; while hoods mounted too high will be hard to reach and will 

loose its performance and efficiency.

• 

If available, also refer to stove top manufacturer’s height clearance requirements and 

recommended hood mounting height above range.

Minimum Duct Size:

• 

Round - 8” minimum

• 

Round - 10” recommended/optional

* Due to different ceiling height configurations, recommended height may not be applicable.

VICTORY range hoods

|   HURRICANE

6

VICTORY range hoods


HURRICANE   |    7

VENTING REQUIREMENTS

Summary of Contents for HURRICANE 30

Page 1: ...me Available Sizes HURRICANE 30 36 42 48 60 NOTICE For residential use only Installer Leave this guide with the homeowner Homeowner Keep this guide for future reference www victoryrangehoods com Rev 2...

Page 2: ...s 10 Preparation 13 Installation Options 13 Option 1 Free Standing 14 Option 2 Under Cabinet 18 Venting Methods 22 Wiring Diagram 25 Range Hood Operations 25 Troubleshooting 26 Do s and Don ts for Duc...

Page 3: ...r from being switched ON accidentally Clean grease laden surfaces frequently To reduce the risk of fire and to disperse air properly make sure to vent air outside DO NOT vent exhaust into spaces betwe...

Page 4: ...ws to disperse the gas If you still smell gas call the gas company and fire department or dial your local emergency service immediately Your safety and the safety of others is very important We have p...

Page 5: ...ge hood must be connected with copper wire plug only The range hood should be connected directly to the fused disconnect or circuit breaker box through flexible armored or non metallic sheathed copper...

Page 6: ...T CAP MINIMUM IMPORTANT A minimum of a 8 round duct standard for this range hood must be used to maintain maximum airflow efficiency There is also an option to use a 10 round duct size for this unit A...

Page 7: ...btract 30ft from the allowable 50ft The remaining distance of 20ft is the longest that the straight ducting in addition to the vent pieces can be Body Stainless Steel 19 gauge Power Rating 120V 60Hz U...

Page 8: ...n x7 for 10 Transition M4 4mm Big Head x15 M4 4mm Bullet Head x12 for Models 30 36 x16 for Models 42 48 Mounting Brackets x2 for Models 30 36 42 48 x3 for Model 60 NOTE Where necessary additional scre...

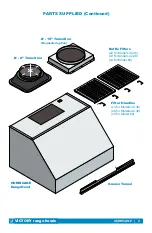
Page 9: ...ition Baffle Filters x2 for Models 30 36 x3 for Models 42 48 x4 for Model 60 Filter Handles x4 for Models 30 36 x6 for Models 42 48 x8 for Model 60 HURRICANE RangeHood Grease Tunnel VICTORY range hood...

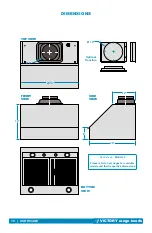
Page 10: ...Transition BOTTOM VIEW SIDE VIEW FRONT VIEW TOP VIEW 6 12 18 29 24 8 Hood shown Model 30 Please refer to next pages for available models and their respective dimensions VICTORY range hoods HURRICANE 1...

Page 11: ...18 24 8 Transition 4 6 12 29 10 Optional Vent Size 18 24 8 Transition 4 6 12 Model 30 Model 36 Model 42 Model 48 Available in 35 41 and 47 VICTORY range hoods HURRICANE 11 DIMENSIONS continued...

Page 12: ...18 24 10 Transition 6 12 59 Model 60 VICTORY range hoods HURRICANE 12 DIMENSIONS continued...

Page 13: ...outlet please refer the product label for the suitable voltage of this unit and verify no debris has entered the duct openings then turn on the range hood 4 Place all supplied parts and required hard...

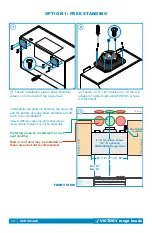
Page 14: ...on 8 Transition on to the top exhaust of range hood using M5 5mm screws 10 Optional 3 Measure the distance between the stove top and the bottom of range hood A distance of 28 to 36 is recommended Due...

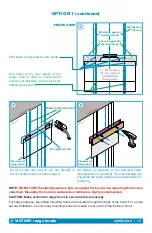
Page 15: ...fe and saw to cut out drywall to accommodate plywood brace support 6 Screw on plywood to the exposed studs woodscrews not included The inserted plywood should be the same depth as the drywall slab it...

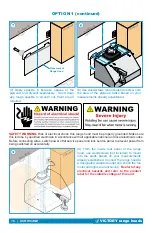
Page 16: ...ounded Make sure this is done by qualified electrician in accordance with all applicable national and local electrical codes Before connecting wires switch power off at service panel and lock service...

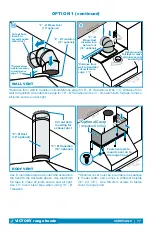
Page 17: ...Ceiling Wall Fasten screws to mount cover on to the range hood Optional Cover requested order Optional Cover requested order Distance from wall to transition circumference edge for 8 Transition will b...

Page 18: ...nge hood 1 Fasten on 8 Transition on to the top exhaust of range hood using M5 5mm screws 10 Optional 2 Measure the distance between the stove top and the bottom of range hood A distance of 27 to 30 i...

Page 19: ...0 Transition is optional Ensure you cut the opening to the correct measurement of transition 5 Screw in woodscrews not included from inside the top panel of the range hood mounting to the bottom panel...

Page 20: ...sition 10 optional Cut out hole on the top panel of cabinet and in ceiling for exhaust duct ROOF VENT C o u n t e r T o p C e i l i n g Wall Cabinets ROOF VENT ROOF VENT Distance from wall to transiti...

Page 21: ...fle Filter Angle filter toward front of hood opening above the front light and control panel Slide toward and into the recess behind the front of hood while raising the filter at the rear Lower filter...

Page 22: ...90 elbow is needed IMPORTANT NEVER exhaust air or terminate duct work into spaces between walls crawl spaces ceiling attics or garages All exhaust must be vented to the outside Use metal aluminum duct...

Page 23: ...t Min 85 from floor Optional Remote Blower Install brace support to attach the optional remote blower Wall Vent Cap Optional Outdoor Remote Blower Roof Vent Roof Vent with Remote Blower Due to differe...

Page 24: ...ions This hood comes with a back exhaust option additional charges will apply to make the hood rear vented This option must be purchased prior shipping Changing from the top vent to back vent onsite c...

Page 25: ...range hood is equipped with 2 rotary switches Left switch control the blower right switch controls the lights BLOWER SWITCH Rotate the switches clockwise to switch the blower ON The switch has 5 posit...

Page 26: ...installed correctly or opening properly A tight mesh on a side wall cap unit might also cause restriction to the air flow 4 The lights work but the blower is not spinning at all is stuck or is rattli...

Page 27: ...an can easily overheat and catch fire The risk of self combustion is higher when the oil has been used several times NEVER cook on open flames under the range hood Check deep fryers during use Superhe...

Page 28: ...steel polish such as 3M or ZEP to polish and buff out the stainless luster and grain Always scrub lightly a with clean cotton cloth and with the grain DO NOT allow deposits to accumulate or remain on...

Page 29: ...a business card or plastic palette knife to prevent scratches on the metal finish and insert in between the switch panel and LED bulb housing Work your way around 2 until the light housing pops out 3...

Page 30: ...nge Hood Outer Ring GU10 LED Bulb Inner Ring To re assemble simply reverse the steps 6 to 2 To re install 7 press the bulb housing carefully and firmly into the recess until you hear a positive snap O...

Page 31: ...t on which the original identification information has been altered obliterated or removed has not been handled or packaged correctly or has been sold as second hand What is Not Covered Consumable par...

Page 32: ...ith ALL original parts and documenta tion packed in all original cartons fillers and shipping cartons A restocking fee of 10 will be charged for all approved return s Exchanges or returns will not be...

Page 33: ...VICTORY range hoods HURRICANE 33 NOTES...

Page 34: ...583 Nicola Avenue Port Coquitlam BC Canada V3B 0M3 www victoryrangehoods com...

Reviews: