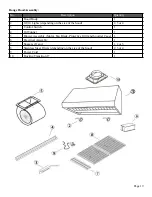
background image

Page 6

IMPORTANT:

• 

A

 minimum of 8” round 

(standard for this range hood) rectangular duct 6”x10” (purchased separately) 

must be used to maintain maximum airflow efficiency.

•  Always use rigid type metal/aluminum ducts if available to maximize airflow when connecting to provided 

duct.

•  Please use 

Duct Run Calculation

 below to compute total available duct run when using elbows, transitions 

and caps.

•  ALWAYS, when possible, reduce the number or transitions and turns. If long duct run is required, increase 

duct size from 8” to 9” or 10”. If a reducer is used, install a long reducer instead of a pancake reducer. Re

-

ducing duct size will restrict airflow and decrease airflow, thus reduce duct size as far away from opening as 

possible.

•  If turns or transitions are required: Install as far away from opening and as far apart, between 2, as possible.

• 

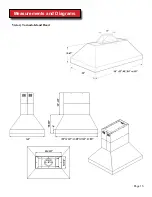
Minimum mount height between stove top to hood bottom should be no less than 28-inch*.

•  Maximum mount height between stove top to hood bottom  should be no higher than 36-inch*.

•  It is important to install the hood at the proper mounting height. Hoods mounted too low could result in heat 

damage and fire hazard; while hoods mounted too high will be hard to reach and will loose its performance 

and efficiency.

•  If available, also refer to stove top manufacturer’s height clearance requirements and recommended hood 

mounting height above range.

* Due to different ceiling height configurations, recommended height may not be applicable.
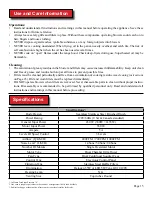
Minimum Duct Size:

• 

Round - 8” minimum

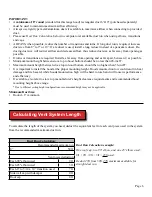
Duct Run Calculation:

Recommended maximum run

8” 

50 ft

Vent piece deduction

Each 90º elbow used

9 ft

Each 45º elbow used

5 ft

Each 8” to 3/14 x 10” transition used

7 ft

Side wall cap with damper

0 ft

Roof cap

0 ft

Duct Run Calcuation example:

One roof cap, two 90º elbow, and one 45º elbow used:
0ft + 9ft + 9ft + 5ft = 

23ft used.

Deduct 23ft from 50ft, 

27ft

 maximum available for 

straight duct run.

Calculating Vent System Length

To calculate the length of the system you need, deduct the equivalent feet for each vent piece used in the system 

from the recommended maximum duct run.

Summary of Contents for Tornado

Page 1: ...RangeHood VICTORY Professional Range Hood NOTICE Installer Leave this guide with the homeowner Homeowner Keep this guide for future reference IMPORTANT Read and save these instructions Rev 3067u 4a Model number Tornado available sizes 36 42 48 54 60 ...

Page 2: ...rities Before servicing or cleaning unit switch power OFF at service panel and lock service panel to pre vent power from being switched ON accidentally Clean grease laden surfaces frequently To reduce the risk of fire and to disperse air properly make sure to vent air outside DO NOT vent exhaust into spaces between walls crawl spaces ceiling attics or garages Ducted fans MUST always be vented to t...

Page 3: ...ny bodily injuries whether caused directly or indirectly by the range hood Clean ventilating fan frequently Always use appropriate cookware and utensils size Always use cookware appropriate for the size of the surface element To reduce the risk of injury to persons in the event of a stove top grease fire SMOTHER FLAMES with a close fitting lid cookie sheet or metal tray then turn OFF the burner BE...

Page 4: ...nstallation 10 11 Range hood operations 12 13 USE AND CARE Troubleshooting 14 Use and care information 15 Specifications 15 Measurements Diagrams 16 22 MAINTENANCE Cleaning 23 Replacing the filter light bulb 23 24 WARRANTY Coverage exceptions 25 Disclaimer Contact Us 26 Tools needed Page 3 Level Flat blade and Phillips screwdrivers Powered screwdriver or drill Measuring tape Utility knife Marker o...

Page 5: ...pending on the size of your range hood same for the nu Blower Assembly No Description No Description 4 1 Air Chamber 4 5 120 v Motor 4 2 Air Flow Grill 4 6 Right Squirrel Cage 4 3 Left Locknut 4 7 Right Locknut 4 4 Left Squirrel Cage 4 8 Air Chamber ...

Page 6: ...ended between stove top and the bottom of range hood It is recommended that the range hood be vented vertically through the roof through 8 or bigger round metal aluminum vent work The size of the vent should be uniform Use no more than three 90 elbows Make sure there is a minimum of 24 61 cm of straight vent between the elbows if more than one elbow is used DO NOT install two elbows together The l...

Page 7: ... height between stove top to hood bottom should be no higher than 36 inch It is important to install the hood at the proper mounting height Hoods mounted too low could result in heat damage and fire hazard while hoods mounted too high will be hard to reach and will loose its performance and efficiency If available also refer to stove top manufacturer s height clearance requirements and recommended...

Page 8: ...bow is needed IMPORTANT NEVER exhaust air or terminate duct work into spaces between walls crawl spaces ceiling attics or garages All exhaust must be ducted to the outside Use metal aluminum duct work only Fasten all connections with sheet metal screws and tape all joints with certified Silver Tape or Duct Tape Use caulking to seal exterior wall or roof opening around the cap ...

Page 9: ...ctor s use The range hood must be connected with copper wire plug only The range hood should be connected directly to the fused disconnect or circuit breaker box through flexible armored or non metallic sheathed copper cable A U L or C S A listed strain relief must be provided at each end of the power supply cable Wire sizes copper wire only and connections must conform with the rating of the appl...

Page 10: ...n of the venting pipe from the hood to the outside Refer to Venting Methods on Page 7 A straight short vent run will allow the hood to perform more efficiently USE MIN 8 DUCT Try to avoid as many transitions elbows and long run as possible This may reduce the performance of the hood IMPORTANT Peel white plastic protective coat off the hood if any Use ALUMINUM tape to seal joints between pipe secti...

Page 11: ... national and local electrical codes Before connecting wires switch power off at service panel and lock service panel to prevent power from being switched on accidentally 4 Connect the range hood to a designated standard outlet or cut off the plug and connect three wires black white and green to house wires and cap with wire connectors Connect according to colors i e black to black white to white ...

Page 12: ...t Refer to Figure 10 for the following five steps Angle baffle filter toward back of hood Push baffle filter up until almost level Slide forward into recess behind the front of hood Lower baffle filter Slide back until it fits into resting positions 9 Repeat Step 8 to install all baffle filters and stainless spacers if any 10 OPTIONAL Install heating lamps not included last 120 Volt 250 Watt maxim...

Page 13: ...Page 12 Range Hood Operations Controls for touch sensitive models ...

Page 14: ...Page 13 Range Hood Operations Continued ...

Page 15: ...e For example 9 duct over 8 hole and loosely secured Check if duct is clogged or if damper unit half cir cular flapper is not installed correctly or opening properly A tight mesh on a side wall cap unit might also cause restriction to the air flow 4 The lights work but the blower is not spinning at all is stuck or is rattling The blower might be jammed or scraping the bot tom due to shipping damag...

Page 16: ...see cleaning instructions on Page 23 Old and worn filters must be replaced immediately DO NOT operate blowers when filters are removed Never disassemble parts to clean without proper instruc tions Disassembly is recommended to be performed by qualified personnel only Read and understand all instructions and warnings in this manual before proceeding Page 15 Specifications3 Body Design Seamless Stai...

Page 17: ...Measurements and Diagrams Page 16 Victory Tornado Island Hood ...

Page 18: ...Page 17 Frame assembly 1 Range hood body 2 Lower frame 3 Upper frame bolted to the lower frame 4 Main ceiling frame secured to structural trusses ...

Page 19: ...Page 18 Circuit Diagram ...

Page 20: ...the size of the hood 2 3 or 4 3 Control Switch 1 4 Oil Tunnel 1 5 Blower Assembly Motor Fan Blade Protective Grill and Squirrel Cage 1 6 Electrical Assembly 1 7 Spacers If any 1 2 or 3 8 Stainless Steel Filters depending on the size of the hood 2 3 or 4 9 Power Cord 1 10 Ducting Transition 8 1 ...

Page 21: ...inary steel wool or steel brushes Small bits of steel may adhere to the surface and cause rusting DO NOT allow salt solutions disinfectants bleaches or cleaning compounds to remain in contact with stainless steel for extended periods Many of these compounds contain chemicals which may be harmful Rinse with water after ex posure and wipe dry with a clean cloth Cleaning Aluminum Grease Filter Stainl...

Page 22: ...gged or turn OFF breaker Make sure the lights are cool to touch carefully align the arrow on the inner ring with the arrow on the outer ring where it says OPEN with the Inner Ring Opener as shown in Figure 1 Figure 1 The inner ring will loosen and the light bulb will be available for removal as shown in Figure 2 Figure 2 Install a new light bulb and reverse the steps Turn ON breaker and range hood...

Page 23: ...ble parts such as light bulbs metal and charcoal filters The natural wear of finish and wear due to improper maintenance use of corrosive and abrasive cleaning products pads and oven cleaner products Chips dents or cracks due to abuse misuse freight damage or improper installation Damage of product caused by accident fire floods or act of God The manufacturer and or distributor reseller is not lia...

Page 24: ...eturn s Exchanges or returns may not be accepted if any packaging is missing Make sure to inspect the hood for damages and defects before installation Appearance flaws of the hood found after installation and not affecting hood performance is not covered under our warranty for returns or exchang es Service visits not covered under warranty will carry a service charge Before Installation Return for...

Reviews: