6.2. Electrical connections
6.2.1. Connect RJ10 cable(s)
These instructions only apply if the system contains Lynx distributor(s) together with a Lynx Smart BMS or a Lynx Shunt VE.Can.
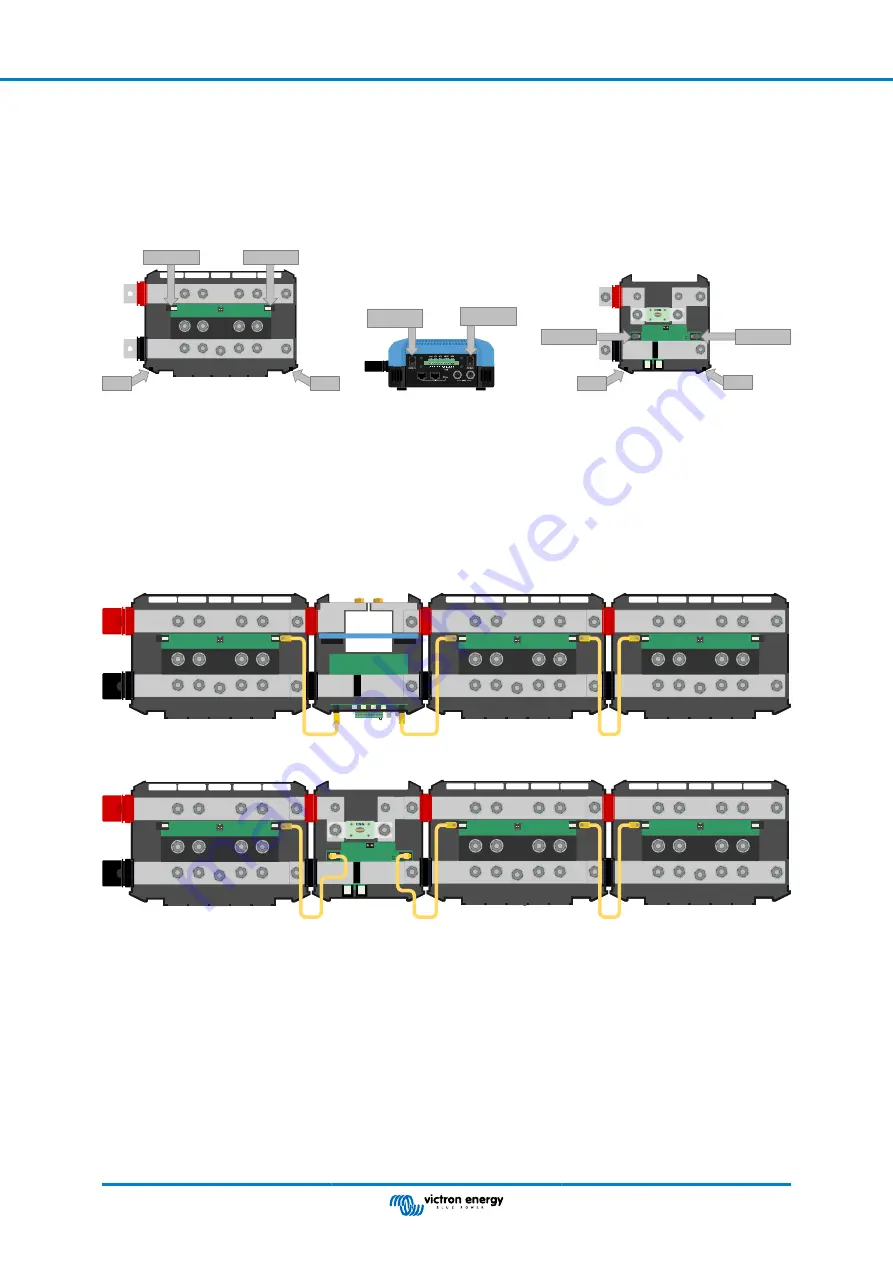
There are two RJ10 connectors in each Lynx Distributor, one on the left and one on the right. See below drawing.
RJ10 connector
RJ10 connector
RJ10 connector
Recess
RJ10 connector
Recess
RJ10 connector
RJ10 connector
Recess
Recess
Locations of the RJ10 connectors and RJ10 cable recesses on the Lynx Distributor, Lynx Smart BMS and the Lynx VE.Can
To connect the RJ10 cables between the various Lynx modules do the following:
• Plug one side of the RJ10 cable in the RJ10 connector of the Lynx distributor, with the retainer clip of the RJ10 connector facing
away from you.
• Feed the RJ10 cable through the recess at the bottom of the Lynx Distributor, see above picture.
• To connect to another Lynx Distributor, feed the cable through its bottom recess and plug the RJ10 cable into the RJ10
connector.
• To connect to a Lynx Shunt VE.Can, feed the cable through its bottom recess and plug the RJ10 cable into the RJ10 connector.
• To connect to a Lynx Smart BMS, plug the RJ10 cable into the RJ10 connector at the bottom of the Lynx Smart BMS.
Connection example Lynx Smart BMS system - RJ10 cables indicated in yellow
Connection example Lynx Shunt VE.Can system - RJ10 cables indicated in yellow
6.2.2. Connect DC wires
This chapter might not apply if the Lynx module is connected to other Lynx modules, like can be the case for the Lynx Smart BMS
or the Lynx Shunt VE.Can.
For all DC connections the following applies:
• All cables and wires connected to the Lynx module need to have been fitted with M8 cable lugs.
• Pay attention to the correct placement of the cable lug, washer, spring washer and nut on each bolt when attaching the cable to
the bolt.
• Tighten the nuts with a torque moment of 14Nm.
Lynx Distributor
Page 14
Installation


