7
4.4
Connecting the Lynx components
The Lynx system must be connected in the following order from left to right:
1.
Lynx Power In (optional)
2.
Lynx Ion
3.
Lynx Shunt VE.Can
4.
Lynx Distributor (optional)
Procedure
1.
First remove all fronts from the Lynx components.
2.
Connect each Lynx to each other from left to right.
3.
Mount the Lynx system to the wall.
4.
Connect your chargers and energy consumers at the Lynx Distributor.
5.
Install the Victron Lithium-Ion batteries. For installation of the Victron Lithium
battery we refer to the Lithium-Ion manual.
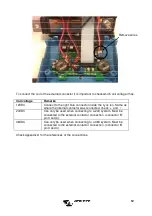
Make sure that the connections between the Lynx units are connec
This prevents series resistance at the connections.
Do not use washers between the connections.
to right:
rgers and energy consumers at the Lynx Distributor.
For installation of the Victron Lithium-Ion
between the Lynx units are connectedtightly.
Summary of Contents for Lynx Ion
Page 1: ...Manual EN Lynx Ion 24V 180Ah Lithium Ion Batteries ...
Page 2: ......
Page 17: ...15 3 Start VEConfigure3 and configure the Li ion BMS Support assistant as follows ...
Page 23: ...21 APPENDIX A OVERVIEW LYNX ION Bottom view B A D E F C ...
Page 24: ...22 Front view I G H J ...
Page 28: ......


