background image

Summary of Contents for UPTIRPS

Page 1: ...h Instructions manual IT Italiano Manuale di istruzioni FR Français Manuel d instructions DE Deutsch Bedienungslanleitung UPTIRPS Weather proof box for Pan Tilt with power supply and control of the illuminators ...

Page 2: ......

Page 3: ...ility for any damage caused by an improper use of the appliances mentioned in this manual Furthermore the manufacturer reserves the right to modify its contents without any prior notice The documentation contained in this manual has been collected with great care the manufacturer however cannot take any liability for its use The same thing can be said for any person or company involved in the crea...

Page 4: ...example FERRAZ SHAWMUT STT2240SPG CN STT2BL240SPG CN rated 120Vac 240Vac In 20kA Maximum distance between installation and reduction is 5m This device was designed to be permanently installed on a building or on a suitable structure The device must be installed permanently before any operation When installing the device comply with all the national standards A disconnecting device readily and easi...

Page 5: ...hat there are no signs that it has been dropped or scratched If there are obvious signs of damage contact the supplier immediately Keep the packaging in case you need to send the product for repairs 5 3 2 Contents Check the contents to make sure they correspond with the list of materials as below Weatherproof box Equipment Instructions manual 5 4 Safely disposing of packaging material The packagin...

Page 6: ...1 Open the box Open the box taking care not to damage the seals Fig 1 After installation and wiring close the product again Position the gaskets correctly and tighten the cable glands 6 1 2 Board description Connect the safety earth to the relative terminal of the power supply connector The board may appear different to that illustrated Depending on the product version the board may not be equippe...

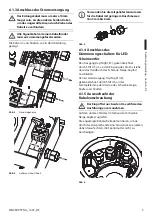
Page 7: ...plied gaskets for cables with reduced diameters From 3mm to 6mm Fig 5 6 1 4 Connecting the light sensitive switch for the LED illuminator Connect the Day Night J5 output identified by STATUS to the alarm input refer to the P T manual Connect the second Day Night J5 output identified by STATUS to the alarms common terminal of the P T 6 1 5 Replacing the cable gland The operation is only to be carri...

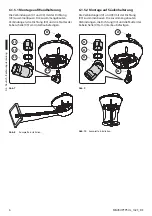
Page 8: ...base with the gasket 04 and the nut of the previously removed cable gland 05 03 04 05 02 01 Fig 7 Fig 8 Complete installation 6 1 5 2 Assembly on parapet bracket Assemble the junction 01 and 03 with the gasket 02 Fix the assembled junctions onto the base with the gasket 04 and the nut of the previously removed cable gland 05 05 04 03 02 01 Fig 9 Fig 10 Complete installation ...

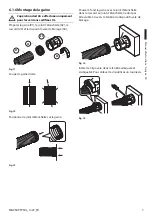
Page 9: ...01 seal cap 02 connector 03 and the oval blocking device 04 03 02 04 01 Fig 11 Straight cut of conduit Fig 12 Position the sealing plug on the sheath Fig 13 Push the silicone sheath and seal cap completely into the connector The seal cap must not be seen through the window of the oval blocking device Fig 14 Install retaining oval clip To re open use a screwdriver Fig 15 ...

Page 10: ... Your product is designed and manufactured with high quality materials and components which can be recycled and reused This symbol means that electrical and electronic equipment at their end of life should be disposed of separately from your household waste Please dispose of this equipment at your local Community waste collection or Recycling centre In the European Union there are separate collect...

Page 11: ...upplied current 24Vac 8A max 50 60Hz Built in twilight sensor for automatic switching on and off Day Night output STATUS Dry contact NO Cables input section From 3 3mm AWG 12 to 2 1mm AWG 14 Cables signal section From 0 52mm AWG 20 to 0 13mm AWG 26 11 4 Environment Indoor Outdoor Operating temperature Standard box From 40 C 40 F to 60 C 140 F UL certified box From 40 C 40 F to 55 C 11 4 2 Certific...

Page 12: ...17 50 239 278 50 Fig 16 UPTIRPS version of the standard box 196 90 5 54 5 108 5 239 226 253 155 35 9 54 5 288 108 5 24 217 Fig 17 UPTIRPS version of the UL certified box Headquarters Italy Videotec S p A Via Friuli 6 I 36015 Schio VI Italy Tel 39 0445 697411 Fax 39 0445 697417 Email info videotec com www videotec com ...

Page 13: ...ni responsabilità per eventuali danni derivanti da un uso improprio delle apparecchiature menzionate in questo manuale Si riserva inoltre il diritto di modificarne il contenuto senza preavviso Ogni cura è stata posta nella raccolta e nella verifica della documentazione contenuta in questo manuale tuttavia il produttore non può assumersi alcuna responsabilità derivante dall utilizzo della stessa Lo...

Page 14: ...e ad esempio FERRAZ SHAWMUT ST23401PG CN ST240SPG CN specificati per 120Vac 240Vac In 20kA La distanza massima tra l installazione e la riduzione è di 5m Questo dispositivo è stato progettato per essere installato in maniera permanente su un edificio o su una struttura adeguata Il dispositivo deve essere installato in maniera permanente prima di effettuare qualsiasi operazione Si devono rispettare...

Page 15: ...i cadute o abrasioni In caso di evidenti segni di danno all imballo contattare immediatamente il fornitore Conservare l imballo nel caso sia necessario inviare il prodotto in riparazione 5 3 2 Contenuto Controllare che il contenuto sia corrispondente alla lista del materiale sotto elencata Scatola stagna Dotazione Manuale di istruzioni 5 4 Smaltimento in sicurezza dei materiali di imballaggio I ma...

Page 16: ...cura di non danneggiare le guarnizioni Fig 1 Al termine delle operazioni di installazione e cablaggio richiudere il prodotto Posizionare correttamente le guarnizioni e serrare i pressacavi 6 1 2 Descrizione della scheda Collegare la terra di sicurezza al relativo morsetto del connettore di alimentazione L aspetto della scheda potrebbe differire da quello illlustrato La scheda a seconda della versi...

Page 17: ...tazione per i cavi di diametro ridotto Da 3mm a 6mm Fig 5 6 1 4 Collegamento dell interruttore crepuscolare per illuminatore a LED Collegare l uscita Day Night J5 identificata da STATUS all ingresso d allarme fare riferimento al manuale del brandeggio Collegare la seconda uscita Day Night J5 identificata da STATUS al morsetto comune degli allarmi presenti nel brandeggio 6 1 5 Sostituzione del pres...

Page 18: ...raccordi assemblati la guarnizione 04 e il dado del pressacavo 05 alla base 03 04 05 02 01 Fig 7 Fig 8 Installazione completata 6 1 5 2 Montaggio su supporto a colonna Assemblare i raccordi 01 e 03 con la guarnizione 02 Fissare i raccordi assemblati la guarnizione 04 e il dado del pressacavo 05 alla base 05 04 03 02 01 Fig 9 Fig 10 Installazione completata ...

Page 19: ...itivo di bloccaggio ovale 04 03 02 04 01 Fig 11 Tagliare la guaina trasversalmente Fig 12 Posizionare il tappo di tenuta sulla guaina Fig 13 Spingere a fondo nel raccordo la guaina con il tappo di tenuta Il tappo di tenuta non deve essere visibile attraverso la finestra del dispositivo di bloccaggio ovale Fig 14 Inserire il dispositivo di bloccaggio ovale nell apposita apertura Per riaprire utiliz...

Page 20: ...dotto è costruito con materiali e componenti di alta qualità che sono riutilizzabili o riciclabili Prodotti elettrici ed elettronici che portano questo simbolo alla fine dell uso devono essere smaltiti separatamente dai rifiuti casalinghi Vi preghiamo di smaltire questo apparecchio in un Centro di raccolta o in un Ecostazione Nell Unione Europea esistono sistemi di raccolta differenziata per prodo...

Page 21: ...nte fornita 24Vac 8A max 50 60Hz Sensore crepuscolare integrato per accensione e spegnimento automatico Uscita Day Night STATUS Contatto pulito NO Sezione dei cavi d ingresso Da 3 3mm AWG 12 a 2 1mm AWG 14 Sezione dei cavi di segnale Da 0 52mm AWG 20 a 0 13mm AWG 26 11 4 Ambiente Interno Esterno Temperatura di esercizio Scatola standard Da 40 C a 60 C Scatola certificata UL Da 40 C a 55 C 11 4 2 C...

Page 22: ...0 239 278 50 Fig 16 UPTIRPS versione della scatola standard 196 90 5 54 5 108 5 239 226 253 155 35 9 54 5 288 108 5 24 217 Fig 17 UPTIRPS versione della scatola certificata UL Headquarters Italy Videotec S p A Via Friuli 6 I 36015 Schio VI Italy Tel 39 0445 697411 Fax 39 0445 697414 Email info videotec com www videotec com ...

Page 23: ...ne toute responsabilité pour les dommages éventuels dus à une utilisation non appropriée des appareils mentionnés dans ce manuel On réserve en outre le droit d en modifier le contenu sans préavis La documentation contenue dans ce manuel a été rassemblée et vérifiée avec le plus grand soin cependant le producteur ne peut pas s assumer aucune responsabilité dérivante de l emploi de celle là La même ...

Page 24: ...on possible FERRAZ SHAWMUT ST23401PG CN ST240SPG CN spécifiés pour 120Vac 240Vca In 20kA La distance maximale entre installation et réduction est de 5m Cette appareil est conçu pour une installation permanente sur un bâtiment ou une structure adéquate L appareil doit être installé d une façon permanente avant d effectuer toute opération Il faut respecter les législations nationales pour l installa...

Page 25: ...tout signe évident de chute ou d abrasion En cas de dommages évidents contacter immédiatement le fournisseur Conserver l emballage en cas de nécessité d expédition du produit pour réparation 5 3 2 Contenu Contrôler que le contenu correspond à la liste matériel indiquée ci dessous Boîte étanche Dotation Manuel d instructions 5 4 Élimination sans danger des matériaux d emballage Le matériel d emball...

Page 26: ...ayant soin de ne pas endommager les garnitures Fig 1 Au terme des opérations d installation et de câblage refermer le produit Positionner correctement les joints et serrer les presse étoupes 6 1 2 Description de la carte Brancher la terre de sécurité à la borne correspondante du connecteur d alimentation L aspect de la carte pourrait être différer de celui qui est illustré La carte selon la versio...

Page 27: ...pour les câbles de petit diamètre De 3mm à 6mm Fig 5 6 1 4 Branchement de l interrupteur crépusculaire pour le projecteur à LED Relier la sortie Day Night J5 identifiée par le STATUT à l entrée de l alarme se référer au manuel de la tourelle Relier la deuxième sortie Day Night J5 identifiée de STATUT à la borne commune aux alarmes présentes dans la tourelle 6 1 5 Remplacement du presse étoupe L op...

Page 28: ...r les joints assemblés le joint 04 et l écrou du presse étoupe 05 a la base 03 04 05 02 01 Fig 7 Fig 8 Installation complète 6 1 5 2 Montage sur support fixation sol Assembler les raccords 01 et 03 avec le joint 02 Fixer les joints assemblés le joint 04 et l écrou du presse étoupe 05 a la base 05 04 03 02 01 Fig 9 Fig 10 Installation complète ...

Page 29: ...le dispositif ovale de blocage 04 03 02 04 01 Fig 11 Couper la gaine droite Fig 12 Positionner le joint d étanchéité sur la gaine Fig 13 Pousser à fond la gaine avec le joint d étanchéité dans le raccord Le joint d étanchéité ne doit pas être visible à travers la fenêtre du dispositif ovale de blocage Fig 14 Insérer le Clip ovale dans la fenêtre adéquate et encliqueter Pour enlever le clip utilise...

Page 30: ...oduit est conçu et fabriqué avec des matèriels et des composants de qualité supérieure qui peuvent être recyclés et réutilisés Ce symbole signifie que les équipements électriques et électroniques en fin de vie doivent être éliminés séparément des ordures ménagères Nous vous prions donc de confier cet équipement à votre Centre local de collecte ou Recyclage Dans l Union Européenne il existe des sys...

Page 31: ...nt fourni 24Vac 8A max 50 60Hz Capteur crépusculaire integrée pour allumage et coupure automatique Sortie Day Night STATUS Contact sec NO Section des câbles d entrée De 3 3mm AWG 12 à 2 1mm AWG 14 Section des câbles de signal De 0 52mm AWG 20 à 0 13mm AWG 26 11 4 Environnement Intérieur Extérieur Température de fonctionnement Boîtier standard De 40 C à 60 C Boîtier certifié UL De 40 C à 55 C 11 4 ...

Page 32: ... 9 217 50 239 278 50 Fig 16 UPTIRPS version du boîtier standard 196 90 5 54 5 108 5 239 226 253 155 35 9 54 5 288 108 5 24 217 Fig 17 UPTIRPS version du boîtier certifié UL Headquarters Italy Videotec S p A Via Friuli 6 I 36015 Schio VI Italy Tel 39 0445 697411 Fax 39 0445 697419 Email info videotec com www videotec com ...

Page 33: ...häden ab die aufgrund unsachgemäßer Anwendung der in diesem Handbuch erwähnten Geräte entstanden ist Ferner behält er sich das Recht vor den Inhalt ohne Vorkündigung abzuändern Die Dokumentation in diesem Handbuch wurde sorgfältig ausgeführt und überprüft dennoch kann der Hersteller keine Haftung für die Verwendung übernehmen Dasselbe gilt für jede Person oder Gesellschaft die bei der Schaffung od...

Page 34: ...strom In 20kA min Benutzt werden können beispielsweise FERRAZ SHAWMUT STT2240SPG CN STT2BL240SPG CN spezifiziert für 120Vac 240Vac In 20kA Der maximale Abstand zwischen dem Einbau und der Abkürzung ist 5m Die Einrichtung ist für den dauerhaften Einbau in ein Gebäude oder eine andere geeignete Struktur konzipiert Vor jeder Operation muss die Einrichtung dauerhaft eingebaut werden Die nationalen Vor...

Page 35: ...che Anzeichen von Stürzen oder Abrieb aufweist Bei offensichtlichen Schadensspuren an der Verpackung muss umgehend der Lieferant verständigt werden Bewahren Sie die Verpackung auf für den Fall dass das Produkt zur Reparatur eingesendet werden muss 5 3 2 Inhalt Prüfen Sie ob der Inhalt mit der nachstehenden Materialliste übereinstimmt Wasserfeste Anschlussdose Ausgerüstet Bedienungslanleitung 5 4 S...

Page 36: ...ose ist darauf zu achten dass die Dichtungen nicht beschädigt werden Abb 1 Nach Beendigung der Installation und der Verkabelung das Produkt wieder schließen Die Dichtungen korrekt positionieren und die Kabelschellen festziehen 6 1 2 Beschreibung der Karte Den Erdungsschutzleiter an die zugehörige Stromversorgungsklemme anschließen Die Abbildung kann von der tatsächlichen Karte abweichen Je nach Ge...

Page 37: ...Durchmesser Von 3mm bis 6mm Abb 5 6 1 4 Anschluss des Dämmerungsschalters für LED Scheinwerfer Den Ausgang Day Night J5 gekennzeichnet durch STATUS an den Eingang des Alarms siehe dazu das Handbuch des Schwenk Neige Kopfes anschließen Den zweiten Ausgang Day Night J5 gekennzeichnet durch STATUS an der Sammelklemme der Alarme des Schwenk Neige Kopfes anschließen 6 1 5 Auswechseln der Kabelverschrau...

Page 38: ...en die Dichtung 04 und die Mutter der Kabelschelle 05 am Unterbau befestigen 03 04 05 02 01 Abb 7 Abb 8 Komplette Installation 6 1 5 2 Montage auf Säulenhalterung Die Verbindungen 01 und 03 mit der Dichtung 03 zusammenbauen Die zusammengebauten Verbindungen die Dichtung 04 und die Mutter der Kabelschelle 05 am Unterbau befestigen 05 04 03 02 01 Abb 9 Abb 10 Komplette Installation ...

Page 39: ...le Blockierungsvorrichtung vorbereiten 04 03 02 04 01 Abb 11 Rohr gerade abschneiden Abb 12 Die Rohrdichtung auf der Ummantelung positionieren Abb 13 Das Wellrohr mit der Rohrdichtung tief in das Anschlussstück schieben Die Rohrdichtung darf über das Fenster der ovalen Blockierungsvorrichtung nicht sichtbar sein Abb 14 Oval Sperre in das Sperrenfenster einsetzen und einrasten Wieder öffnen mittels...

Page 40: ...lt mit qualitativ hochwertigen Materialien und Komponenten die recycelt und wiederverwendet werden können Dieses Symbol bedeutet daß elektrische und elektronische Geräte am Ende ihrer Nutzungsdauer von Hausmüll getrennt entsorgt werden sollen Bitte entsorgen Sie dieses Gerät bei Ihrer örtlichen Sammelstelle oder im Recycling Centre In der Europäischen Union gibt es unterschiedliche Sammelsysteme f...

Page 41: ...Bestromt 24Vac 8A max 50 60Hz Integrierte Fotozelle für automatik Ein und Ausschalten Ausgang Day Night STATUS Potenzialfreier Kontakt NO Querschnitt der Eingangskabel Von 3 3mm AWG 12 bis 2 1mm AWG 14 Querschnitt der Signalkabel Von 0 52mm AWG 20 bis 0 13mm AWG 26 11 4 Umgebung Innen Außen Betriebstemperatur Standardgehäuse Von 40 C bis 60 C Gehäuse UL zertifiziert Von 40 C bis 55 C 11 4 2 Zertif...

Page 42: ... 9 217 50 239 278 50 Abb 16 UPTIRPS Standardversion des Gehäuses 196 90 5 54 5 108 5 239 226 253 155 35 9 54 5 288 108 5 24 217 Abb 17 UPTIRPS UL zertifizierte Version des Gehäuses Headquarters Italy Videotec S p A Via Friuli 6 I 36015 Schio VI Italy Tel 39 0445 697411 Fax 39 0445 697416 Email info videotec com www videotec com ...

Page 43: ......

Page 44: ... France Tel 33 2 32094900 Fax 33 2 32094901 Email info fr videotec com Asia Pacific Videotec HK Ltd Flat 8 19 F On Dak Industrial Building 2 6 Wah Sing Street Kwai Chung NT Hong Kong Tel 852 2333 0601 Fax 852 2311 0026 Email info hk videotec com Americas Videotec Security Inc 35 Gateway Drive Suite 100 Plattsburgh NY 12901 U S A Tel 1 518 825 0020 Fax 1 518 825 0022 Email info usa videotec com www...

Reviews: