background image

MNVKVIPNX_1744_DE

7 Anleitung für den 

normalen Betrieb

Der Scheibenwischer ist bei 

Aussentemperaturen unter 0°C oder bei 

Frost nicht zu betätigen.

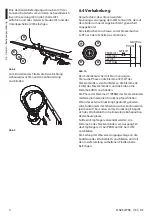
8 Informationen bezüglich 

Entsorgung und Recycling

Die EU-Richtlinie 2012/19/ЕU über Elektro- und 

Elektronik-Altgeräte (WEEE) verpflichtet, dass 

diese Geräte nicht zusammenn mit festen 

Haushaltsabfällen entsorgt werden sollten. Diese 

besondere Abfällen müssen separat gesammelt 

werden, um den Rückgewinnungsstrom und das 

Recycling der darin enthaltenen Materiale zu 

optimieren , sowie zur Minderung der Einwirkung auf 

die menschliche Gesundheit und Umwelt  aufgrund 

des Vorhandenseins von potentiell gefährlichen 

Stoffen.

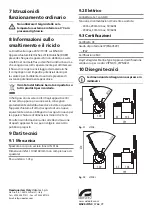
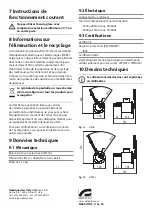
Das Symbol des gekreuzten Mullbehälters 

ist auf allen Produkten markiert, um sich 

daran zu erinnern. 

Die Abfälle dürfen an die angemessenen 

Müllsammelstellen gebracht werden. Andernfalls 

darf man es kostenlos an den Vertragshändler auch 

bringen, bei dem das  Gerät gekauft wurde. Das kann 

im Moment der Einkauf von neuen gleichartigen 

Produkten  passieren oder auch ohne Verpflichtung 

einen neuen Kauf zu tätigen, falls die Größe der 

Ausrüstung kleiner als 25cm beträgt.
Mehr Informationen über die korrekte Entsorgung 

dieser Geräte erhalten Sie bei der entsprechenden 

Behörde.

9 Technische Daten

9.1 Mechanik

Bürste und Körper aus rostfreiem Stahl AISI 316L
Abmessungen (ØxL): 100x169mm (ohne Bürste)
Einheitsgewicht: 1.7kg

9.2 Elektrik

Verbinder 3+1 Kontakte
Versorgungsspannung/Stromaufnahme:

•  24Vac, 290mA max, 50/60Hz
•  230Vac, 30mA max, 50/60Hz

9.3 Zertifizierungen

CE bestätigt
Schutzart IP (EN60529):

•  IP67

EAC-Zertifizierung
Lloyd's Register Marine Type Approval (Zertifizierung 

nur für diese Codes gültig: VIPNX1C, VIPNX2C)

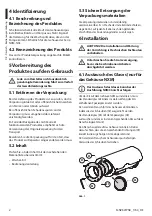
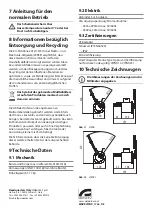
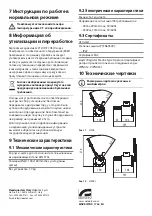
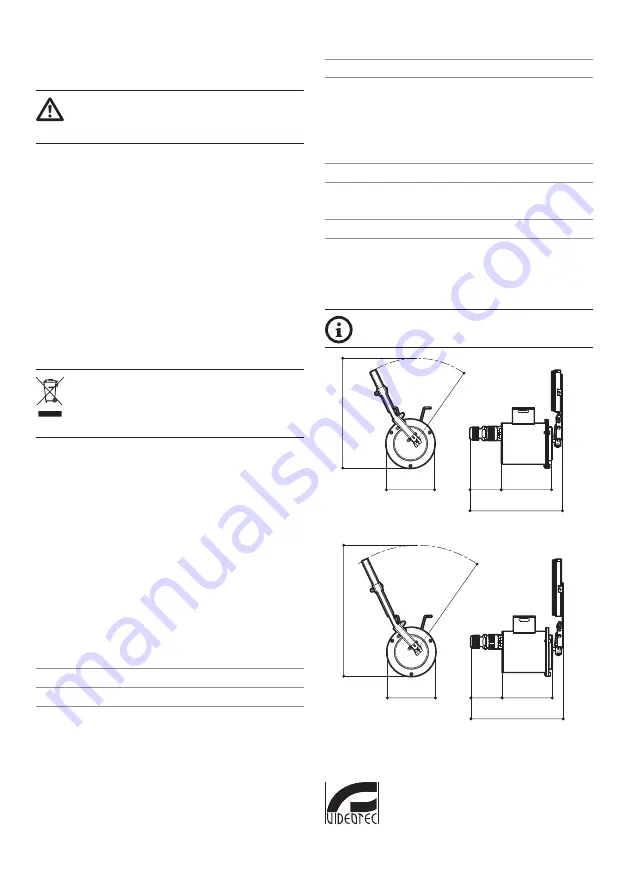
10 Technische Zeichnungen

Die Abmessungen der Zeichnungen sind in 

Millimeter angegeben.

65

104

191

100

226

R170

Abb.


11

 VIPNX.

65

104

191

100

270

R214

Abb.


12

 VIPNXL.

Headquarters Italy

 Videotec S.p.A.

Via Friuli, 6 - I-36015 Schio (VI) - Italy

Tel. +39 0445 697411 - Fax +39 0445 697414

Email: info@videotec.com

www.videotec.com

Summary of Contents for VIPNX

Page 1: ...EN English Instruction manual IT Italiano Manuale di istruzioni FR Français Manuel d instructions DE Deutsch Bedienungsanleitung RU Русский Руководство по эксплуатации VIPNX VIPNXL Wiper for housing ...

Page 2: ......

Page 3: ...bility for any damage caused by an improper use of the appliances mentioned in this manual Furthermore the manufacturer reserves the right to modify its contents without any prior notice The documentation contained in this manual has been collected and verified with great care The manufacturer however cannot take any liability for its use The same thing can be said for any person or company involv...

Page 4: ...he list of materials as below Wiper kit Instruction manual 5 3 Safely disposing of packaging material The packaging material can all be recycled The installer technician will be responsible for separating the material for disposal and in any case for compliance with the legislation in force where the device is to be used 6 Installation CAUTION Device installation and maintaining must be performed ...

Page 5: ...ening it in the stand by position on the left of the front glass Fig 4 If necessary use the fixing clip to adjust the position of the wiper body so it does not interfere with the housing support Assembly is flexible based on the orientation of the housing Pay attention to adjust the wiper blade in the housing NXM36 Blade movement must not interfere with the screw heads Fig 5 6 3 Installation of th...

Page 6: ...m PHASE NEUTRAL SWITCH PERM 01 COM 02 SW 03 EARTH 01 02 03 Fig 10 Power the wiper by connecting the phase to terminal 03 SW of the connector the neutral to terminal 02 COM of the connector and the earthing to the EARTH terminal Using an outer button connect the phase to terminal 01 PERM of the connector Having pressed the outer button continuous permanent functioning of the wiper is obtained Relea...

Page 7: ... equipment at the time of purchase of a new equivalent or without obligation to a new purchase for equipment with size smaller than 25cm For more information on proper disposal of these devices you can contact the responsible public service 9 Technical data 9 1 Mechanical Wiperblade and enclosure constructed from AISI 316L stainless steel Dimensions ØxL 100x169mm 3 9x6 7in not comprehensive of bla...

Page 8: ... Il produttore declina ogni responsabilità per eventuali danni derivanti da un uso improprio delle apparecchiature menzionate in questo manuale Si riserva inoltre il diritto di modificarne il contenuto senza preavviso Ogni cura è stata posta nella raccolta e nella verifica della documentazione contenuta in questo manuale Il produttore tuttavia non può assumersi alcuna responsabilità derivante dall...

Page 9: ...ndente alla lista del materiale sotto elencato Kit tergicristallo Manuale di istruzioni 5 3 Smaltimento in sicurezza dei materiali di imballaggio I materiali d imballo sono costituiti interamente da materiale riciclabile Sarà cura del tecnico installatore smaltirli secondo le modalità di raccolta differenziata o comunque secondo le norme vigenti nel Paese di utilizzo 6 Installazione ATTENZIONE L i...

Page 10: ...la nella posizione di riposo sul lato sinistro del vetro frontale Fig 4 Agendo sulla fascetta di fissaggio regolare eventualmente la posizione del corpo del tergicristallo in modo che questo non interferisca con il supporto della custodia Il montaggio risulta così flessibile a seconda dell orientamento della custodia Fare attenzione alla regolazione della spazzola del tergicristallo nella custodia...

Page 11: ...SWITCH PERM 01 COM 02 SW 03 EARTH 01 02 03 Fig 10 Alimentare il tergicristallo collegando la fase al morsetto 03 SW del connettore il neutro al morsetto 02 COM del connettore e la terra al morsetto EARTH Collegare tramite un pulsante esterno la fase al morsetto 01 PERM del connettore Mantenendo premuto il pulsante esterno si otterrà un funzionamento continuo permanente del tergicristallo Rilascian...

Page 12: ... è stata acquistata l apparecchiatura all atto di acquisto di una nuova equivalente o senza obbligo di un acquisto nuovo per le apparecchiature di dimensioni minori di 25cm Per ulteriori informazioni sulla corretta dismissione di questi apparecchi ci si può rivolgere al servizio pubblico preposto 9 Dati tecnici 9 1 Meccanica Spazzola e corpo in acciaio Inox AISI 316L Dimensioni ØxL 100x169mm non c...

Page 13: ...rsonnel technique qualifié Le fabricant décline toute responsabilité pour les dommages éventuels dus à une utilisation non appropriée des appareils mentionnés dans ce manuel On réserve en outre le droit d en modifier le contenu sans préavis La documentation contenue dans ce manuel a été rassemblée et vérifiée avec le plus grand soin Le fabricant cependant ne peut assumer aucune responsabilité déri...

Page 14: ... Kit essuie glace Manuel d instructions 5 3 Élimination sans danger des matériaux d emballage Le matériel d emballage est entièrement composé de matériaux recyclables Le technicien chargé de l installation est tenu de l éliminer conformément aux dispositions en matière de collecte sélective et selon les normes en vigueur dans le pays d utilisation 6 Installation ATTENTION L installation et l entre...

Page 15: ...rbre de sortie en le fixant en position de repos sur le côté gauche du verre avant Fig 4 En agissant sur le collier de fixation réglez éventuellement la position du corps de l essuie glace pour ne pas qu il interfère avec le support du caisson Ainsi le montage est flexible selon l orientation du caisson Soyez attentif au réglage du balai d essuie glace dans le caisson NXM36 Le mouvement du balai n...

Page 16: ...ma électrique PHASE NEUTRAL SWITCH PERM 01 COM 02 SW 03 EARTH 01 02 03 Fig 10 Alimentez l essuie glace en reliant la phase à la borne 03 SW du connecteur le neutre à la borne 02 COM du connecteur et la terre à la borne EARTH À l aide d un bouton extérieur reliez la phase à la borne 01 PERM du connecteur En maintenant le bouton appuyé vous obtiendrez un fonctionnement continu permanent de l essuie ...

Page 17: ...és gratuitement au distributeur où vous avez acheté l équipement au moment de l achat d un nouvel dispositif équivalent ou sans obligation d achat pour un équipement de taille inférieure de 25cm Pour plus d informations sur l élimination correcte de ces dispositifs vous pouvez contacter le service public responsable 9 Données techniques 9 1 Mécanique Balai et corps en acier Inox AISI 316L Dimensio...

Page 18: ...ab die aufgrund unsachgemäßer Anwendung der in diesem Handbuch erwähnten Geräte entstanden ist Ferner behält er sich das Recht vor den Inhalt ohne Vorkündigung abzuändern Die Dokumentation in diesem Handbuch wurde sorgfältig ausgeführt und überprüft Der Hersteller kann dennoch keine Haftung für die Verwendung übernehmen Dasselbe gilt für jede Person oder Gesellschaft die bei der Schaffung oder Pro...

Page 19: ...en Sie ob der Inhalt mit der nachstehenden Materialliste übereinstimmt Wischer Kit Bedienungslanleitung 5 3 Sichere Entsorgung der Verpackungsmaterialien Die Verpackungsmaterialien sind vollständig wiederverwertbar Es ist Sache des Installationstechnikers sie getrennt auf jeden Fall aber nach den geltenden Vorschriften des Anwendungslandes zu entsorgen 6 Installation ACHTUNG Die Installation und W...

Page 20: ...linksseitigen Ruheposition der Frontscheibe zu befestigen Abb 4 Durch Einwirken auf die Befestigungsschelle gegebenenfalls die Position des Scheibenwischerkorpus so einstellen dass dieser nicht die Gehäusehalterung überlagert Die Montage ist somit je nach Ausrichtung des Gehäuses flexibel Auf die Einstellung des Wischerblatts bei dem Gehäuse NXM36 achten Die Wischerblattbewegung darf nicht mit den...

Page 21: ...ERM 01 COM 02 SW 03 EARTH 01 02 03 Abb 10 Den Scheibenwischer mit Strom versorgen Hierzu die Phase an die Klemme 03 SW des Steckverbinders den Nullleiter an die Klemme 02 COM des Steckverbinders und die Erde an die Klemme EARTH anschließen Die Phase der Klemme 01 PERM des Steckverbinders mittels einem externen Druckknopf anschließen Wenn der externe Druckknopf gedrückt gehalten wird funktioniert d...

Page 22: ...auch bringen bei dem das Gerät gekauft wurde Das kann im Moment der Einkauf von neuen gleichartigen Produkten passieren oder auch ohne Verpflichtung einen neuen Kauf zu tätigen falls die Größe der Ausrüstung kleiner als 25cm beträgt Mehr Informationen über die korrekte Entsorgung dieser Geräte erhalten Sie bei der entsprechenden Behörde 9 Technische Daten 9 1 Mechanik Bürste und Körper aus rostfre...

Page 23: ...ированным персоналом Производитель не несет ответственности за любые повреждения возникающие в результате неправильного использования указанного в настоящем руководстве оборудования Помимо этого производитель сохраняет за собой право изменять содержание руководства без предварительного уведомления Представленная в настоящем руководстве документация прошла тщательную проверку Однако производитель н...

Page 24: ... соответствие представленному ниже списку материалов Комплект стеклоочистителя Руководство по эксплуатации 5 3 Безопасная утилизация упаковочных материалов Упаковочные материалы могут подвергаться переработке Технический специалист установщика отвечает за сортировку материалов для переработки а также за соблюдение требований законодательства действующего в месте установки устройства 6 Монтаж ПРЕДУ...

Page 25: ...фиксируйте ее таким образом чтобы в положении покоя она находилась с левой стороны от переднего стекла Рис 4 При необходимости используйте крепежный хомут для того чтобы отрегулировать положение корпуса стеклоочистителя и он не соприкасался с кронштейном кожуха Получаемое соединение подстраивается под ориентацию кожуха Обратите внимание на положение щетки стеклоочистителя в случае кожуха NXM36 При...

Page 26: ...WITCH PERM 01 COM 02 SW 03 EARTH 01 02 03 Рис 10 Подключите питание стеклоочистителя соединив фазу с клеммой 03 SW разъема нейтраль с клеммой 02 COM разъема и заземление с клеммой EARTH С помощью внешней кнопки подключите фазу к клемме 01 PERM разъема При удержании внешней кнопки в нажатом состоянии стеклоочиститель включается в режиме постоянной непрерывной работы После отпускания кнопки щетка ст...

Page 27: ...овой аналогичной продукции или без обязательства совершить новую покупку в случае оборудования чей размер не превышает 25cm Для получения более подробной информации о надлежащей утилизации данных устройств вы можете обратиться в уполномоченную государственную организацию 9 Технические характеристики 9 1 Механические характеристики Корпус и щетка для стеклоочистителя выполнены из нержавеющей стали ...

Page 28: ...ance Tel 33 1 60491816 Fax 33 1 69284736 Email info fr videotec com Asia Pacific Videotec HK Ltd Flat 8 19 F On Dak Industrial Building No 2 6 Wah Sing Street Kwai Chung New Territories Hong Kong Tel 852 2333 0601 Fax 852 2311 0026 Email info hk videotec com Americas Videotec Security Inc Gateway Industrial Park 35 Gateway Drive Suite 100 Plattsburgh NY 12901 U S A Tel 1 518 825 0020 Fax 1 518 825...

Reviews: