Settings - Sound / Audio Output
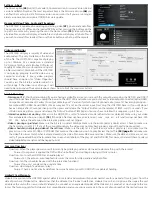
The HD2700D is capable of outputting audio through the HDMI
(7)
cable, the red/
white RCA jacks
(9)
and the black Digital Audio RCA jack
(10)
(individually or all at the
same time). To change audio outputs, simply chose an option from the Sound menu
(29)
and choose R/L Audio RCAs
(30)
, HDMI
(31)
or Digital Audio RCA
(32)
.
Settings - Sound / Volume
On the Sound menu you can adjust the output volume
(33)
of the HD2700D just as
you can with the volume and mute buttons on the remote control.
Settings - Sound / Pass Through
If you would like your audio signal from the HD2700D to travel through an intermedi-
ary component without alteration then turn on the Enable Pass Through option
(34)
.
Settings - Display / Brightness, Contrast and Saturation
Brightness
(35)
, contrast and saturation are all adjustable under the Display menu
option using the remote and the navigation buttons.
Settings - Display / Video Output
The HD2700D is capable of outputting Composite video (NTSC (United States Com-
posite Video Standard)
(36)
or PAL (European Composite Video Standard)
(37)
, Com-
ponent Video
(38)
(YpbPr 480i, 480p, 576i, 576p, 720p 50HZ, 720p 60HZ, 1080p 50HZ,
1080p 60HZ) and HMDI
(39)
(480i, 480p, 576i, 576p, 720i, 720p, 1080i or 1080p).
The HD2700D will only output one video signal at a time and is typically shipped set
to HDMI 720p. You can switch the video output using the “Output” button on the top
of the remote. The “Output” buttons switches to the default setting of each output.
The button should be pressed twice to change 1 mode. For example pressing the
button once will bring up the current output mode, pressing it again will advance it 1
mode. If you wish to change the output from 720p to 1080p simply press and release
the “Output” button twice. For additional options, use the settings / display option.
Settings - Language (39)
Use the language settings option if you wish to change the settings menu language.
Available options are Chinese, English, Japanese, Korean, German, Spanish, French,
Italian, Portuguese, Dutch, Russian, Polish, Turkish and Czech.
Settings - Date & Time
Date and time settings are only required if you using Scheduling Mode
(21)
. Date
(40)
, time and time zone
(41)
can be edited using the remote under the Date & Time
option. For automatic time sync
(42)
, simply connect the Ethernet jack to any inter-
net connection, activate the sync setting and the time and date will automatically be
updated.
When adjusting date and time make sure you set your time zone first. Adjusting the
time zone after setting the date and time will change the set time and possibly the
date. Using the remote you can use the arrow keys and the SELECT button or you can
switch to “Mouse Mode”.
Settings - Reset
The Reset option
(44)
on the settings menu will simply reset the HD2700D to its de-
fault settings. If you have received a firmware update, insert the supplied SD or USB
and then select the upgrade option
(45)
.
(29)
(30)
(31)
(32)
(33)
(34)
(35)
(36)
(37)
(38)
(39)
(40)
(42)
(44)
(41)
(39)
(45)


