Settings - Sound / Audio Output
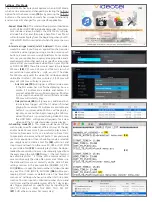
The is capable of outputting audio through either the HDMI
(7)
cable,
the red/white RCA jacks
(9)
or the black Digital Audio RCA jack
(10)
. To change
audio outputs, simply chose an option from the Sound menu
(29)
and choose R/L
Audio RCAs
(30)
, HDMI
(31)
or Digital Audio RCA
(32)
.
Settings - Sound / Volume
On the Sound menu you can adjust the output volume
(33)
of the just
as you can with the volume and mute buttons on the remote control.
Settings - Sound / Pass Through
If you would like your audio signal from the to travel through an in-
termediary component without alteration then turn on the Enable Pass Through
option
(34)
.
Settings - Display / Brightness, Contrast and Saturation
Brightness
(35)
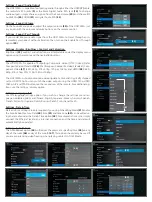
, contrast and saturation are all adjustable under the Display menu
option using the remote and the navigation buttons.
Settings - Display / Video Output
The is capable of outputting Composite video (NTSC (United States
Composite Video Standard)
(36)
, PAL (European Composite Video Standard), Com-
ponent Video
(37)
(480i, 480p, 576i, 576p, 720p or 1080p) and HMDI
(38)
(480i,
480p, 576i, 576p, 720i, 720p, 1080i or 1080p).
The will only output one video signal at a time and is typically shipped
set to HDMI 720p. You can switch the video output using the HDMI 720p, HDMI
1080p, A/V and YPbPr buttons on the second row of the remote. For additional op-
tions, use the settings / display option.
Settings - Language (39)
Use the language settings option if you wish to change the settings menu lan-
guage. Available options are Chinese, English, Japanese, Korean, German, Spanish,
French, Italian, Portuguese, Dutch, Russian, Polish, Turkish and Czech.
Settings - Date & Time
Date and time settings are only required if you using Scheduling Mode
(21)
and/or
the Auto Reboot Feature. Date
(40)
, time
(41)
and time zone
(42)
can be edited us-
ing the remote under the Date & Time option
(43)
. For automatic time sync, simply
connect the Ethernet jack to any internet connection and the time and date will
automatically be updated.
Settings - Auto Reboot
The Auto Reboot option
(44)
will reboot the player at a specified time
(45)
on any
day of the week
(46)
or day of the month
(47)
. This option should only be used if
you are experiencing video freezing when playing content in FILES Mode.
(29)
(30)
(31)
(32)
(33)
(34)
(36)
(38)
(39)
(40)
(41)
(35)
(45)
(42)
(44)
(43)
(46)
(47)
(37)


