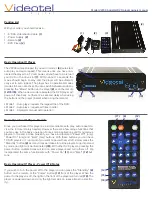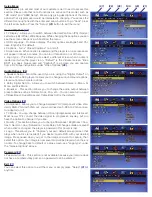
Remote functions - part 2
Aside from the “Power On”, “Stand By”, “Eject” and “Mode” buttons described in
page 1 all the remaining buttons are fairly standard. This list below goes over the
basic function of each of the remaining buttons.
(22)
“Display” - This will rotate 4 modes of current title/chapter and time title
elapsed/title remaining/chapter elapsed/chapter remain/Off
(23)
“Arrows/Enter” - These buttons would be used on a disc menu or when
using the set up menu of the player.
(24)
“Menu” - This will bring up the root menu of your DVD. Please note that
when in “Mode 1” or “Mode 2” the player will auto select a menu
option within a few seconds. Use “Mode 3” to avoid this.
(25)
“Rewind” - Each button press will increase the rewind speed as follows
2x / 4x / 8x / 16x / 32x / then back to play.
(26)
“Play” - This will play your movie if stopped or paused and depending on
your DVD, it may begin playing an option when on a menu.
(27)
“Chapter Back” - Will advance backwards through chapters (only in the
current title, once you get to the last chapter, it will stop or start
at 1 again, depending on how the DVD is made).
(28)
“Stop” - This will stop the movie and bring up the default screen.
(29)
“Subtitle” - Pressing this button will scroll through all available subtitle
languages (if available).
(30)
“Volume Up/Down” - Pressing these buttons will adjust the output volume
of the dvd player. Important note: When changing discs, putting
the player into stand by or powering on the player, the volume
defaults back to maximum.
(31)
“Setup” - This is used to access the DVD players operational menu. There
are a few dozen options that 99% of people won’t need to
change, but in case you want to change the screen output, logo
screen, audio out, etc...see page 3.
(32)
“Mute” - This will mute all the audio coming out of the player.
(33)
“Pause” - This will pause the current DVD playing. Press again to play or
press the “Play” button
(26)
.
(34)
“Fast Forward” - Each button press will increase the fast forward speed as
follows: 2x / 4x / 8x / 16x / 32x / then back to play.
(35)
“Repeat” - This button will allow you to select a different repeat option. Each
button press with scroll though the following options: Chapter
repeat / Title repeat / All (entire disc repeat) / Off
(36)
“Chapter Forward” - Will advance forward through chapters (only in the
current title, once you get to the last chapter, it will stop or start
at 1 again, depending on how the DVD is made).
(22)
(23)
(24)
(25)
(26)
(27)
(28)
(30)
(33)
(34)
(35)
(36)
(29)
(32)
(31)
Connections
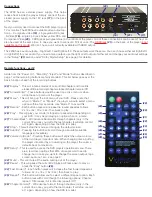
The 2200 has an external power supply. This helps
reduce heat inside the player. Simply connect the en-
closed power supply to the 12V jack
(17)
on the back
of the player.
Next you simply need to connect the DVD player to your
TV or monitor. The 2200 has 3 available video output op-
tions.... Composite video
(18)
- single yellow RCA jack
, S-Video
(19)
- single 4 pin jack below yellow RCA and
Component Video
(20)
- 3 RCA jacks (red/green/blue) in the middle of the player. All 3 of these connections can be used. They can
also be used at the same time, in case you want to connect 3 TV’s at once. The
HDMI jack
(21)
on the back of the player
is not
available on this model
. We don’t have a unit currently available with HDMI output.
The 2200 has 4 audio outputs... Right/Left 1 and Right/Left 2. These outputs work the same. You can choose either set (right/left 1
or right/left 2) for your audio. If you need a mono output, use the right or left output of either set and change your audio out settings
in the “Setup”
(31)
section under “Dolby Digital Setup” (see page 3 for details).
(17)
(18)
(20)
(19)
(21)
Not Active


