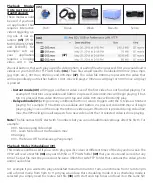
StudioPro has 2 modes -
Advanced mode
and
Simple mode
.
You can switch between these 2 modes by clicking the icon in the upper right corner
(83)
. Simple mode
allows you to create 1 scene. Inside this scene yon rotate trough multiple images or videos using the Play-
list
(84)
widget. The “Outline”
(92)
section lists all the widgets on the scene. You can click on each one and
edit the properties to the right. In this example the text below the 1st “restaurant” section
(93)
is selected.
To the right you can see the same text in the “Label” section. The below example was downloaded from
the “Global scenes”
(85)
catalog, accessible from the “library” drop down option. There are hundreds of
templates and samples to choose from or you can create one from scratch
(86)
. After making changes to
anything in StudioPro you must Save/Upload your work
(77)
.
(83)
(86)
(85)
(84)
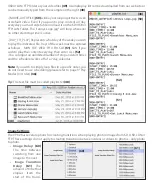
Once your campaign or scene is finished you can assign it to all of your screens or to select ones. Simply
click on the “Stations”
(87)
option and the screen below will appear. From this screen you can change the
name of the screen / player on the right
(88)
. You can also choose which campaign or scene
(89)
you wish
to display. The player status (online or offline) is also shown on the left
(90)
. Using the “snapshot”
(91)
button you can get a live image of what is playing on your screen. When making changes to the station
screen you must also Save / Upload
(77)
.
(92)
(93)
(90)
(87)
(88)
(89)
(91)


