

ETH0
C
AM CT
R
TM
CAMERA
PRIMARY
SECONDARY
LINE IN
LINE OU
T
NOTE: Stands must be used when placing the unit
vertically. See photo on the front page.
Do not power on HD-220 unit until Display(s) and Camera are fully
connected and powered on.
1.
Connect Power cable.
2.
Connect Ethernet cable to ETH-0 and to your
network.
3.
Connect the TV using HDMI/DVI cable to DVI Display
dongle and then connect to an available display port.
* Repeat for the secondary display
4.
Connect camera:
* For video connection use DVI/DVI cable for Sony
or DVI/HDMI cable for Minrray
* For Camera Control connection:
a.
Connect VISCA cable to camera
b.
Connect VISCA cable to USB/Serial DB9 cable
c.
Connect USB/Serial DB9 cable to the CAM CTRL port on
the unit
5.
Connect USB SpeakerPhone cable to an available
USB port.
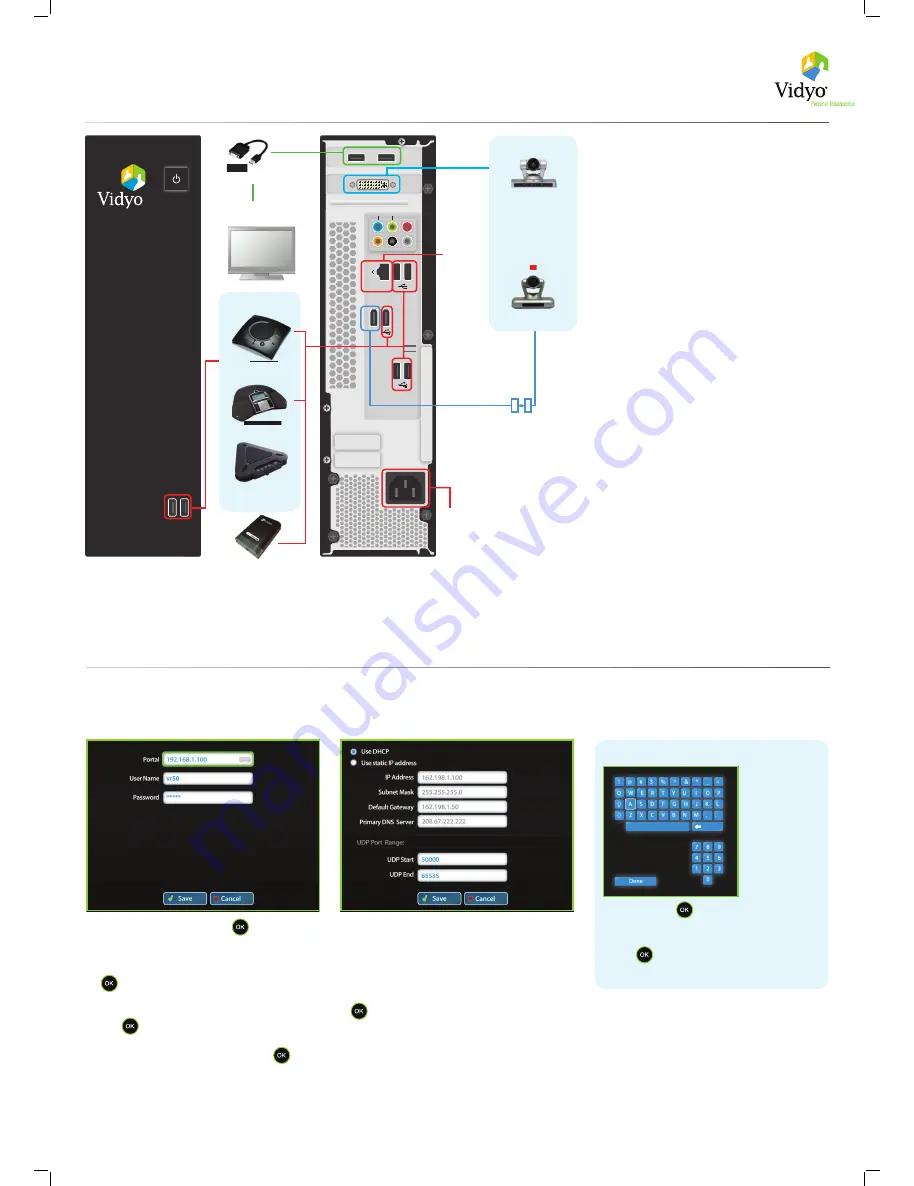
Front
Back
1.
Power
3.
Primary & Secondary
Display
Adapter,
Display Port/DVI
2.
Ethernet
DB9-CONNECTION
USB TO SERIAL
VISCA
Adapter,
VidyoConferencing
TM
System Setup
The VidyoRoom Hardware
* See separate VIdyoRoom User Guide and included CD-ROM for more details.
Start Up Screens
*
Upon bootup you see the
Accounts
settings screen:
4a.
4b.
4c.
1.
Enter Portal – Arrow right, click
and use the
onscreen keyboard to enter the IP address of the
VidyoPortal that the VidyoRoom is connected to.
Enter Name — Arrow down to the
Name
fi eld, click
and use the onscreen keyboard to enter the
name of the VidyoPortal.
Enter Password — Arrow down to the
Password
fi eld,
click
and use the onscreen keyboard to enter
the password of the VidyoPortal.
Scroll down to the
Save
button and press
to
save your settings
To change network settings for your VidyoRoom,
arrow down to
Network
. The default setting is
Use
DHCP
.
Set to
Use static IP address
and specify network
settings, using the onscreen keyboard to enter
appropriate information, then scroll down and press
on the
Save
button.
2.
In a fi eld, click
to view the keyboard.
Use up and down, left and right arrow keys
to navigate.
Click
to enter a character.
Select
Done
to close the onscreen keyboard
Using the Onscreen Keyboard
5.
Yamaha PJP-20UR
VGA2USB (optional)
OR
Konftel 300
Use only one audio device
between the above
Audio Device
Video Device
4.
OR
OR
Minrray HDCAM90-S-VY
(1080p@30fps)
Sony EVI-HD7V
(1080p@30fps)
Preferred
Sony EVI-HD3V
(720p@60fps)
DVI/DVI
for Sony
DVI/HDMI
for Minrray
Chat 150
OR
All manuals and user guides at all-guides.com


