


3
1.3 Packungsinhalt überprüfen
Kontrollieren Sie den Lieferumfang auf
Vollständigkeit:
- Magnetband, 5 m
- Anleitung
2. Einleitung
Das selbstklebende Magnetband ist auf sei-
ner Oberfläche polarisiert (Südpol oben). Es
leitet die Führungsmagnete der CarMotion
Fahrzeuge. Je nach Art der Straße wird es
in ein vorgefertigtes Straßensystem einge-
setzt oder mit Hilfe einer Oberfräse in die
Anlagenplatte eingebaut.
3. Einbau
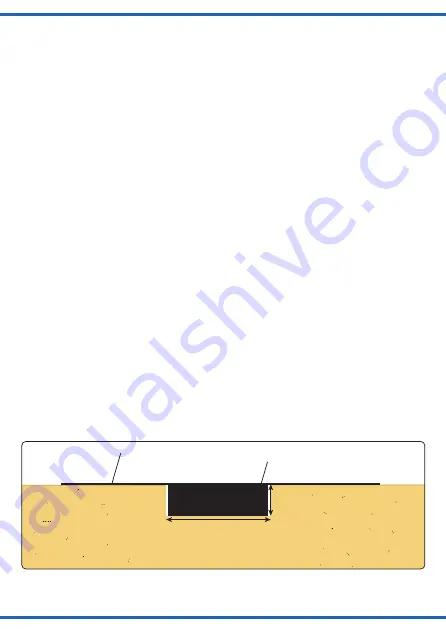
1. Fräsen Sie eine Nut von 3,1 mm Breite
und ca. 1,1 – 1,2 mm Tiefe mittig
zur gewünschten Fahrspur (Abb. 1).
Dazu ist eine Oberfräse mit einem
3,1 mm Fräser perfekt geeignet.
2. Legen Sie das Magnetband (selbstkle-
bend) in die Nut ein. Achten Sie darauf,
dass das Magnetband plan mit der An-
lagenplatte verlegt wird.
Hinweis:
Sollte sich das Magnetband ent-
magnetisieren, fahren Sie mit mehreren
aneinandergereihten Magneten (z. B. Art.
8431) über das Magnetband um die Rich-
tung N/S wiederherzustellen.
1.3 Checking the package contents
Check the contents of the package for
completeness:
- Magnetic tape, 5 m
- Manual
2. Introduction
The self-adhesive magnetic tape is polar-
ized on its surface (south pole on top). It
leads the guiding magnets of the CarMotion
vehicles. Depending on the type of road, it
is integrated into a prefabricated road sys-
tem or built into the layout plate with the
help of a routing machine.
3. Mounting
1. Mill a 3.1 mm wide and approx. 1.1 -
1.2 mm deep groove in the centre of
your desired roadway. The ideal tool for
this operation is a router with a 3.1 mm
milling tool.
2. Insert the magnetic tape (self-adhe-
sive) into the groove. Make sure that
the magnetic tape is flush with the lay-
out’s surface.
Note:
Should the magnetic tape become
demagnetised, move several magnets
(e. g. item 8431) in a row over the magnetic
tape to restore the N/S direction.
1,1 – 1,2 mm
3,1 mm
Anlagenplatte /
Plant plate
Fahrbahn /
Road
Magnetband /
Magnetic tape
Fig. 1
Abb. 1
Tipp:
Als Fahrbahn eignen sich die Voll-
mer Steinkunst Straßen (z. B. Art. 48260).
Hint:
Vollmer Stone Art Streets make for a
great roadway (e. g. item 48260)


