background image

12

Connect the equipotential bonding in accordance with
the requirements stipulated by your local power supply
utility and VDE [or local] regulations.

c

 Carry out the equipotential bonding in accordance

with the technical requirements stipulated by the local
power supply utility and SEV regulations.

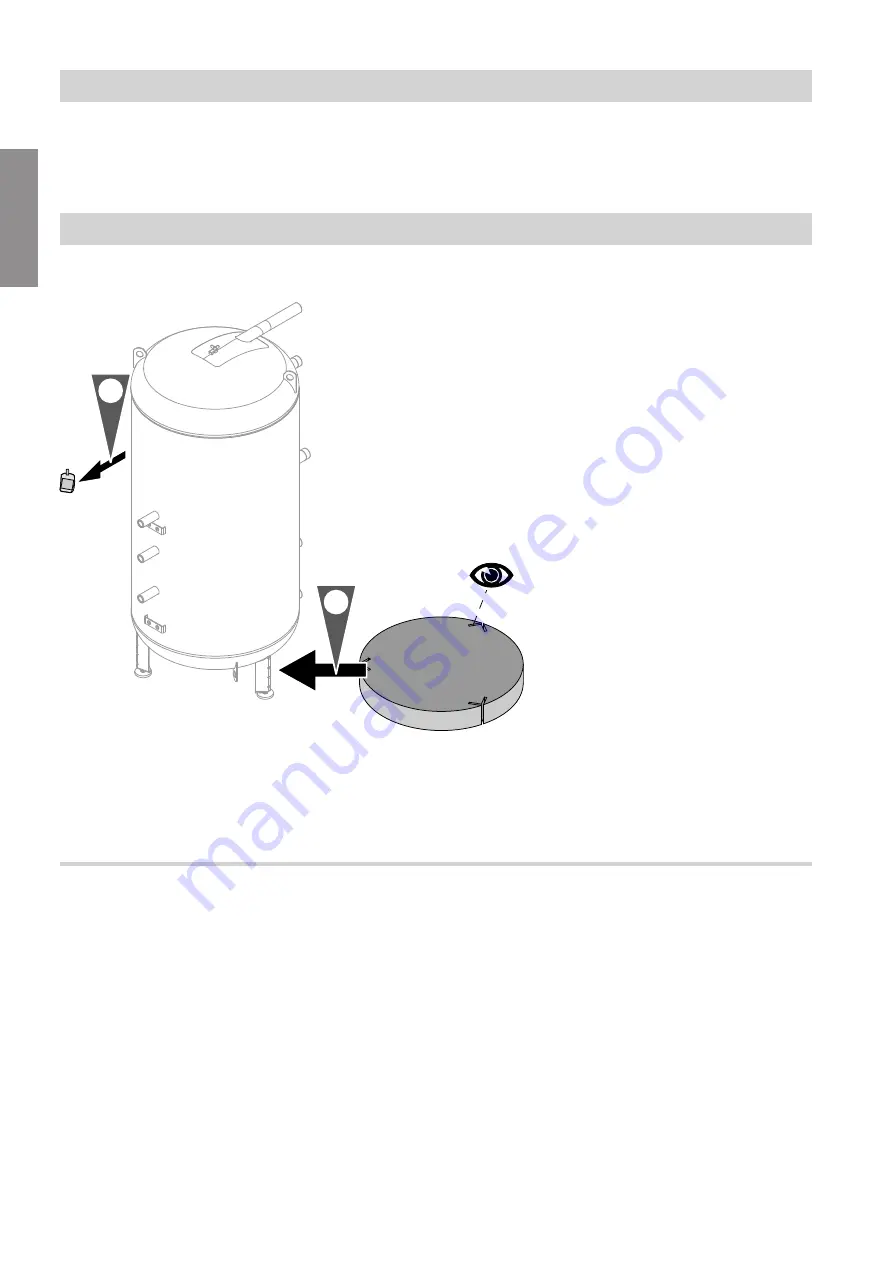
Type SVPA 400 l: Fitting the thermal insulation

Fitting the lower thermal insulation mat

2.

1.

Fig. 8

!

Please note

The thermal insulation must not come into con-
tact with naked flames.
Exercise caution when welding and brazing.

Fitting the thermal insulation on the Vitocell without Vitotrans

Note

Ensure that no fleece remnants enter the heating
water buffer cylinder through the cylinder connections.

Installation sequence

Connecting the equipotential bonding

5548 462 GB

Installation

Summary of Contents for SVPA

Page 1: ...ion and service instructions for contractors VIESMANN Vitocell 100 E 100 W Type SVW SVPA Heating water buffer cylinder For applicability see the last page VITOCELL 100 E 100 W 5548 462 GB 9 2014 Please keep safe ...

Page 2: ...ristics are not permissible e g cable pipework routing cladding or partitions Danger Leaking or blocked flue systems or an insuffi cient supply of combustion air can cause life threatening poisoning from carbon monoxide in the flue gas Ensure the flue system is in proper working order Apertures for supplying combustion air must be non closable Extractors Operating appliances that extract air to th...

Page 3: ...h the system can compromise its function Installing non authorised components and making non approved modifications or con versions can compromise safety and may inva lidate the warranty For replacements use only original spare parts supplied or approved by Viessmann Safety instructions Safety instructions cont 5548 462 GB ...

Page 4: ...the lower thermal insulation mat levelling the Vitocell 16 Fitting the thermometer sensor if available 17 Type SVPA Fitting the Vitotrans 18 Fitting the Vitotrans 18 Thermal insulation on the Vitocell with Vitotrans 20 Fitting the thermal insulation jacket 20 Closing the thermal insulation and fitting the cover strips 21 Fitting the cover 22 Fitting the cylinder temperature sensor 23 Connections o...

Page 5: ...presupposes that a fixed installation in conjunction with permissible system specific compo nents has been carried out Commercial or industrial usage for a purpose other than heating the building or DHW shall be deemed inappropriate Any usage beyond this must be approved by the man ufacturer for the individual case Incorrect usage or operation of the appliance e g the appliance being opened by the...

Page 6: ...ur Vitosilver Vitocell 100 W White Vitocell 100 E type SVPA 400 750 and 950 l Steel heating water buffer cylinder for storing heating water in combination with heat pumps solar thermal systems solid fuel boilers and heat recovery Suitable for systems to EN 12828 and DIN 4753 Connections Type SVW 200 l Fig 1 Front A Thermometer sensor retainer B Thermometer TH C Female connection for immersion heat...

Page 7: ... 2 SPR2 for cylinder temperature sensor F Heating water return 2 HR2 from the heating circuits G Heating water return 1 HR1 to the heat generator H Drain outlet E Type SVPA 400 l B A C D E Fig 3 Front A Thermometer sensor retainer B Thermometer TH C Heating water flow G 1 D Return stratification G 1 E Heating water return G 1 Installation information Product information cont 5548 462 GB Installati...

Page 8: ... from the heat generator D Sensor well 2 SPR2 for cylinder temperature sensor E Heating water flow 3 HV3 heating water return 1 HR1 F Sensor well SPR3 for cylinder temperature sensor G Heating water return 2 HR2 from the heating circuits H Heating water return 3 HR3 to the heat genera tor drain outlet E Installation information Product information cont 5548 462 GB Installation ...

Page 9: ...Fig 5 Front A Thermometer sensor retainer B Thermometer TH up to 4 pce accessories C Heating water flow G 1 D Return stratification G 1 E Heating water return G 1 Installation information Product information cont 5548 462 GB Installation ...

Page 10: ...or and thermometer sensor F Heating water flow 3 HV3 heating water return 1 HR1 G Heating water return 2 HR2 from the heating circuits H Sensor well 3 SPR3 for cylinder temperature sensor and thermometer sensor K Heating water return 3 HR3 from the heating circuits L Sensor well 4 SPR4 for cylinder temperature sensor M Heating water return 4 HR4 to the heat genera tor drain outlet E N Thermometer ...

Page 11: ...ns Maintain the minimum clearance Note The unheated length of any threaded immersion heater installed on site must be at least 100 mm Vitocell Capacity Dim a Immersion heater output Type SVW 200 l min 650 mm 6 kW Vitocell 100 E 100 W type SVW Please note The thermal insulation must not come into con tact with naked flames Exercise caution when welding and brazing 1 Install the cylinder temperature...

Page 12: ...gulations Type SVPA 400 l Fitting the thermal insulation Fitting the lower thermal insulation mat 2 1 Fig 8 Please note The thermal insulation must not come into con tact with naked flames Exercise caution when welding and brazing Fitting the thermal insulation on the Vitocell without Vitotrans Note Ensure that no fleece remnants enter the heating water buffer cylinder through the cylinder connect...

Page 13: ... body Note Leave the clip fasteners in the first notch 2 At the front of the cylinder Attach 6 clip fasteners to the edges of the right and left sections of the ther mal insulation jacket 3 Push the clip fasteners at the back of the cylinder as close together as they will go 4 Push the clip fasteners at the front of the cylinder as close together as they will go Installation sequence Type SVPA 400...

Page 14: ...hesive Fit the thermal insulation jacket evenly around the cyl inder body by patting it Note Slide the thermometer sensor into the clamping bracket at the upper base as far as possible and tighten the wing nut Installation sequence Type SVPA 400 l Fitting the thermal insulation cont 5548 462 GB Installation ...

Page 15: ...l Fitting the thermal insulation Please note The thermal insulation must not come into con tact with naked flames Exercise caution when welding and brazing Installation sequence Type SVPA 400 l Fitting the thermal insulation cont 5548 462 GB Installation ...

Page 16: ...e plate B Bag with adjustable feet Insert the adjustable feet into the legs as far as possi ble then adjust them to level the cylinder Note Never extend the adjustable feet beyond a total length of 35 mm Installation sequence Type SVPA 750 950 l Fitting the thermal cont 5548 462 GB Installation ...

Page 17: ...e the thermometer sensor capillaries to the back Note Repeat the following steps for each of the thermom eters installed 4 Depending on where the sensor is to be fitted Secure the thermometer sensor in the clamping bracket or pull the sensor retainer out of the sensor well 5 Secure the sensor to the outside of the sensor retainer contact spring so that it is flush with the front of the spring Note...

Page 18: ...the Vitotrans 1 2 Fig 14 2 3 1 Fig 15 1 Fit the bolts to the cylinder 2 Fit the module 3 Wind the nuts onto the bolts until hand tight Installation sequence Type SVPA Fitting the Vitotrans 5548 462 GB Installation ...

Page 19: ...otrans 2 Connect heating water return connection pipe B to connection E on the Vitotrans 3 Connect return stratification connection pipe C to connection F on the Vitotrans 4 Connect the pipes to the cylinder connections Installation sequence Type SVPA Fitting the Vitotrans cont 5548 462 GB Installation ...

Page 20: ...ip fasteners to the edges of the right and left sections of the thermal insulation jacket Place the thermal insula tion jacket around the cylinder body Note Leave the clip fasteners in the first notch 2 Fit 4 clip fasteners above and 2 clip fasteners behind the Vitotrans so that they are evenly spaced 3 Push the clip fasteners as close together as possi ble Installation sequence Thermal insulation...

Page 21: ...uts on the bolts 2 Trim and fit the cover strip 3 Insert the rear sections of the Vitotrans thermal insulation Observe the groove in the thermal insu lation A 2 3 4 1 Fig 19 A Type plate self adhesive Installation sequence Thermal insulation on the Vitocell with cont 5548 462 GB Installation ...

Page 22: ...n towards the front by patting it This reduces the gap between the Vitotrans and the cylinder 3 Fit the rear strip to the thermal insulation 4 Affix the type plate Fitting the cover 1 A 2 Fig 20 A Viessmann logo Installation sequence Thermal insulation on the Vitocell with cont 5548 462 GB Installation ...

Page 23: ...flush with the front of the spring Insert the sensor retainer with sensor into the sensor well as far as it will go Connections on the heating water side Any number of heating water buffer cylinders type SVPA can be connected in series or in parallel The connection pipes and air vent valves must be provided on site Please note The thermal insulation must not come into con tact with naked flames Ex...

Page 24: ...R3 from the heating circuits B Heating water return 4 HR4 to the heat generator C Heating water flow 1 HV1 to the heating circuits D Heating water flow 2 HV2 from the heat generator E Air vent valve EL F Drain outlet E Cylinder bank connected in parallel type SVPA 750 and 950 l Fig 23 A Heating water return 3 HR3 from the heating circuits B Heating water return 4 HR4 to the heat generator C Heatin...

Page 25: ...ce instructions 024 Spray paint 025 Touch up paint stick Vitosilver 026 Vitocell 100 logo 027 VIESSMANN logo Pos Part 001 Clamping bracket 002 Sensor retainer 003 Plug 004 Cover 005 Thermometer 30 120 C 007 Adjustable foot 008 Top panel 009 Flange insulation 010 VIESSMANN logo curved Parts list type SVW 200 l Ordering parts type SVW 200 l 5548 462 GB Service ...

Page 26: ...26 002 004 003 010 005 001 009 008 007 002 A Fig 24 Parts list type SVW 200 l Ordering parts type SVW 200 l cont 5548 462 GB Service ...

Page 27: ...m this parts list Cylinder assembly type SVPA 400 l Pos Part 0001 Plug 0002 Clamping bracket 0003 Type plate Vitocell 100 E SVPA 400 l 0004 Sensor retainer 0005 Adjustable foot 0006 Vitocell 100 E installation and service instructions 0001 0002 0003 0004 0005 0006 Fig 25 Parts list type SVPA 400 l Ordering parts type SVPA 400 l 5548 462 GB Service ...

Page 28: ...trip 0009 Cover strip 0010 Thermometer 30 to 120 C 0011 Thermometer cover grey 0012 Sensor well bezel 0013 Clip fastener 6 pce 0014 Insulation mat bottom 0001 0002 0003 0004 0005 0006 0007 0008 0006 0007 0009 0010 0011 0012 0014 0013 0001 0002 0003 0004 0005 0006 0007 0008 0006 0007 0009 0010 0011 0012 0014 0013 Fig 26 Parts list type SVPA 400 l Thermal insulation assembly type SVPA 400 l 5548 462...

Page 29: ...his parts list Cylinder assembly type SVPA 750 950 l Pos Part 0001 Adjustable foot 0002 Sensor retainer 0003 Vitocell 100 E SVPA type plate 0004 Clamping bracket 0005 Vitocell 100 E installation and service instructions 0006 Plug 0006 0005 0003 0004 0002 0001 Fig 27 Parts list type SVPA 750 950 l Ordering parts type SVPA 750 950 l 5548 462 GB Service ...

Page 30: ...ip 0008 Thermometer cover grey 0009 Thermometer 30 120 C 0010 VIESSMANN logo curved 0011 Cover strip 0012 Bezel 3 pce 0013 Bezel 2 pce 0014 Cap with logo 0015 Bezels without hole 0016 Cover with thermal insulation 0013 0013 0004 0011 0005 0002 0003 0001 0001 0008 0009 0012 0007 0006 0010 0012 0006 0015 0014 0014 Fig 28 Parts list type SVPA 750 950 l Thermal insulation assembly type SVPA 750 950 l ...

Page 31: ...e Service date by Service Service Service date by Service Service Service date by Service Service Service date by Service Service Service date by Commissioning service reports Commissioning service reports 5548 462 GB Service ...

Page 32: ...ressure 24 Permissible temperatures 23 Product information 6 S Siting the cylinder 11 Type SVW 11 T Thermal insulation fitting With Vitotrans 20 Thermometer sensor 14 17 V Vitotrans fitting 18 Applicability Serial no see type plate 7201937 7201938 7248307 7501369 7552963 Viessmann Limited Hortonwood 30 Telford Shropshire TF1 7YP GB Telephone 44 1952 675000 Fax 44 1952 675040 E mail info uk viessma...

Reviews: